Electrical and Communication
  • 29 Nov 2024
  • PDF

Electrical and Communication

  • PDF

The content is currently unavailable in Chinese (Simplified, People's Republic of China). You are viewing the default English version.
文章摘要

Ports

#

Port Type

Description

1

HDMI

Not used

2

USB type C

Optionally accessed through ethernet dongle

3

M12 A-Coded 17 Pin

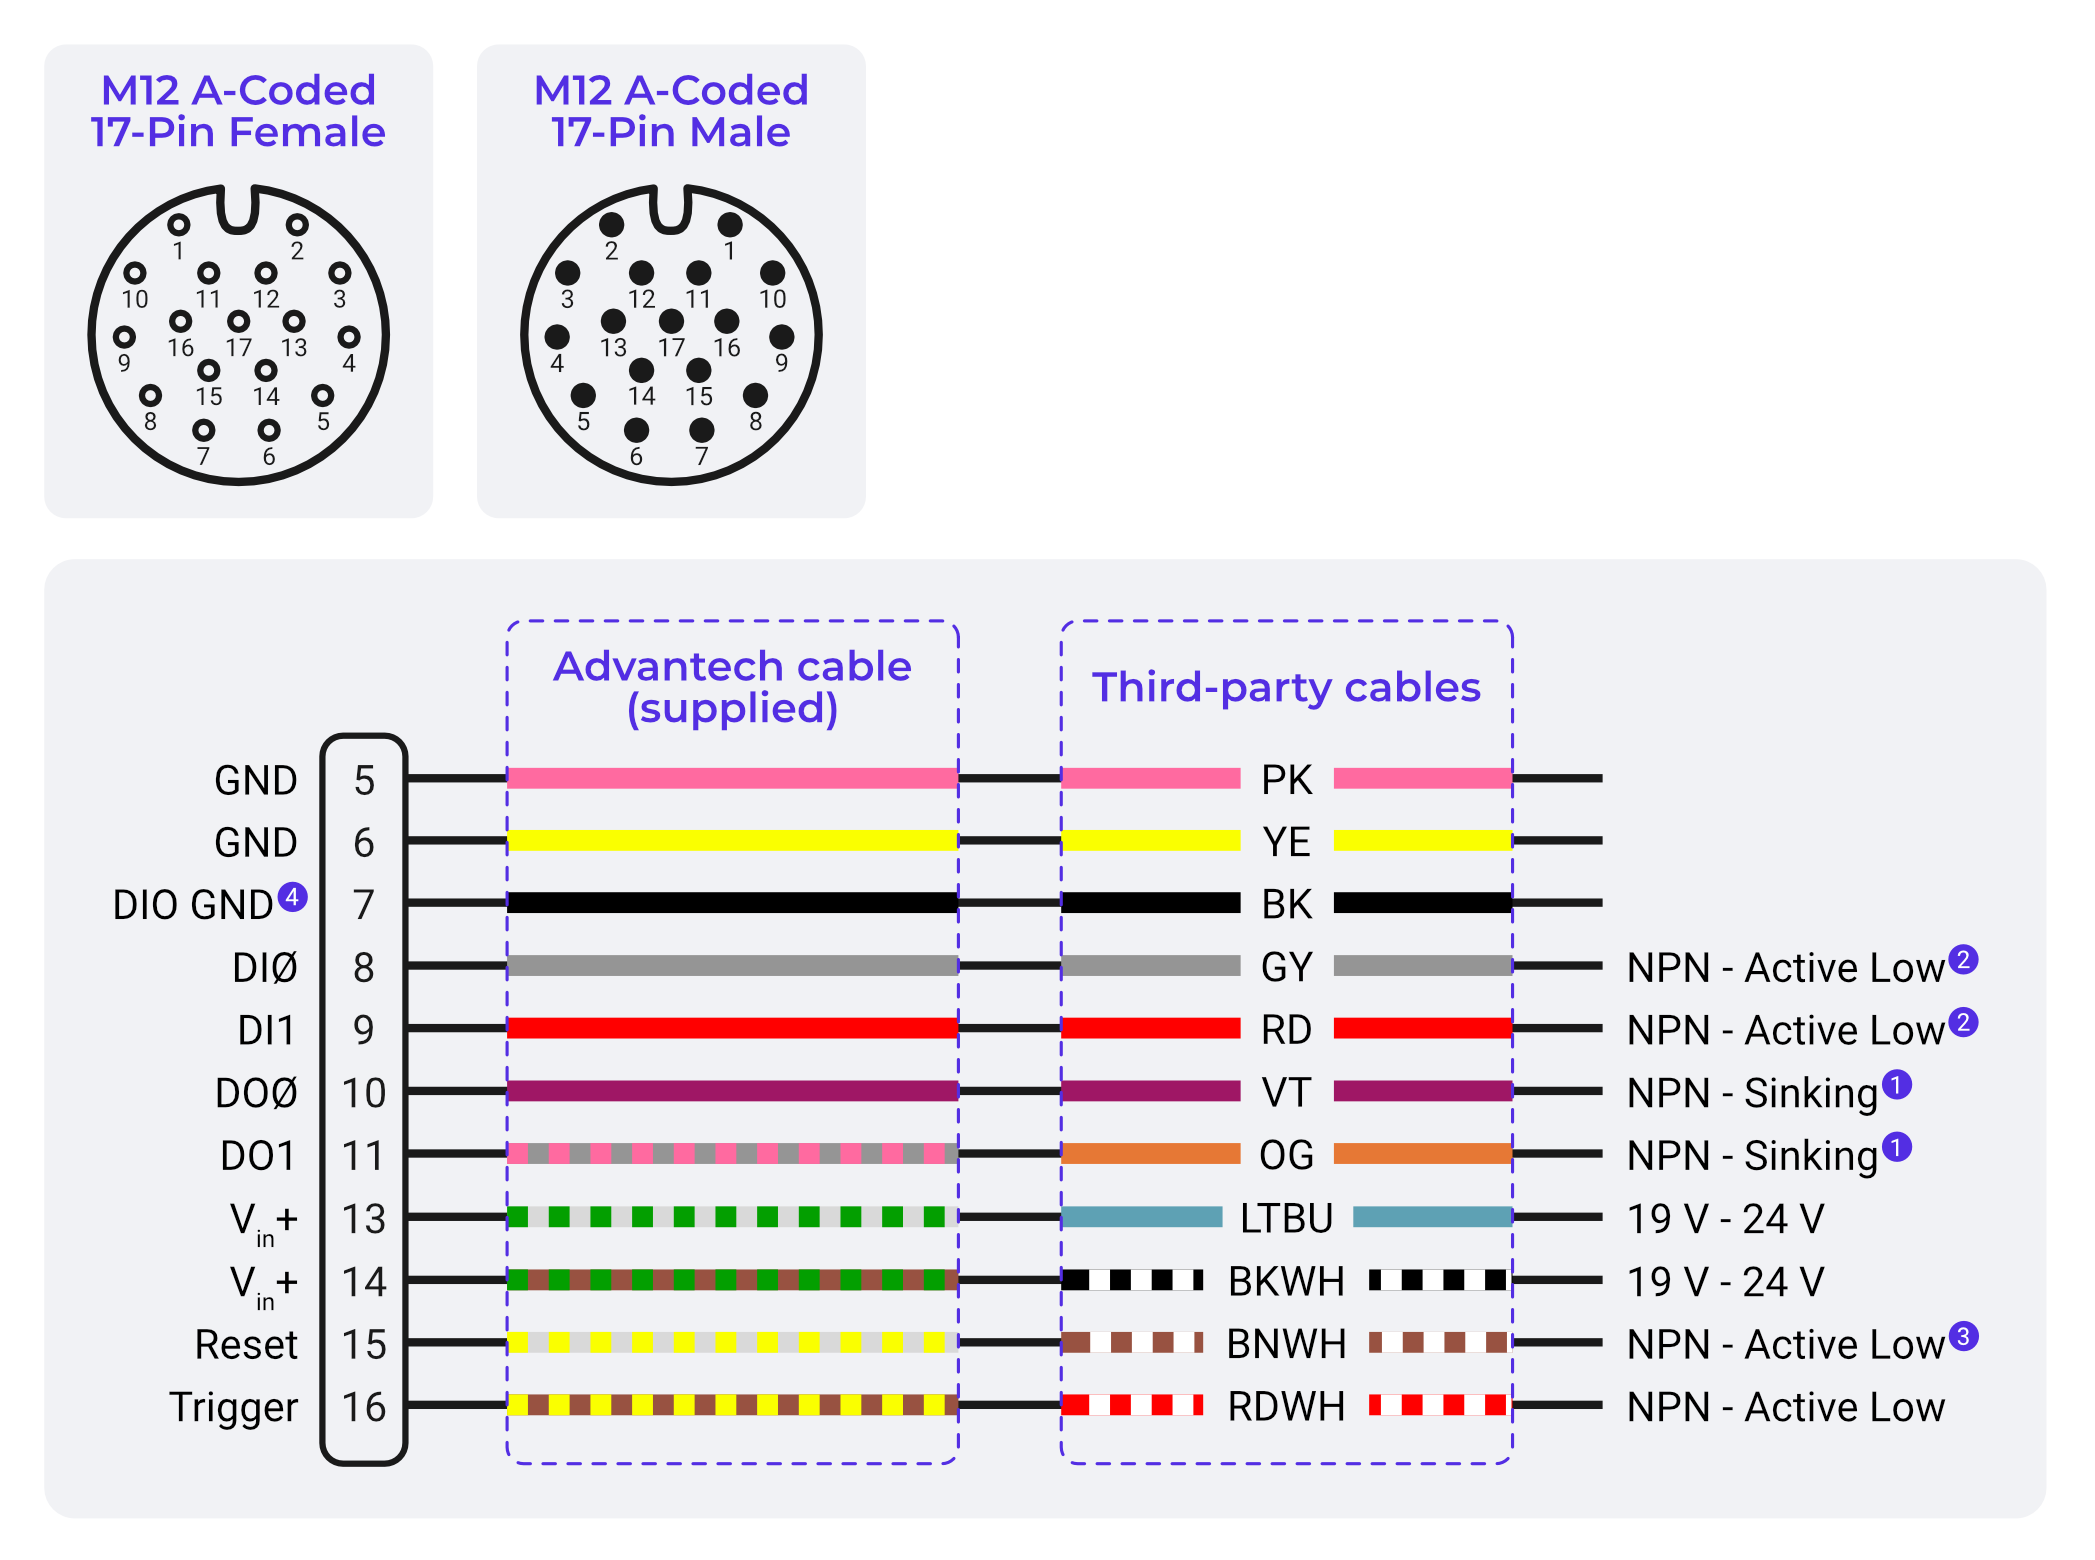
Power I/O (see I/O Pinout and Wiring)

4

M12 X-Coded Ethernet

Used for camera programming, network communication, and PLC communication

5

Micro USB

Used for camera programming

I/O Pinout and Wiring

Note

1: When active, output sinks to GND. Max 100mA. When not active, output is floating. Requires an external power supply.

2: Pull to GND to activate input.

3: Pull to GND to reboot the camera. This is not needed for most applications. Keep floating to avoid unexpected restarts.

4: DIO GND is tied to GND through a thermal fuse. When connecting the OV20i’s digital I/O lines to a system that is powered from a different power supply, use this pin to tie the grounds together.

5: If not sufficient power, Please modify the wiring to ensure that the 24V power supply is connected to both ports, rather than only connecting it to a single terminal. This adjustment is necessary to maintain consistent voltage across all required components.

Connecting to the OV20i Software

There’s no need to turn the camera on, when it’s powered it will automatically start. There are three ways to connect to the OV20i software. Once connected, refer to Software Setup to activate the product and start creating a recipe.

Mac Users

If you’re you’re connecting using Google Chrome on a Mac, you may get an error - “This site can’t be reached” (ERR_ADDRESS_UNREACHABLE). You’ll need to go to MAC OS System Settings > Privacy and Security. Then scroll to find Local Network. Make sure it is enabled for Google Chrome.

Connecting Directly via USB

  1. Remove the rubber side flap on the OV20i to expose the auxiliary connections. Connect a micro USB cable from the camera (see image) to the computer you will use to connect to the OV20i.

  2. Open your browser and enter the IP address 192.168.55.1 to connect to the OV20i software.

    Note

    This IP address never changes and does not require configuration of your network adapter.

Connecting Directly via Ethernet

  1. Plug into the M12 ethernet port through an ethernet adapter.

  2. Configure your ethernet adapter’s IP address to 192.168.0.10. In the Subnet Mask field, enter 255.255.255.0.

    Tip

    For help configuring your ethernet adapter’s IP address, refer to the links below:

    Windows - Change TCP/IP settings (Microsoft Support)

    Mac - Change TCP/IP settings (Apple Support)

  3. Open your browser and enter the IP address 192.168.0.100 to connect to the OV20i software.

    Note

    This IP address is configurable and can be automatically assigned via DHCP or changed to suit your networking needs.

Connecting via an Ethernet Network

To manually assign a static IP address to the OV20i device, follow these instructions:

  1. Connect to the OV20i software using one of the above methods.

  2. In the OV20i software, go to Settings > System.

  3. Click Edit to change the network settings of the OV20i.

  4. Scroll to the bottom of the page and click the Static IP option. Enter the appropriate IP address and Subnet Mask. You can also optionally set the Gateway and DNS. If you’re unsure of these settings, check with your network administrator to avoid conflicts with existing devices or other technical difficulties. Once you’ve entered the new network settings, click Save.

  5. After changes have been saved, you will see a message prompting you to restart the OV20i to apply the saved changes.

    Important

    Take note of the Static IP address you have entered. If you mistyped the IP address information it can be difficult to find the device.

    To restart the OV20i device, do one of the following:

    • Go to System Settings in the OV20i software, scroll down to Power, and click Reset.

    • Press the physical Reset button on the top of the OV20i camera, near the indicator LEDs.

    • Unplug the camera, wait 5 seconds, then plug it back in.

  6. After the OV20i is restarted, you may use the newly assigned static IP address to access this device from any computer on the same network.

💡 Keep in mind

To prevent IP conflicts and ensure smooth connectivity for your camera, it's essential to configure a unique IP address for each device on your network.

To detect IP conflicts, use an IP scanner tool to identify any devices sharing the same IP address. If conflicts are found, adjust the IP address of one or more devices to ensure uniqueness and eliminate conflicts.


本文对您有帮助吗?