使用 Node-RED 发送电子邮件
本教程演示如何使用 Node-RED 设定来自 OV20i 摄像头的自动邮件通知。您将学习如何配置 Gmail 集成,并创建将检测警报、系统状态更新以及故障通知直接发送到您的邮箱的流程。
您将构建的内容: 一个自动化邮件系统,使用 Gmail SMTP 将 OV20i 的检测结果、警报和通知发送给指定收件人。
实际应用场景: 在检测失败时立即收到邮件警报、向管理层发送每日质量报告,或在系统出现问题时通知维护团队——以上均可由您的视觉检测系统自动完成。
先决条件
- 具备 Node-RED 访问权限的 OV20i 摄像头
- 用于发送邮件的 Gmail 账户
- 对 Node-RED 流的基本了解
- 访问 Google 账户安全设置
教程概览
我们将构建: 一个 Node-RED 流,能够自动发送包含检测结果和系统警报的电子邮件通知。
所需时间: 20-30 分钟(含 Gmail 设置)
掌握的技能: Gmail 应用密码设置、SMTP 配置、自动化邮件通知
步骤 1:设置 Gmail 应用密码
1.1 启用两步验证
- 在 accounts.google.com 登录您的 Google 账户
- 在左侧导航菜单中点击“安全性”
- 查找“以 Google 登录”部分
- 点击“2 步验证”
- 若尚未启用,请按照提示启用两步验证
备注
在创建应用密码之前,需要启用两步验证。
1.2 生成应用密码
- 在启用两步验证后返回安全性页面
- 点击“应用密码”(在“以 Google 登录”下)
- 将应用类型选择为“Mail”
- 将设备类型选择为“Other”
- 输入一个名称,如“OV20i Node-RED Email”
- 点击“生成”
1.3 保存您的应用密码
- 复制 Google 显示的 16 位密码
- 将其安全保存——您将需要它来配置 Node-RED
- 注:此密码仅显示一次。如丢失,请重新生成一个
检查点: 您应已保存一个用于 Node-RED 的 16 位 Gmail 应用密码。
步骤 2:安装 Email 节点(如有需要)
2.1 检查是否有 Email 节点
- 在 OV20i 摄像头上打开 Node-RED
- 在左侧调色板的输出区查找“email”节点
- 如果找不到,需要安装 email 包
2.2 安装 Email 包(如有需要)
- 在 Node-RED 中点击汉堡菜单(≡)
- 选择“Manage palette”(管理调色板)
- 点击“Install”标签
- 搜索“node-red-node-email”
- 点击该包旁的“Install”(安装)
步骤 3:创建基础邮件流程
3.1 添加所需节点
- 导航到 IO Block 以访问 Node-RED
- 从调色板拖拽以下节点到画布:
- 注入节点(用于测试)
- Email 节点(来自输出区)
- 将注入输出连接到邮件输入
3.2 基础流程结构
Inject → Email
流程目的: 用于测试和基本通知的简单邮件发送。

第 4 步:配置邮件内容
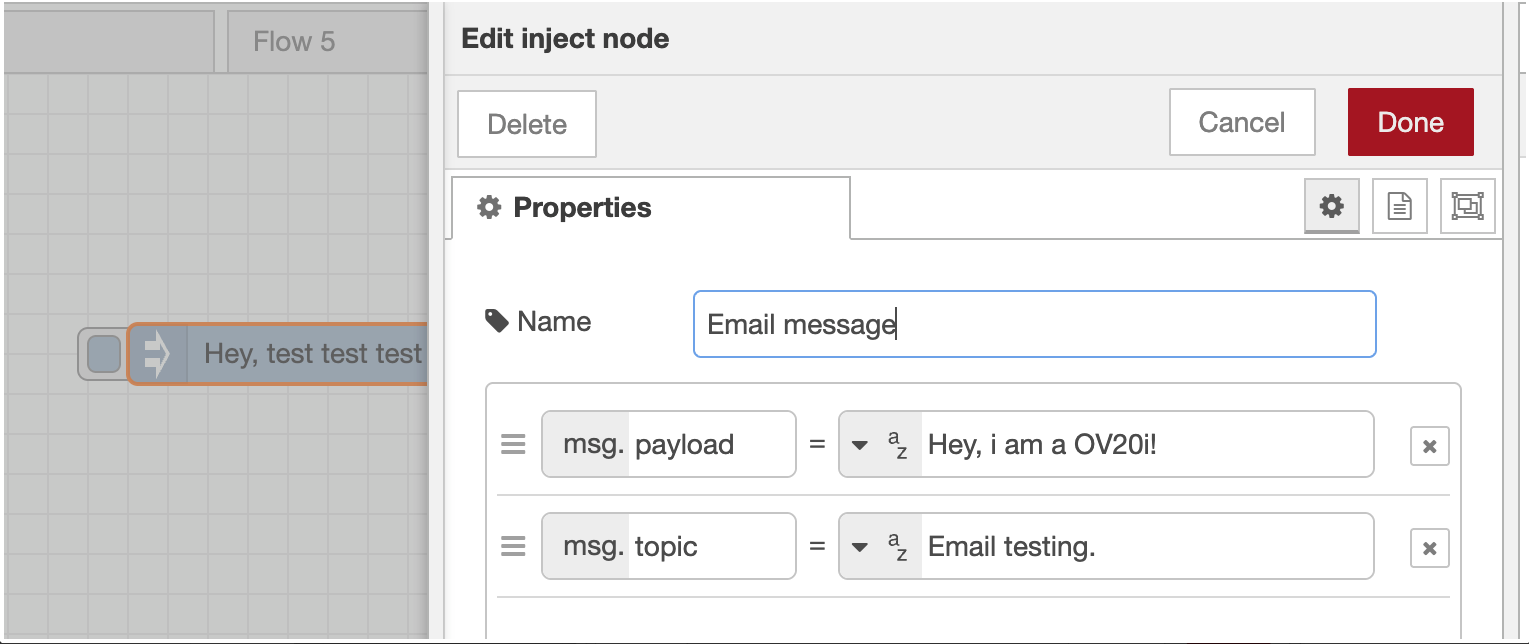
4.1 设置注入节点
- 双击注入节点以打开属性
- 设置载荷:
- 载荷类型: "string"
- 载荷值:您的邮件正文文本(例如 “来自 OV20i 的检查警报”)
- 添加邮件主题:
-
单击“+ add” 以添加一个属性
-
属性名称: "topic"
-
属性值:您的邮件主题(例如“OV20i 检查警报”)
-
4.2 示例基本配置
载荷(邮件正文):
Inspection completed at Station 1
Status: Alert triggered
Time: Check timestamp for details
主题(邮件主题):
OV20i Inspection Alert - Station 1
4.3 保存注入配置
- 为节点命名,例如 "Email Trigger"
- 单击 "Done" 以保存配置
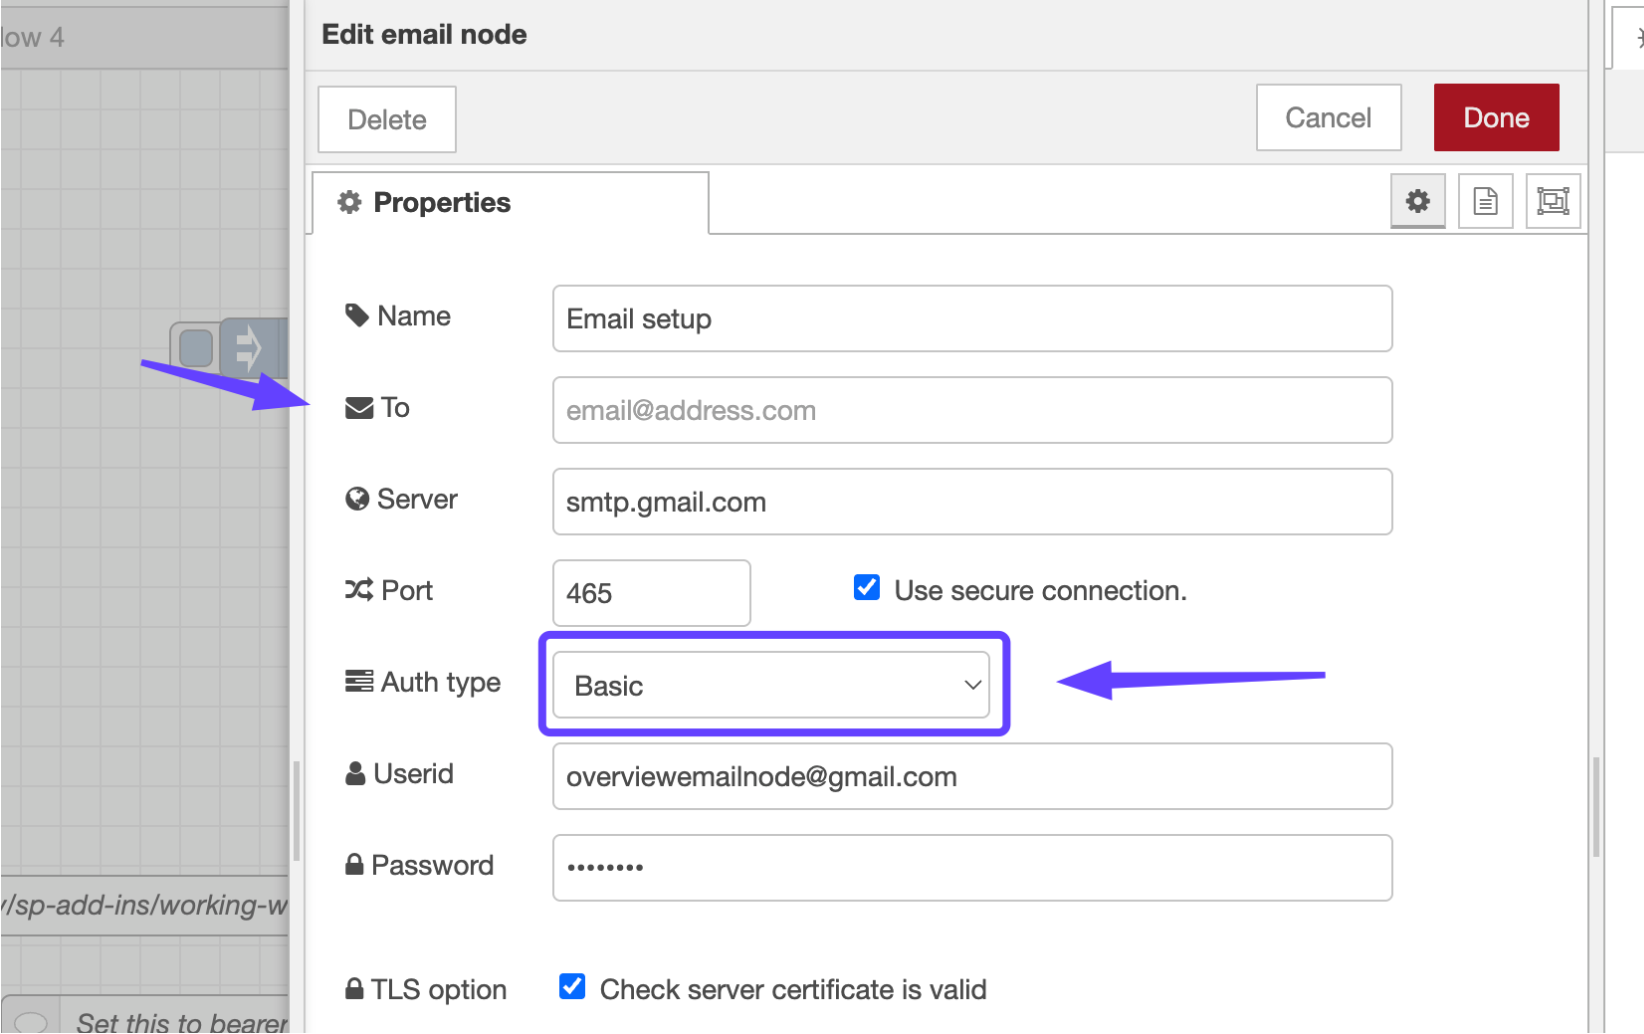
第 5 步:配置 Email SMTP 设置
5.1 设置 Email 节点
- 双击邮件节点以打开属性
- 配置基本设置:
- 名称: "Send Alert Email"(或描述性名称)
- To:收件人邮箱地址(例如 quality@company.com)
5.2 配置 Gmail SMTP
- 服务器:
smtp.gmail.com - 端口:
465 - 勾选 "使用安全连接"
- 身份验证类型:
Basic - Userid:您的完整 Gmail 地址(例如 alerts@company.com)
- 密码:第 1 步中的 16 位应用程序密码
5.3 安全设置
- 勾选 "检查服务器证书是否有效"
- 确保所有设置均已正确输入
- 单击 "Done" 以保存邮件节点配置
检查点: 您的邮件节点应显示无错误指示,并显示收件人地址。
第 6 步:测试您的邮件流
6.1 部署与测试
- 在右上角点击 "Deploy" 按钮
- 等待显示 "Successfully deployed" 消息
- 点击注入节点按钮(左侧的灰色方块)
6.2 验证邮件送达
- 检查收件人邮箱的测试邮件
- 若未出现在收件箱,请检查垃圾邮件文件夹
- 在 Node-RED 调试面板中查找任何错误信息
6.3 如有需要请排除故障
常见问题:
- 错误的应用程序密码:重新生成 Gmail 应用程序密码
- SMTP 设置:验证服务器和端口是否正确
- 防火墙:确保允许出站 SMTP 流量
第 7 步:与检查结果的集成
7.1 连接到检查流程
根据检查结果发送邮件:
- 查找您的主检查流程(以“All Block Outputs”开头)
- 将您的邮件流作为检查处理的分支添加
- 在检查逻辑之后连接,但与最终结果并行
7.2 示例集成流程
All Block Outputs → [Inspection Logic] → Final Pass/Fail
                                      ↓
                              Format Email → Send Email

7.3 动态电子邮件内容
将 inject node 替换为函数节点以实现动态内容:
// Dynamic email based on inspection results
const result = msg.payload.result ? "PASSED" : "FAILED";
const timestamp = new Date().toLocaleString();
const station = global.get("station_name") || "Unknown Station";

// Set email subject
msg.topic = `Inspection ${result} - ${station}`;

// Set email body
msg.payload = `Inspection Report:
Status: ${result}
Station: ${station}
Time: ${timestamp}
Image: ${msg.payload.image_url || "No image available"}

Please review and take appropriate action.`;

return msg;
步骤 8:完整流程示例
8.1 导入现成的 Flow
您可以导入此完整 Flow JSON:
[
  {
    "id": "email_node_1",
    "type": "e-mail",
    "name": "Send Inspection Alert",
    "server": "smtp.gmail.com",
    "port": "465",
    "secure": true,
    "authtype": "BASIC",
    "to": "quality@company.com"
  },
  {
    "id": "format_email",
    "type": "function",
    "name": "Format Email Content",
    "func": "const result = msg.payload.result ? 'PASSED' : 'FAILED';\nmsg.topic = `Inspection ${result}`;\nmsg.payload = `Status: ${result}\\nTime: ${new Date()}`;\nreturn msg;"
  }
]
8.2 根据需要进行自定义
- 更新贵组织的电子邮件地址
- 根据您的具体需求修改电子邮件内容
- 调整时序和触发条件
- 在生产部署前充分测试
故障排除
常见问题
| 问题 | 症状 | 解决方法 |
|---|---|---|
| 身份验证失败 | "Login failed" 错误 | 验证应用密码是否正确,并启用两步验证 |
| 连接超时 | 未发送邮件,出现超时错误 | 检查防火墙设置,验证 SMTP 服务器和端口 |
| 邮件在垃圾邮件 | 邮件已送达但在垃圾邮件文件夹 | 将发件人添加到安全列表,改进邮件内容 |
| 流程未触发 | 无调试输出 | 检查流程连接和触发条件 |
调试您的 Email Flow
- 在每一步之后添加调试节点以跟踪数据
- 检查 Node-RED 日志以获取详细错误信息
- 如有需要,使用外部邮件客户端测试 SMTP 设置
- 验证相机到 Gmail 服务器的网络连接
成功!您的邮件集成已完成
您的 OV20i 摄像头现在可以:
✅ 发送自动化的检查结果电子邮件通知
✅ 提供包含检查详情的丰富且格式化的消息
✅ 支持多位收件人及升级工作流
✅ 提供定期报告与摘要
✅ 基于检查结果的条件消息处理
最佳实践
邮件管理
- 使用描述性主题,带有清晰的状态指示
- 保持消息简洁,但信息充分
- 包含时间戳和工位标识
- 在通知中提供可执行的信息
安全性与可靠性
- 保护应用密码 - 安全存储并定期轮换
- 为系统通知使用专用的电子邮件账户
- 定期测试邮件投递以确保可靠性
- 监控投递失败情况,并具备备用通知方式
性能注意事项
- 限制邮件发送频率 以避免触发垃圾邮件检测
- 为不同的告警类型使用合适的收件人名单
- 对高吞吐量系统实现速率限制
- 在包含大附件时考虑邮件大小
下一步
在设置电子邮件通知后:
- 为不同类型的告警创建电子邮件模板
- 为各利益相关者设置分发列表
- 为关键问题实现升级工作流
- 为管理层创建定期报告
- 与其他通知系统集成(SMS、Teams 等)