First Recipe Creation
This deep dive explains what a Recipe is, outlines the differences between Classification and Segmentation, and provides step-by-step guidance on creating a Recipe. It also includes a detailed walkthrough of Image Setup configuration, Template Image capture and Alignment setup, ROI optimization, data collection and AI training, as well as image augmentation configuration.
See this topic in action: How to create a segmentation recipe in minutes
Learning Objectives
By the end of this deep dive, you will understand:
- what a recipe is
- the difference between classification vs. segmentation – and when to use each
- how to create a recipe
- how to configure Imaging Setup
- how to capture a Template Image and configure the Aligner
- what ROIs (Regions of Interest) are and how to optimize them
- data collection for AI training
- recipe Testing and Validation
What is a Recipe?
- A configured set of instructions that tells the camera how to inspect a specific part or product.
- Defines camera settings, including exposure, focus, and lighting parameters for consistent image capture.
- Includes processing logic such as ROI definitions, Aligner, classification, or segmentation classes.
- Stores input/output configurations to integrate with automation systems for pass/fail or advanced signals.
- Can be saved and reused to ensure consistent inspections across shifts, lines, or facilities.
Classification vs. Segmentation
Definitions
- Classification: Identifying the type of object in the ROI
- Segmentation: Locating and analyzing regions in the image/ROI
Examples
| Image Classification | Image Segmentation | Image Classification | Image Segmentation |
|---|---|---|---|
| What is a sheep? | Which pixels belong to which object? | Is this pizza acceptable or defective? | Where is each pepperoni? |
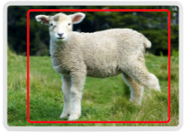 | 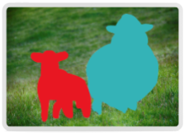 | 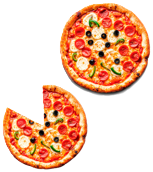 |  |
Key Comparison
| Classification | Segmentation | |
|---|---|---|
| Speed | Speed depends on Image Setup and complexity. Generally efficient and fast with simple setups | Can be as fast or even faster than classification when optimized, especially with streamlined models |
| Accuracy | Good for overall pass/fail or part type identification | Higher accuracy for precise defect localization |
| Complexity | Simple to set up and maintain; fewer parameters | Complex – Needs more data, labeling, and tuning |
| Data Requirement | Low – Needs fewer labeled images | Moderate – Requires many images with detailed pixel accurate annotations |
| Use Cases | Part presence, orientation, basic quality checks, part inserted/not inserted etc. | Surface defects, fine feature inspection, multi-defect detection, count, measurement etc. |
Creating and Exporting a Recipe
Use the Export Recipe button next to a Recipe to export an individual Recipe.
![]()
Use the Export button at the top of the screen to export multiple Recipes at once.

Use the Import button at the top of the screen to import Recipes.

Remember: Each recipe supports only one inspection type at a time, either segmentation or classification. Choose the correct type before beginning your setup.
Image Setup
Image Rotation

- What it is: Rotates the image (0° or 180°).
- When to use it: If the camera is mounted at an angle but you want the image displayed the other way in the interface.
If you need to rotate the image by 90°, rotate the camera.
Gain

- What it is: Artificially brightens the image digitally (like ISO on a camera).
- Effect:
- Higher gain → brighter image, but adds noise (grainy look).
- Lower gain → cleaner image, but needs good lighting.
| High Gain | Low Gain |
|---|---|
 |  |
| Brighter and noisier | Darker and less noise |
Only increase gain if adjusting exposure or lighting is not possible.
Template Image and Alignment
Skip Aligner

- What it is: Turns off the alignment step during inspection.
- When to use: If the part is always in the same position and orientation in the image.
Template Regions

- What it is: Defines the area(s) of the template image used for alignment.
- Rectangle: Draw a rectangular region of interest.
- Circle: Draw a circular region of interest.
- Ignore Template Region: Exclude certain areas from alignment to avoid distracting patterns or irrelevant features.
- Best use: Helps the system focus only on the most distinctive part features for accurate alignment.
Rotation Range
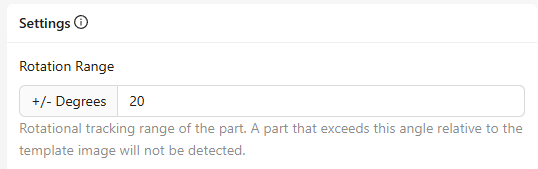
- What it is: Sets how much rotation (in degrees) the system will tolerate when matching the part to the template.
- Example: Setting ±20° allows the part to rotate slightly but still be detected.
- When to adjust: Increase if parts tend to rotate during production; decrease for highly consistent orientations.
Sensitivity

- What it is: Controls how finely the system looks for a match between the live image and the template.
- Effect:
- High sensitivity → detects more subtle details, useful for complex parts.
- Lower sensitivity → reduces false matches but may miss fine features.
Confidence Threshold

- What it is: Sets the minimum confidence score required for the system to accept a detection.
- Effect:
- Higher threshold → fewer false positives but might miss borderline matches.
- Lower threshold → more detections, but with increased risk of false positives.
Start moderate and adjust based on test results.
Scale Invariant

- What it is: Allows the system to detect parts that are slightly larger or smaller than the original template image.
- When to enable: If part size may vary slightly due to positioning, distance changes, or manufacturing tolerances.
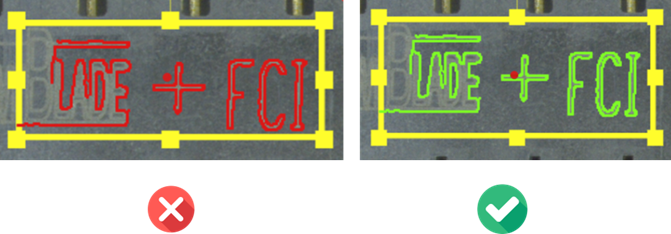
Live Preview Legend

1. A configurable bounding box that defines the specific region of the camera’s field FOV to monitor during triggering.
- Purpose: Ensures the camera focuses only on the relevant area, ignoring unnecessary background regions.
- Best use:
- For moving objects, to guarantee the part stays fully within the detection area.
- To optimize processing speed by reducing the amount of image data analyzed.
2. A visual red dot showing the center point of all defined ROIs (Regions of Interest) in the image.
- Purpose: Helps you align and position the search region relative to the part or camera view.
3. The green line indicates the edge of the object is detected.
If you see the line change to red, try increasing the ROI size, adjusting the ROI, or increasing the Sensitivity.
ROI (Region of Interest) Definition and Optimization
Inspection Types

- What it is: Defines the type of inspection being performed and groups similar ROIs (Regions of Interest).
- Example: “Holes” for checking the presence, size, or quality of holes in a part.
- Key features:
- Add Inspection Type: Create new categories for different inspection requirements.
- # of ROIs: Shows how many ROIs are currently assigned to that inspection type.
Transformation
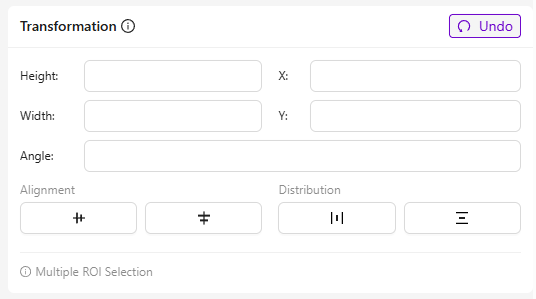
- What it is: Adjusts the position and geometry of selected ROIs for precise alignment and placement.
- Fields and their purpose:
- Height/Width: Changes the size of the ROI.
- X / Y: Moves the ROI’s position along horizontal (X) and vertical (Y) axes.
- Angle: Rotates the ROI around its center.
- Best use: Speeds up setup when you have repetitive patterns, like multiple identical holes.
Inspection Regions
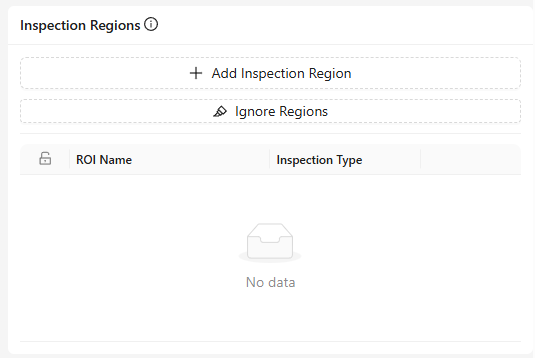
- What it is: A list of all ROIs defined in the template image.
- Features:
- Add Inspection Region: Create a new ROI manually.
- Ignore Regions: Exclude specific regions from processing.
- Edit: Save, delete or cancel.
- Lock Icon: Indicates locked ROIs that cannot be moved without unlocking.
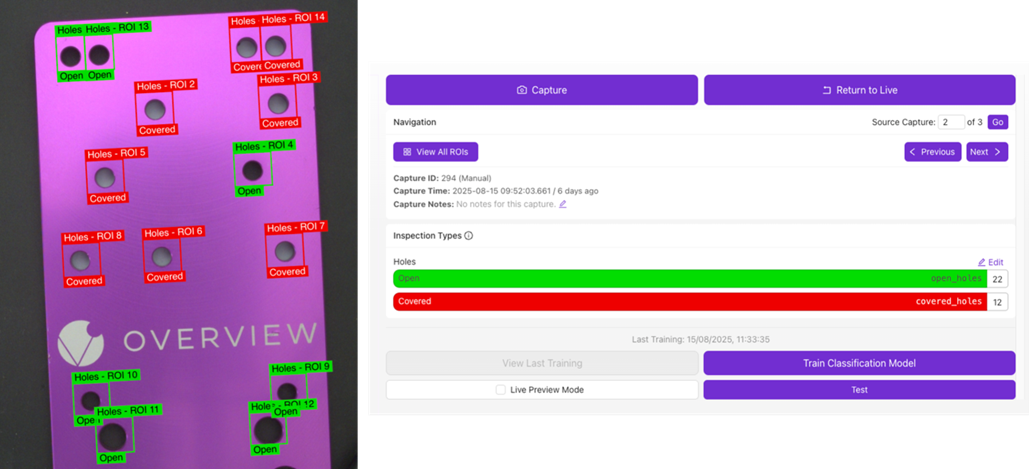
Live Preview Mode
![]()
- What it is: Shows real-time feedback after adjusting or adding ROIs.
- Use case: Great for fine-tuning ROI positions and sizes during setup.
Test Button
![]()
- What it is: Run backtesting based on old images to verify changes.
- Use case: To compare current results with previous settings for accuracy and consistency.
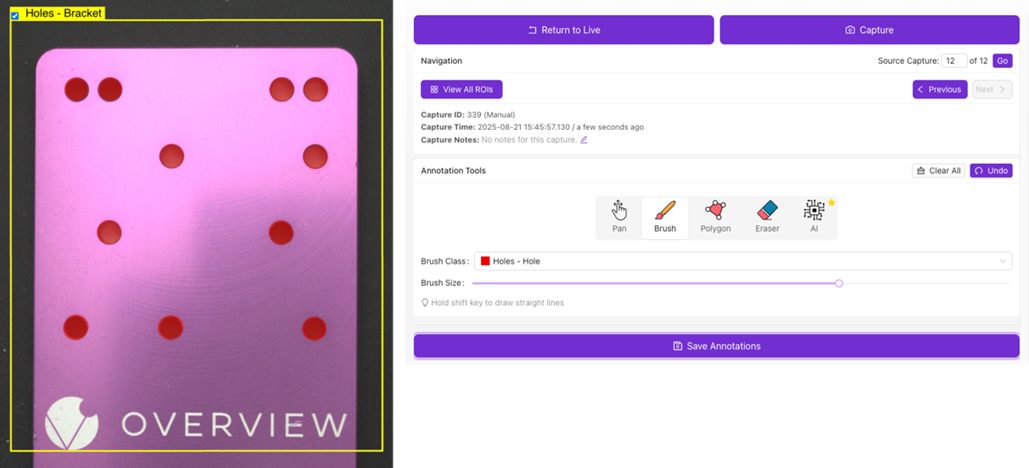
Data Collection and AI Training
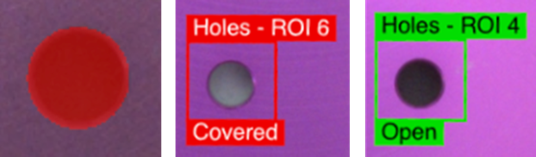
Define different inspection classes and label each ROI based on its designated inspection type (see the example below).
Use the Annotation Tools to label/annotate the image. Use the Brush Class drop-down menu to select the class to annotate. The current limit is up to 10 classes per recipe for segmentation.
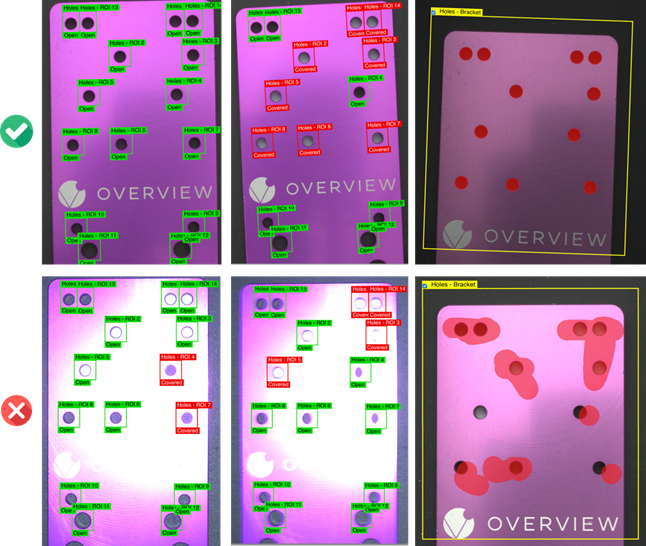
Importance of good data
-
Garbage In, Garbage Out: AI models can only be as good as the data you feed them. Poor-quality or inconsistent data leads to inaccurate results.
-
Diversity Matters: Collect data that represents all real-world variations: different shifts, lighting conditions, part positions, and surface conditions.
-
Quality Over Quantity: A smaller, clean, well-labeled dataset will often perform better than a large but noisy or inconsistent dataset.
Annotation Basics:
- Classification: Tag entire images or ROIs as a specific class (e.g., “Good”, “Damaged”).
- Segmentation: Brush over, outline, or highlight specific areas of interest with pixel-level accuracy (e.g., scratch location on a surface).
- Consistency: Use consistent rules and definitions for labeling to avoid confusion during training.
Common Pitfalls
- Insufficient Data: Too few samples will lead to underfitting, causing poor real-world performance.
- Imbalanced Classes: Overrepresentation of one class (e.g., many “good” parts but few defective ones) skews the model.
- Poor Labeling: Incorrect, inconsistent, or rushed labeling leads to significant accuracy drops.
- Ignoring Environment Changes: Not updating the dataset when lighting, part orientation, or surface conditions change leads to drift in accuracy.
- Not Validating Data: Skipping quality checks before training often results in wasted time and rework.
Data Augmentation
Image augmentations artificially modify your training images to improve the model's robustness. They simulate real-world variations like brightness shifts, rotations, or noise so the model performs well in different conditions.
Color Augmentations

Brightness
- What it is: Adjusts how light or dark the image appears.
- Use case: To handle slight changes in lighting during production.
Use ±0.1 for stable setups; increase if lighting varies more.
Contrast
- What it is: Changes the difference between light and dark areas.
- Use case: Useful for parts with texture or varied surfaces to help the model adapt to visual differences.
Hue
- What it is: Shifts the color tones slightly.
- Use case: Good for setups where lighting color (e.g., LED temperature) might shift over time.
Saturation
- What it is: Adjusts the intensity of colors.
- Use case: Helps handle variations in illumination that make images appear duller or more vibrant.
Geometric Augmentations
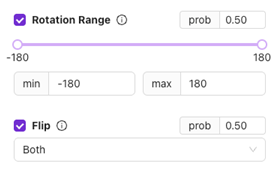
Rotation Range
- What it is: Rotates the image randomly within the set range (e.g., ±20°).
- Use case: For parts that may come in slightly rotated positions.
Avoid excessive rotation for parts that are usually fixed in orientation.
Flip
- What it is: Flips the image horizontally, vertically, or both.
- Use case: Helpful for symmetrical parts or when orientation may flip during handling.
Lighting & Color Simulation
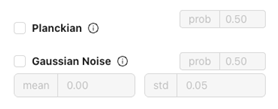
Planckian
- What it is: Simulates variations in color temperature (e.g., warm or cool lighting).
- Use case: Handles different shifts or work cells with varying light sources.
Gaussian Noise
- What it is: Adds subtle noise to the image.
- Use case: Improves robustness if your production environment has small visual noise or camera sensor artifacts.
Motion Simulation
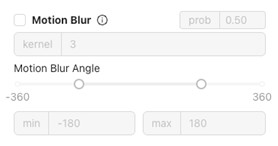
Motion Blur
- What it is: Simulates slight blurring as if the part moved during capture.
- Use case: Critical for high-speed lines where motion blur may occur.
Probability (prob)
![]()
- What it is: Sets the likelihood of applying each augmentation during training.
- Example: 0.50 = 50% chance of applying that change to any given training image.
Start at 0.5 for most augmentations and adjust based on real-world variability.
Training Parameters (Segmentation)
Training parameters (also called hyperparameters) are the settings that control how a machine learning model learns from data.
Learning Rate

- Definition: Controls how quickly the model updates its internal weights during training.
- Value (0.003): The higher the learning rate, the faster the model learns, but too high may cause instability or poor accuracy.
- Slider Range: From 10^-4 (very slow) to 10^-1 (very fast).
Usually, a value between 0.001–0.01 is a good starting point for segmentation tasks.
ROI (Region of Interest) size

- Definition: Defines the size (width × height) of the image area used during training.
- Unchecked: By default, the model automatically determines ROI based on your data.
- When Checked: You can manually set the width and height if you need consistent input dimensions (for example, all images cropped to 256×256 pixels).
Use a fixed size (e.g., 256×256) when your dataset has images of different sizes and you want consistent input for better stability, reproducibility, or to match a known model architecture.
Let it automatically choose when your data already has a uniform resolution or when you want the system to optimize for the best region of interest based on your dataset’s characteristics.
Number of Iterations (Epochs)

- Definition: One epoch = one full pass through the entire training dataset.
- Value (100): The model will train for 100 complete passes.
Increasing this number usually improves accuracy up to a point but takes longer.
Rule of thumb: Monitor the training and validation loss during training. If the validation loss stops decreasing while training loss keeps dropping, it’s a sign the model is overfitting and you should stop training earlier.
Architecture

- Definition: Selects the size and complexity of the neural network.
- Small: Trains faster and is often enough for most datasets. Ideal for quick experimentation or smaller datasets.
- Larger models can capture more detail but may overfit on small datasets, while smaller models are more efficient and generalize better when data is limited.
Start with Small, it’s often sufficient and helps you iterate faster before scaling up.
External GPU

Contact Support to know more about External GPU.
Training Parameters (Classification)
Training parameters (also called hyperparameters) are the settings that control how a machine learning model learns from data.
Learning Rate

- Definition: Controls how quickly the model updates its internal weights during training.
- Value (0.003): The higher the learning rate, the faster the model learns, but too high may cause instability or poor accuracy.
- Slider Range: From 10^-4 (very slow) to 10^-1 (very fast).
Usually, a value between 0.001–0.01 is a good starting point for segmentation tasks.
Validation Percent

- Definition: Defines what portion of your dataset will be set aside for validation (testing during training).
- Purpose: Validation data helps monitor how well the model performs on unseen examples, preventing overfitting.
- Range: 0–50%.
Common choices are 10–20%.
If set to 0%, all data is used for training, which may improve training accuracy but makes it harder to detect overfitting.
ROI (Region of Interest) size
- Definition: Defines the size (width × height) of the image area used during training.
- Unchecked: By default, the model automatically determines ROI based on your data.
- When Checked: You can manually set the width and height if you need consistent input dimensions (for example, all images cropped to 256×256 pixels).
Use a fixed size (e.g., 256×256) when your dataset has images of different sizes and you want consistent input for better stability, reproducibility, or to match a known model architecture.
Let it automatically choose when your data already has a uniform resolution or when you want the system to optimize for the best region of interest based on your dataset’s characteristics.
Number of Iterations (Epochs)
- Definition: One epoch = one full pass through the entire training dataset.
- Value (100): The model will train for 100 complete passes.
Increasing this number usually improves accuracy up to a point but takes longer.
Rule of thumb: Monitor the training and validation loss during training. If the validation loss stops decreasing while training loss keeps dropping, it’s a sign the model is overfitting and you should stop training earlier.
Architecture
- Definition: Selects the size and complexity of the neural network.
- Small: Trains faster and is often enough for most datasets. Ideal for quick experimentation or smaller datasets.
Start with Small, it’s often sufficient and helps you iterate faster before scaling up.
| Architecture and Camera | Description | Recommended Use |
|---|---|---|
| ConvNeXt-Pico | Ultra-light model optimized for speed and low memory use. | Great for quick experiments or limited hardware. |
| ConvNeXt-Nano | Slightly larger than Pico; better accuracy with minimal added cost. | Good balance for small–medium datasets. |
| ConvNeXt-Tiny | Offers improved accuracy while still efficient. | Suitable for moderate datasets and longer training runs. |
| ConvNeXt-Small | Most capable variant in this list. Higher capacity and accuracy. | Use for large datasets or when maximum performance is needed. |
External GPU
Contact Support to know more about External GPU.