使用 Segmenter
本教程将引导您通过 OV80i 的 AI 驱动 segmentation 功能,创建一个完整的 segmentation 检测。您将学习如何通过让摄像头逐像素地识别和测量这些特征来检测和分析诸如铅笔标记、划痕或其他缺陷。
以下是本主题的实际演示: 如何在几分钟内创建 segmentation 配方
您将学习的内容:
- 如何从头到尾设置 segmentation 配方
- 如何训练 AI 模型以识别特定特征
- 如何基于 segmentation 结果配置通过/不通过逻辑
- 如何在生产应用中优化 segmentation 的性能
Real-World Application: 本教程以铅笔标记检测为例,但相同原理同样适用于检测划痕、裂纹、污染或任何其他可通过视觉区分的特征。
前提条件
- OV80i 相机系统已设置并连接
- 含有要检测特征的样品件(例如带铅笔标记的纸张)
- 对 AI 训练概念有基础理解
- 具备对 Recipe Editor 和 Node-RED 功能的访问权限
教程概览
我们将构建的内容: 一个能够检测纸张上的铅笔标记并基于检测到的标记数量来确定通过/不通过的 segmentation 模型。
所需时间: 45-60 分钟(含训练时间)
掌握的技能: AI 模型训练、 segmentation 标注、通过/不通过逻辑配置
第 1 步:创建新的 Segmentation 配方
1.1 开始一个新配方
- 在 All Recipes 页面,点击右上角的 "+ New"
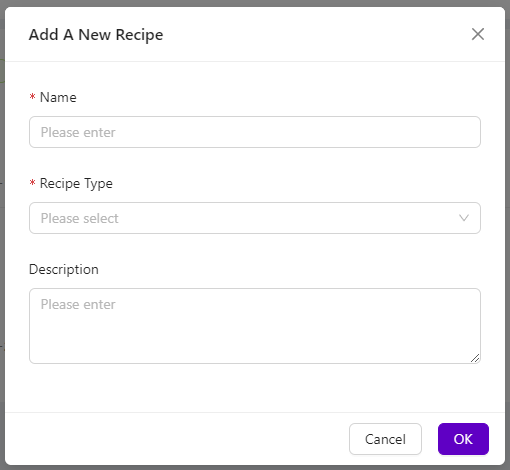
- 将显示 Add A New Recipe 对话框
- 为您的配方输入描述性 名称(例如 "Pencil_Mark_Detection")
- 从下拉菜单中选择 "Segmentation" 作为 Recipe Type
- 点击 "OK" 创建新配方
为什么选择 Segmentation? 与识别整个对象的分类不同,Segmentation 会在图像中定位并测量特征的特定部分,因此非常适用于缺陷检测、污染分析或测量覆盖面积。
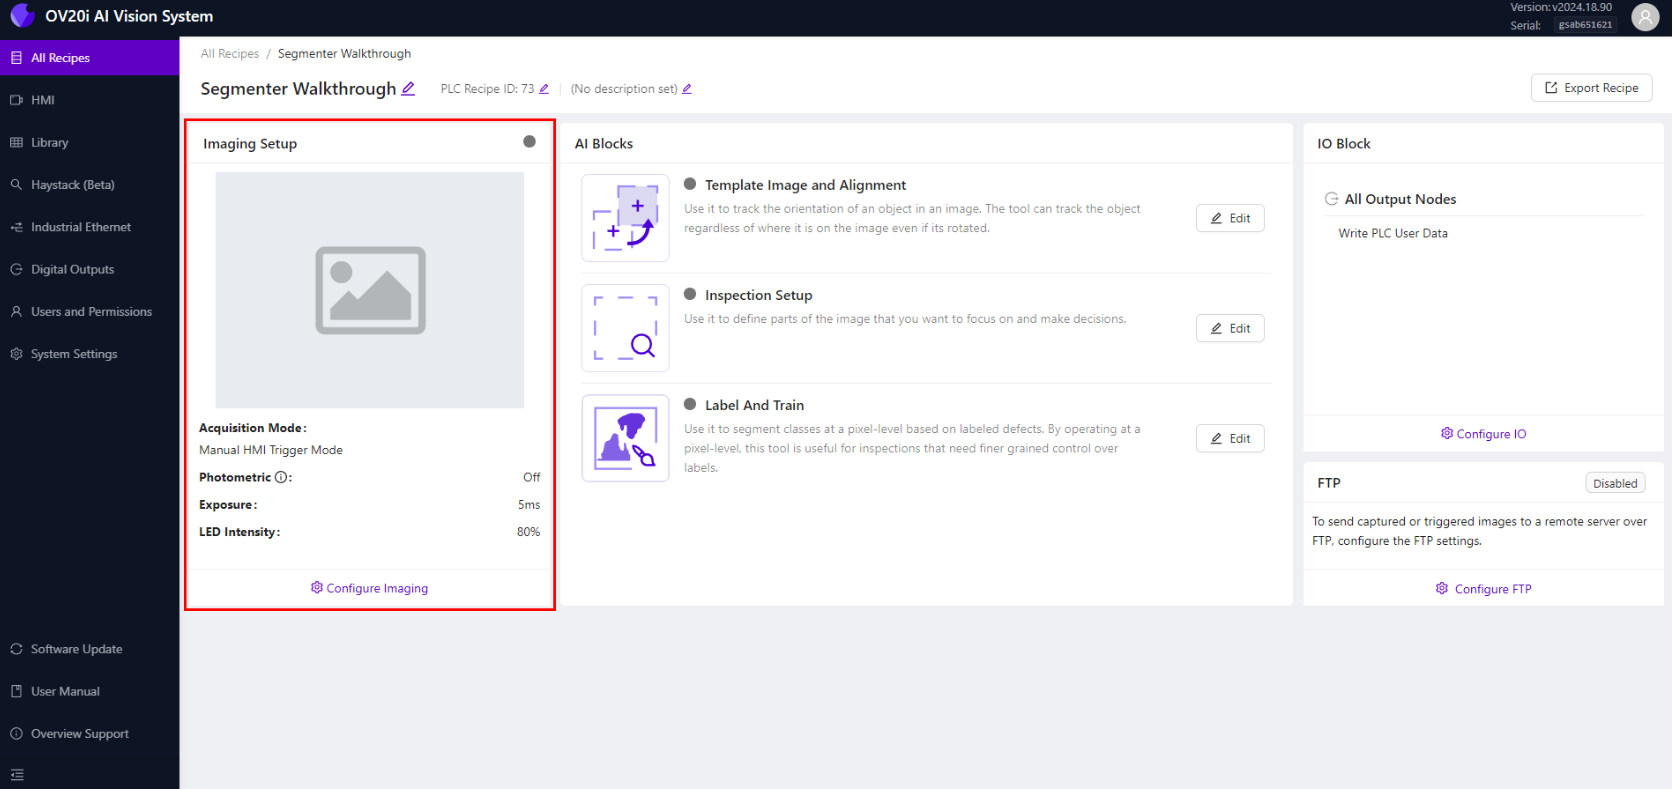
1.2 启用并打开 Recipe Editor
- 新创建的配方将显示在 All Recipes 页面,标记为 "Inactive"(未激活)
- 在配方右侧选择 "Activate" 以启用

- 点击 "Activate and go to editor" 以确认并启动配方编辑器
检查点: 您应该在面包屑导航中看到带有您的 segmentation 配方名称的 Recipe Editor 界面。
第 2 步:配置相机成像
2.1 访问成像设置
- 在 Recipe Editor 中,点击左下角的 "Configure Imaging"
- 这将打开成像配置页面,您将在其中优化摄像头设置
2.2 优化对焦设置
- 将包含铅笔标记的样品纸放置在摄像头的视野范围内
- 使用 Focus slider 以在铅笔标记处获得清晰对焦
- 也可以手动输入对焦值以提高精度
- 如有可用,请使用 Focus View 查看边缘高亮和对焦分数
对焦提示:
- 将焦点聚焦在缺陷将出现的表面
- 确保铅笔标记清晰且轮廓分明
- 更高的对焦分数表示更好的对焦质量
2.3 配置曝光设置
- 调整 曝光 滑块以实现合适的亮度
- 铅笔痕迹应清晰可见,且不过曝纸面
- 先使用自动设置,必要时进行微调
- 监控实时预览以实现实时查看变化
曝光指南:
- 铅笔痕迹应与纸面具有良好的对比度
- 避免过曝导致细微痕迹被冲淡
- 确保整个检测区域照明一致
2.4 设置 LED 照明
- 为你的应用选择合适的 LED Light Pattern 以适应你的场景
- 对于铅笔痕迹,通常均匀照明效果最佳
- 调整 LED Light Intensity 以尽量减少阴影和眩光
- 如存在反射问题,请测试不同的模式
2.5 调整 Gamma 与对比度
- 进行微调 Gamma 以增强铅笔痕迹与背景之间的对比度
- 更高的 gamma 可以让微小铅笔痕迹更明显
- 较低的 gamma 可以降低干净区域的噪声
- 平衡 gamma 以在缺陷可见性和背景清晰度之间达到最佳平衡
2.6 保存成像设置
- 一旦所有设置均已优化,请点击 "Save Imaging Settings"
- 现在相机配置已为该配方保存
- 实时预览应显示清晰、对比度良好的图像
检查点: 您的相机应产生清晰的图像,铅笔痕迹应能够从纸张背景中轻松区分。
Step 3: 配置模板与对齐
3.1 导航至 模板图像与对齐
- 在面包屑导航中单击 配方名称 以返回到配方编辑器
- 从菜单中选择 “模板图像与对齐”
3.2 跳过对齐器以本教程
- 由于我们要在整张纸上检测特征,请单击 “Skip Aligner”
- 这将禁用基于位置的对齐并使用整张图像
- 点击 “Save” 以应用更改
何时使用对齐器: 启用对齐器当你需要在可能移动或旋转的部件的特定位置检测特征时。对于整张纸检查(如铅笔痕迹),跳过对齐器通常是合适的。

Step 4: 设置检查区域
4.1 导航至 检查设置
- 返回到配方编辑器并选择 “检查设置”
- 这里你将定义要分析的图像区域
4.2 配置 ROI(Region of Interest)
- 你将看到相机视野的预览
- 拖动 ROI 框的角点 以调整其大小和位置
- 对铅笔痕迹的检测,通常覆盖整张纸区域
- 确保 ROI 包含铅笔痕迹可能出现的所有区域
ROI 最佳实践:
- 包含可能出现缺陷的所有区域
- 排除边缘或背景等不应分析的区域
- 让 ROI 足够大以捕捉部件定位的变化
- 避免包含文本、徽标或其他预期标记
4.3 保存 ROI 配置
- ROI 放置正确后,点击 "Save"
- 现在检查区域已为您的分割模型定义
第 5 步:对模型进行标注和训练
5.1 导航至“标注与训练”
- 返回配方编辑器并选择“标注与训练”
- 这是你将教会 AI 如何识别铅笔标记的地方
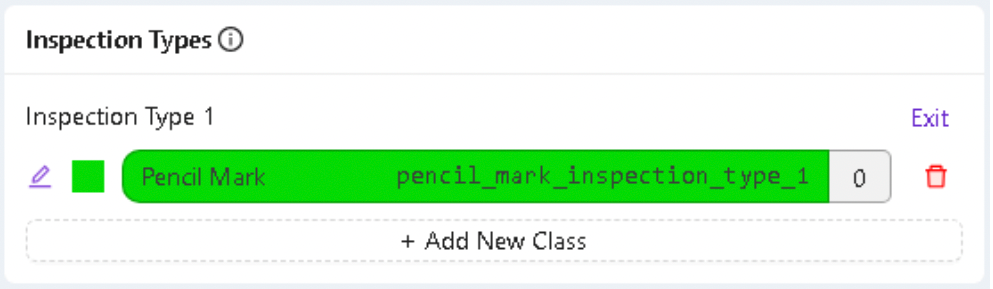
5.2 配置检测类别
- 在 Inspection Types(检测类型)下,单击 "Edit"(编辑)
- 将类别重命名为 "Pencil Mark"(或你特定的缺陷类型)
- 为可视化检测到的标记选择一个醒目的 颜色
- 单击 "Save"(保存)以应用更改
5.3 捕捉训练图像
- 至少拍摄 10 张图片,覆盖具有不同铅笔标记的纸张
- 调整训练示例:
- 不同大小和形状的铅笔标记
- 明暗不同的标记
- 纸张上的不同位置
- 不同的标记密度
训练图像提示:
- 包含微妙和明显的标记
- 捕捉你将遇到的各种光照条件
- 在每张图片中包含未标记的干净区域
- 确保图像代表生产条件
5.4 标注训练图像
- 对于每张训练图像,使用 Brush tool(画笔工具)来勾画铅笔标记
- 仅涂抹铅笔标记 - 避免标注纸张或其他特征
- 标注要精确但全面
- 在完成每张图像后,单击 "Save Annotations"(保存标注)
注释最佳实践:
- 在将标注为 "pencil marks" 时保持一致性
- 包含完整标记,而不仅是部分
- 不要标注诸如文本或徽标之类的预期标记
- 使用稳健、细致的笔触以获得准确边界
5.5 审核标注
- 请再次检查所有标注的图像以确保准确性
- 查找漏标或标注错误的区域
- 对需要纠正的图像重新标注
- 高质量的标注可提升模型性能
Step 6: 训练分割模型
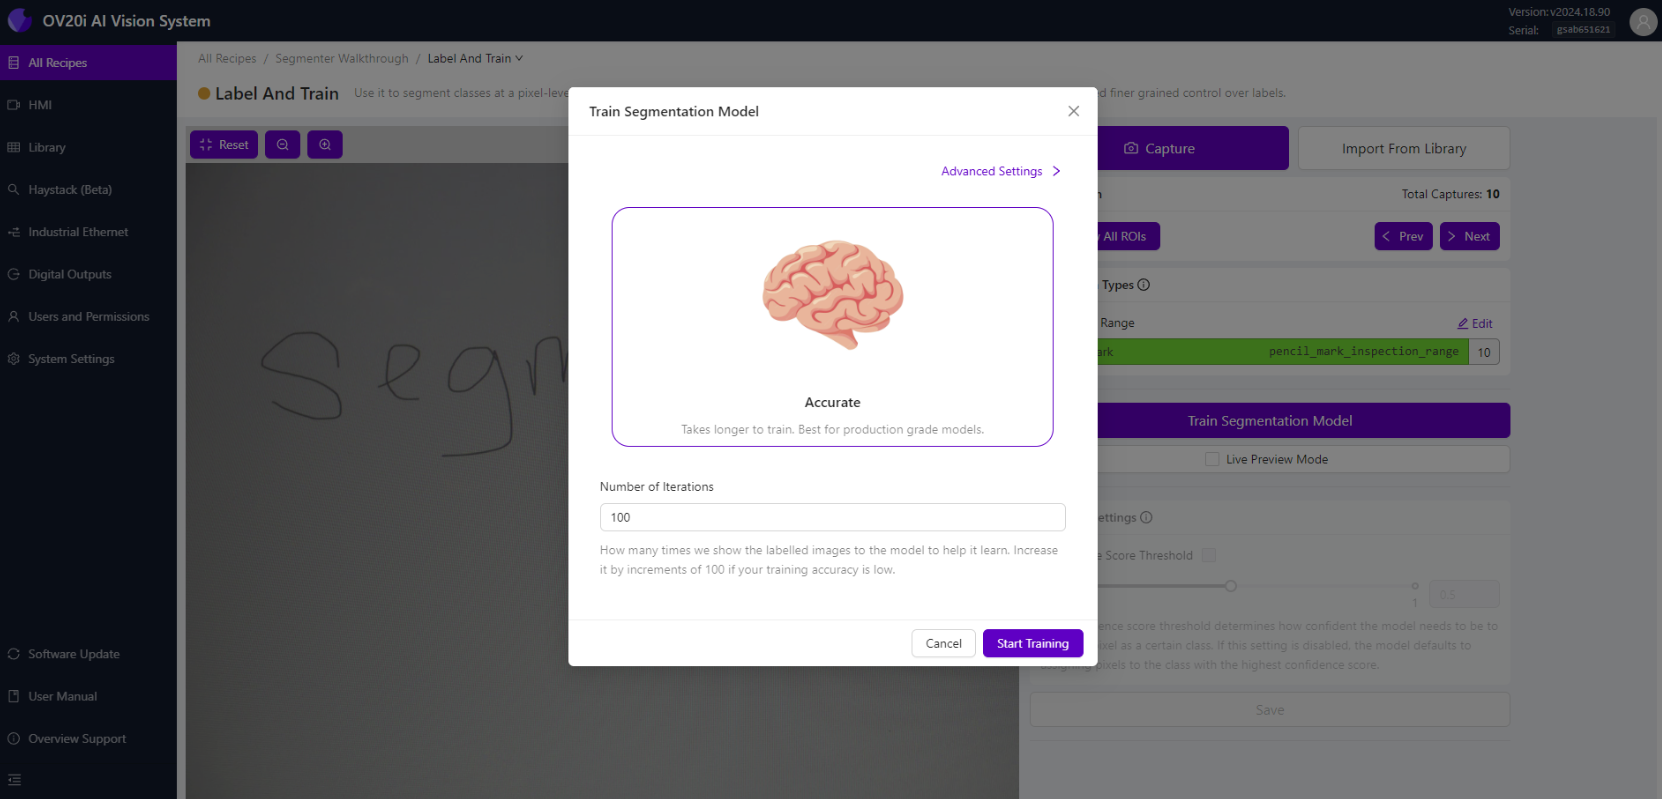
6.1 启动训练过程
- 标注至少 10 张图像后,单击“Return to Live”(返回实时)
- 单击 "Train Segmentation Model"(训练分割模型)
- 输入用于训练的 Number of Iterations(迭代次数)
迭代指南:
- 初始训练从 100-200 次迭代开始
- 更多迭代通常会提高准确性,但耗时更长
- 监控训练进度并按需调整
- 在准确性要求与训练时间之间取得平衡
6.2 监控训练进度
- 单击 "Start Training"(开始训练)以开始该过程
- 将显示一个训练进度模态框,包含:
- 当前迭代次数
- 训练准确性百分比
- 预计剩余时间
6.3 训练控制选项
在训练过程中,您可以:
- Abort Training(中止训练) - 如需修改,请中止训练
- Finish Training Early(提前完成训练) - 当准确性足够时停止训练
- Monitor Progress(监控进度) - 观察准确性在迭代中的提升
训练提示:
- 达到目标准确度后,训练将自动结束
- 更高的准确性百分比表示更好的模型性能
- 如果准确性进入平台期,您可能需要更多训练数据
6.4 评估训练结果
- 训练完成后,查看最终准确性
- 单击 "Live Preview" 以查看实时分割结果
- 使用新样本进行测试以验证模型性能
成功指标:
- 铅笔标记以您选择的颜色高亮显示
- 干净区域保持未标记
- 检测在不同标记类型之间保持一致
- 模型对新样本(未见样本)的响应良好
第 7 步:配置通过/失败逻辑
7.1 导航至 IO Block
- 返回配方编辑器并单击 "Configure I/O" 或从面包屑菜单中选择 "IO Block"
7.2 设置 Node-RED 流
- 删除现有的 Classification Block Logic 节点
- 从左侧调色板,拖入:
- All Block Outputs 节点(若尚未存在)
- Function 节点
- Final Pass/Fail 节点
- 连接节点:All Block Outputs → Function → Final Pass/Fail

7.3 配置通过/失败逻辑
双击 Function 节点并选择下列逻辑示例之一:
选项 1:若未检测到缺陷则通过
// Pass if no pencil marks are found
const allBlobs = msg.payload.segmentation.blobs;
const results = allBlobs.length <1;
msg.payload = results;
return msg;
选项 2:若所有标记都较小则通过
// Pass if all marks are smaller than threshold
const threshold = 500; // pixels
const allBlobs = msg.payload.segmentation.blobs;
const allUnderThreshold = allBlobs.every(blob => blob.pixel_count < threshold);
msg.payload = allUnderThreshold;
return msg;
选项 3:若总覆盖率较低则通过
// Pass if total marked area is below threshold
const threshold = 5000; // total pixels
const allBlobs = msg.payload.segmentation.blobs;
const totalArea = allBlobs.reduce((sum, blob) => sum + blob.pixel_count, 0);
msg.payload = totalArea < threshold;
return msg;
7.4 部署并测试逻辑
- 单击 "Done" 以保存函数
- 单击 "Deploy" 以激活逻辑
- 导航至 HMI 以测试您的通过/失败逻辑
测试您的逻辑:
- 使用干净的样本进行测试(应通过)
- 对轻微标记的样本进行测试(应按您的标准通过/失败)
- 对标记严重的样本进行测试(应失败)
- 验证结果是否符合您的预期
第 8 步:优化与验证
8.1 使用生产样本进行测试
- 通过检测对多份测试样本进行测试
- 验证检测准确性是否达到您的要求
- 检查通过/失败逻辑是否正确工作
- 记录任何问题或边缘情况
8.2 进一步调整模型性能
如果检测不一致:
- 添加更多具有变体示例的训练图像
- 提高标注质量与一致性
- 调整成像设置以获得更好对比度
- 使用更多迭代进行重新训练
若通过/失败逻辑需要调整:
- 修改 Node-RED 函数中的阈值
- 测试不同的逻辑方法
- 考虑用于复杂决策的多重标准
- 使用生产要求进行验证
8.3 生产验证
- 在实际条件下对真实生产部件进行测试
- 与质量团队共同验证,以确保标准符合要求
- 记录性能指标,如检测准确性和假阳性率
- 建立监控,以随时间跟踪性能
第 9 步:理解分割结果
9.1 分割数据结构
您的分割结果包括:
- Blobs:单个检测到的特征(铅笔标记)
- Pixel Count:每个检测到的特征的像素计数
- Location Data:特征出现的位置
- Confidence Scores:对每次检测的置信度评分
9.2 使用分割数据
您可以基于以下条件创建更为复杂的通过/通过逻辑:
- Number of defects 检测到的缺陷数量
- Size of individual defects(像素计数)单个缺陷的大小
- Total defect area(所有像素计数之和)总缺陷面积
- Defect location(缺陷出现的位置)缺陷位置
- Defect shape characteristics(如用于高级应用时的缺陷形状特征)
成功!您的分割模型已完成
您的 OV80i 分割检测现在可以:
✅ 在图像中自动检测铅笔标记(或您自定义的特征)
✅ 测量检测到的特征的大小和数量
✅ 根据您的特定标准做出通过/失败决定
✅ 提供关于每个检测到的特征的详细信息
✅ 适应标记大小、形状和位置的变化
关键要点
Segmentation vs. Classification:
- Segmentation 在图像中发现并测量特征
- Classification 识别整个对象或总体条件
- 使用 Segmentation 进行缺陷检测、污染分析或覆盖度测量
Training Best Practices:
- 高质量标注比数量更重要
- 在训练集中包含多样化示例
- 对生产样本进行 thoroughly 测试
- 根据需要进行监控和重新训练
Through/Fail Logic:
- 从简单的条件开始,按需逐步增加复杂性
- 用边界情况和边界样本测试逻辑
- 为保持一致性记录你的标准
- 考虑多因素以实现稳健的决策
下一步
现在您已经完成了第一份分割模型:
- 应用于其他用例 - 尝试检测不同类型的缺陷或特征
- 与生产系统集成 - 连接到 PLCs 或质量管理系统
- 建立数据收集 - 跟踪性能指标和检测统计
- 培训操作员 - 确保团队理解如何监控和维护系统
- 计划维护 - 安排定期模型更新和性能评审