AI-POWERED DOCS
What do you want to know?
Connect to Tulip
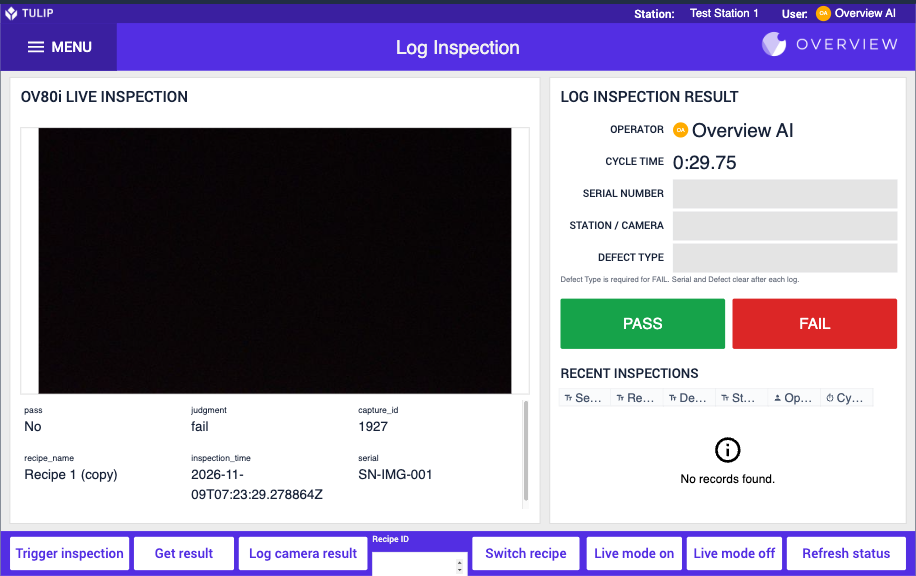
Tulip is a no-code platform for frontline operations apps. This guide connects an OV80i to Tulip with a ready-made kit, so an operator station in Tulip can:
- Trigger an inspection and send a part serial (or any other field) with it.
- Read the result: pass/fail, recipe, capture ID, time and the captured image.
- Switch recipes when the product changes.
- Turn live (production) mode on and off.
- Log every result to a Tulip Table and chart it on a dashboard.
You do not have to build any of this by hand. Download the two files below, import them, point them at your camera, and you are running.
Download the kit
| File | What it is | Import it into |
|---|---|---|
| ov-tulip-node-red-flow.json | Node-RED flow for the camera. Adds HTTP endpoints for trigger, result, recipe switch, live mode and status, plus optional MQTT. Has a built-in README. | The camera's Node-RED editor |
| overview-camera-station-tulip-app.tar.gz | Tulip export of the Overview Camera Station app, its HTTP connector (6 functions) and its results table. | Tulip, Apps |
How it fits together
 Tulip app (operator station)                 OV80i camera
 ┌──────────────────────────┐                ┌───────────────────────────────┐
 │ Trigger / Get result /   │   HTTP          │ Node-RED "Tulip integration"  │
 │ Switch recipe / Live     │ ─────────────▶ │ tab: /node-red/tulip/...      │
 │ mode buttons             │ ◀───────────── │   Trigger node, Capture       │
 │                          │   JSON result  │   Metadata, All Block Outputs │
 └──────────────────────────┘                └───────────────────────────────┘
            ▲                                             │
            │  runs through a Tulip Edge device or        │ optional MQTT:
            │  On-Premise Connector Host on the           ▼ ov/<serial>/result
            │  camera's network                       plant MQTT broker
Tulip calls the camera through an HTTP connector. The Node-RED flow on the camera answers those calls, fires inspections and turns the camera's results into simple, flat JSON that Tulip can map straight into variables.
Before you start
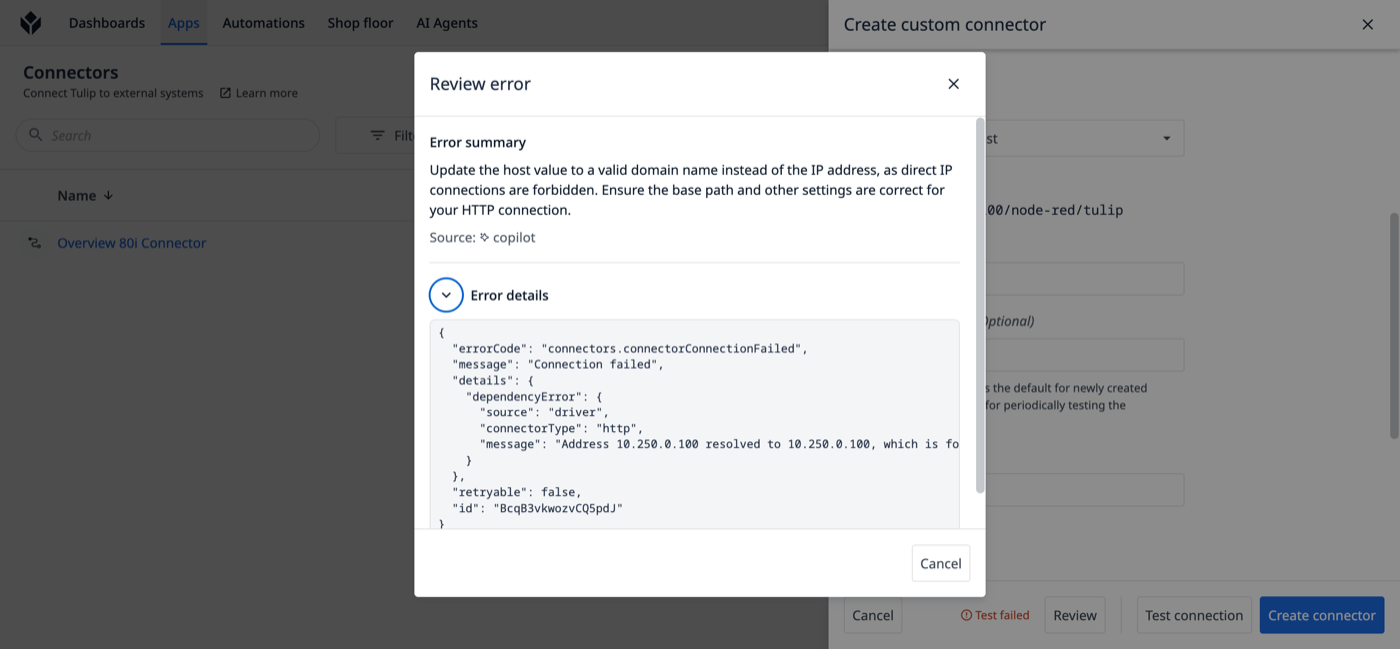
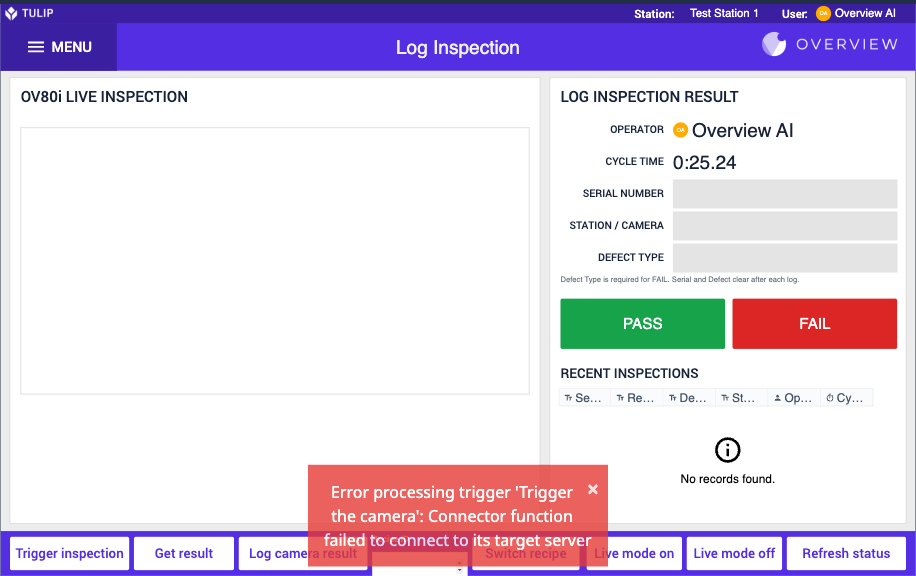
A connector running on Tulip's Cloud Connector Host refuses private addresses such as 10.x.x.x or 192.168.x.x. The connection test fails with "Address 10.250.0.100 resolved to 10.250.0.100, which is forbidden", and app buttons show "Connector function failed to connect to its target server".
To reach a camera on the plant network you need one of these on the same network as the camera:
- a Tulip Edge device (Edge IO, Edge MC), or
- an On-Premise Connector Host.
Then set the connector's Running on to that host. Ask your Tulip administrator if you are not sure which you have.
You also need:
- An OV80i you can reach in a browser, and its IP address.
- The recipe you want to drive from Tulip, with its trigger set to Node-RED. If the recipe uses another trigger mode, the flow's Trigger node does nothing.
- A Tulip account that can create apps and connectors.
Step 1: Import the Node-RED flow on the camera
-
Open the camera UI and activate the recipe you want to use.
-
Go to Node-RED.
-
Open the menu (top right) and choose Import.
-
Click select a file to import, pick
ov-tulip-node-red-flow.json, choose new flow, then Import.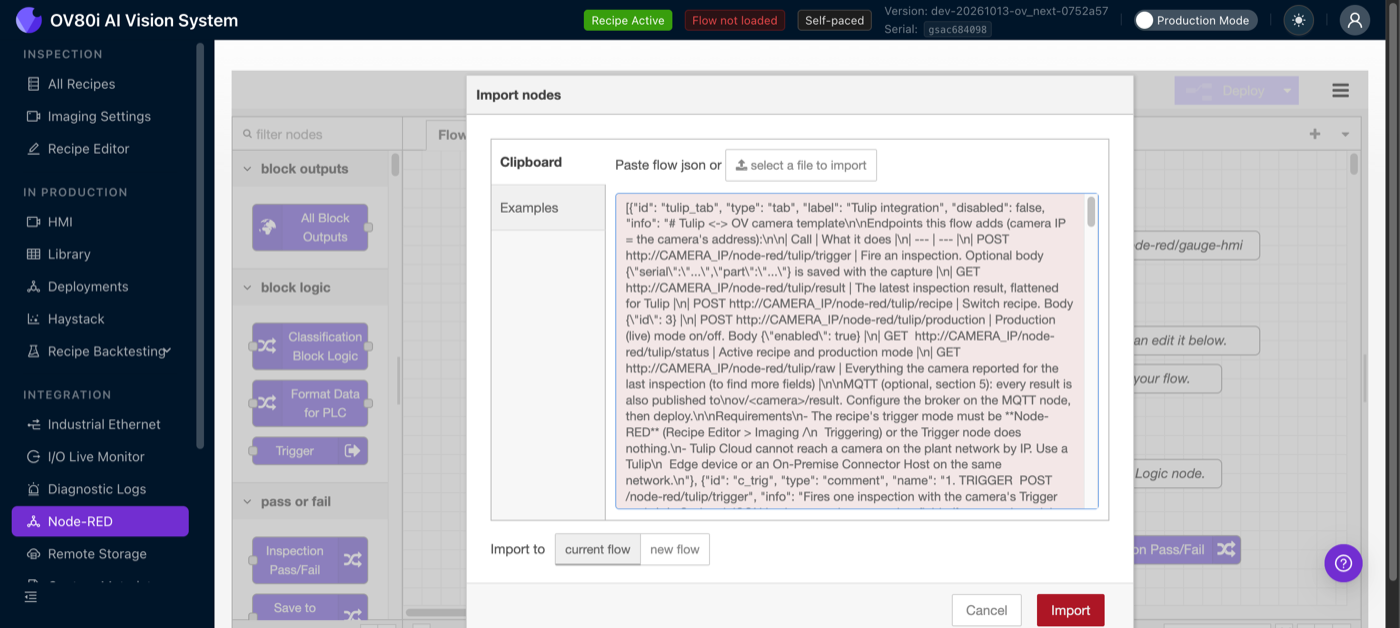
-
Click Deploy.
A new tab called Tulip integration appears. It is laid out in five numbered sections, one per job:
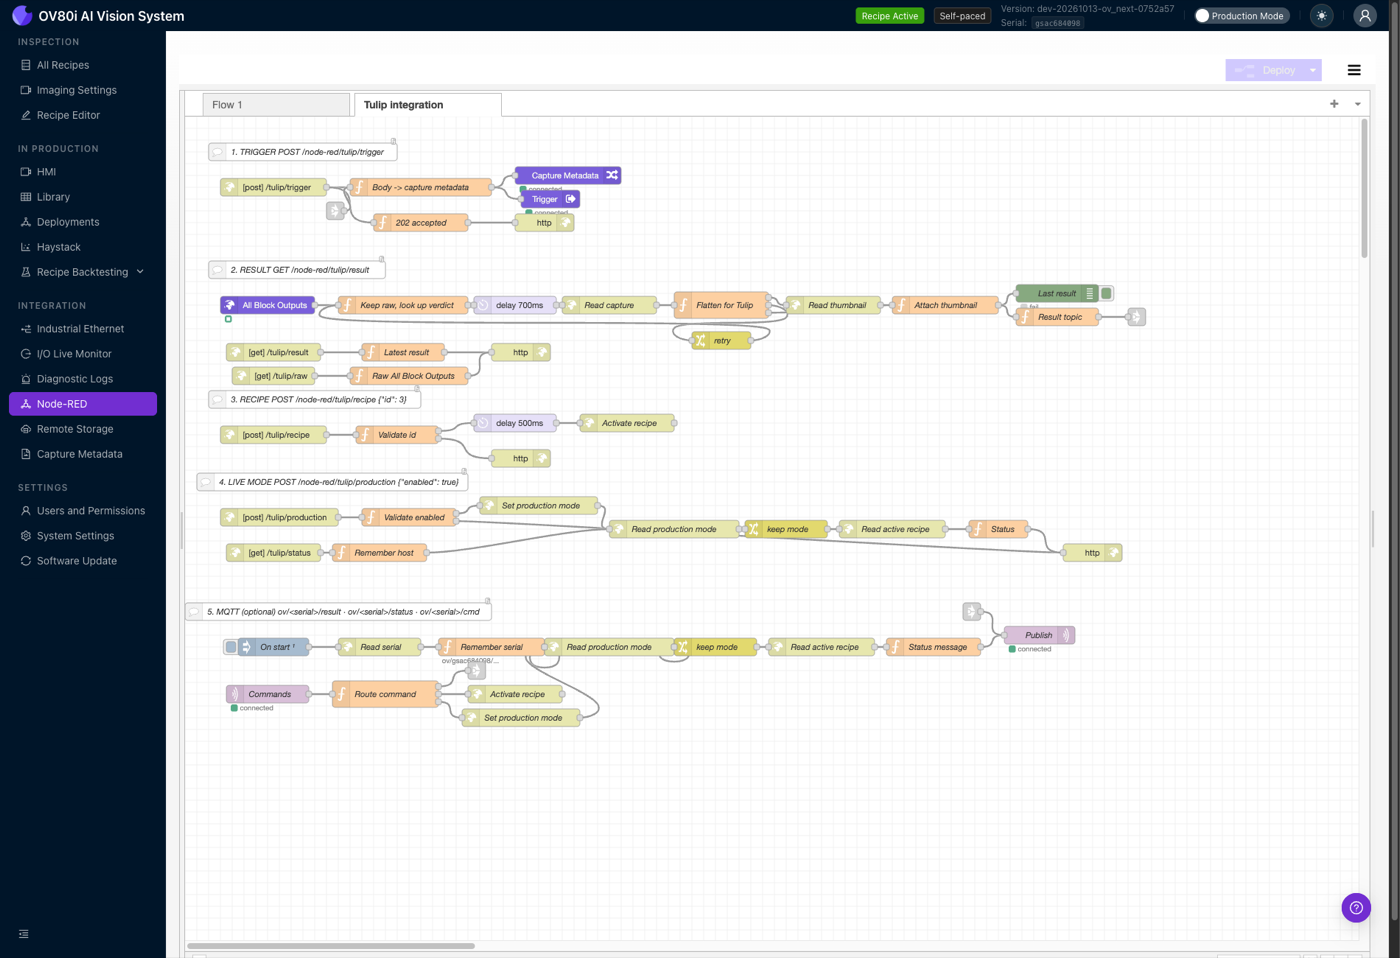
The tab's own README (select the tab, then open the info sidebar) lists every endpoint, so anyone opening the flow later knows what it does:
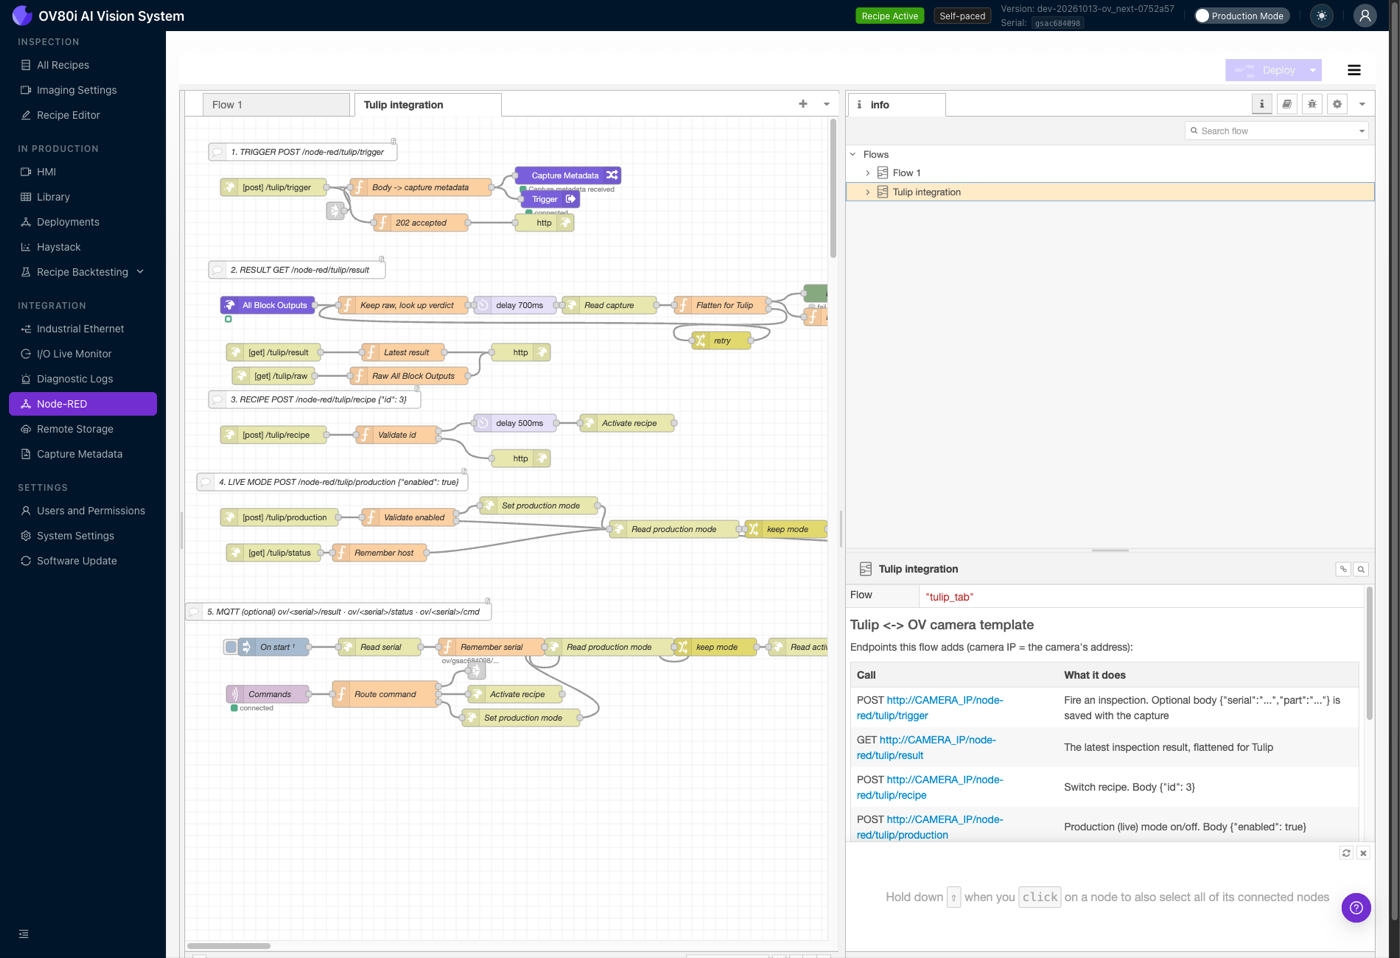
Each recipe has its own Node-RED flow. When a recipe is activated, the camera reloads Node-RED with that recipe's flow. If you switch from Tulip to a recipe that does not have the Tulip integration tab, the camera stops answering Tulip until you switch back. Import and deploy the flow in each recipe you plan to switch between.
To add the flow to another recipe, activate that recipe first, then open Node-RED again.
Check it works
From any computer on the camera's network, run:
curl -X POST http://CAMERA_IP/node-red/tulip/trigger \
  -H "Content-Type: application/json" \
  -d '{"serial":"SN-24-118734","operator":"line-2"}'

# about 1.5 seconds later
curl http://CAMERA_IP/node-red/tulip/result
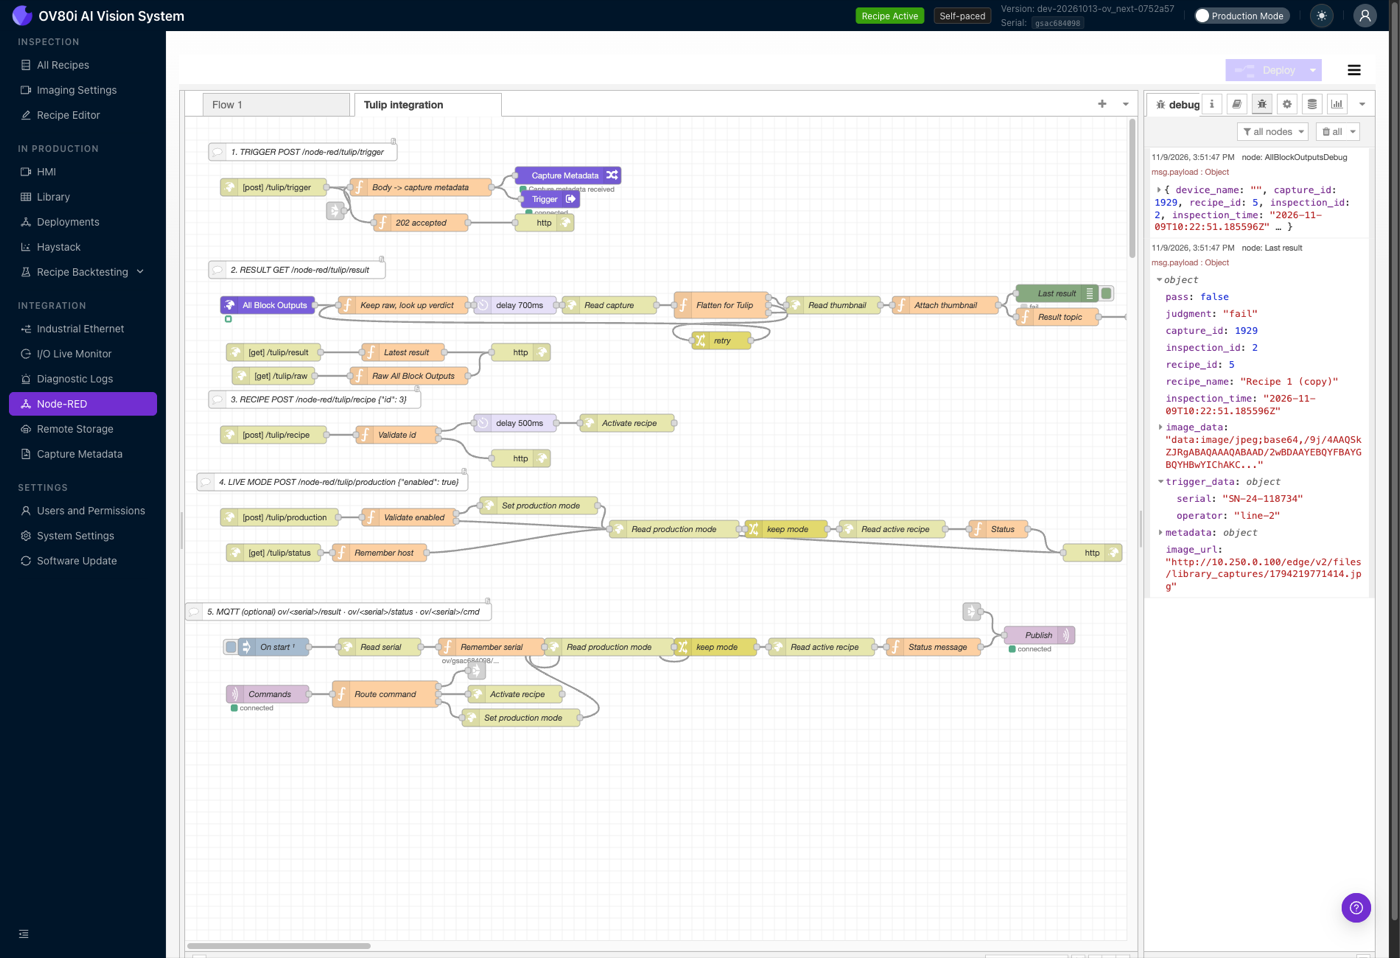
The trigger returns 202 straight away. The result looks like this, and the same object shows in the Node-RED debug sidebar:
{
  "pass": false,
  "judgment": "fail",
  "capture_id": 1923,
  "inspection_id": 12,
  "recipe_id": 5,
  "recipe_name": "Recipe 1 (copy)",
  "inspection_time": "2026-11-09T05:45:02.710681Z",
  "image_data": "data:image/jpeg;base64,/9j/4AAQSkZJRgABAQ...",
  "image_url": "http://CAMERA_IP/edge/v2/files/library_captures/1794203102931.jpg",
  "trigger_data": { "serial": "SN-24-118734", "operator": "line-2" },
  "metadata": { }
}
Endpoints the flow adds
All paths are on the camera, under http://CAMERA_IP/node-red/tulip.
| Call | Body | What it does |
|---|---|---|
POST /trigger | Optional flat JSON, for example {"serial":"SN-1","operator":"line-2"} | Fires one inspection. String and number fields are saved with the capture as Capture Metadata. Replies 202 with {accepted, at, result_url} right away. |
GET /result | The latest result, flattened for Tulip (fields below). 404 until the first inspection. | |
POST /recipe | {"id": 5} | Switches recipe. Replies 202 first, then switches. Confirm with GET /status (about 2.5 seconds). |
POST /production | {"enabled": true} | Turns live (production) mode on or off and returns the new status. |
GET /status | {production_mode, active_recipe_id, active_recipe_name, last_result} | |
GET /raw | Everything the camera reported for the last inspection. Use it to find extra fields to add. |
Result fields
| Field | Type | Notes |
|---|---|---|
pass | boolean | The camera's final verdict. |
judgment | text | "pass" or "fail". |
capture_id | integer | Find the image in the camera Library by this ID. |
inspection_id | integer | |
recipe_id, recipe_name | integer, text | The recipe that ran. |
inspection_time | text | ISO 8601 time from the camera. |
image_data | text | A 640 px JPEG of the capture inside the result, as a data:image/jpeg;base64,... value (about 13 KB). This is what the Tulip app shows: it needs no extra connection to the camera and works on Tulip's https pages. |
image_url | text | Link to the full-size image on the camera, built from the address you called. Plain http, so it opens only on a device on the camera's network, and not inside Tulip (see Limitations). |
trigger_data | object | The fields you sent with the trigger, for example serial. |
metadata | object | All Capture Metadata on the image, including anything the recipe adds. |
trigger_data is separate from metadataIf the recipe's own flow also writes Capture Metadata, the last write wins and your serial number may not show in the Library. trigger_data always holds exactly what Tulip sent, so read the serial from there.
Open All Recipes and select the recipe. The ID is the number in the address bar, for example /recipes/5/....
Step 2: Import the Tulip app
-
In Tulip, go to Apps and open the folder where you want the app.
-
Open the folder's ... menu and choose Import.
-
Click Import a file and pick
overview-camera-station-tulip-app.tar.gz, then Import.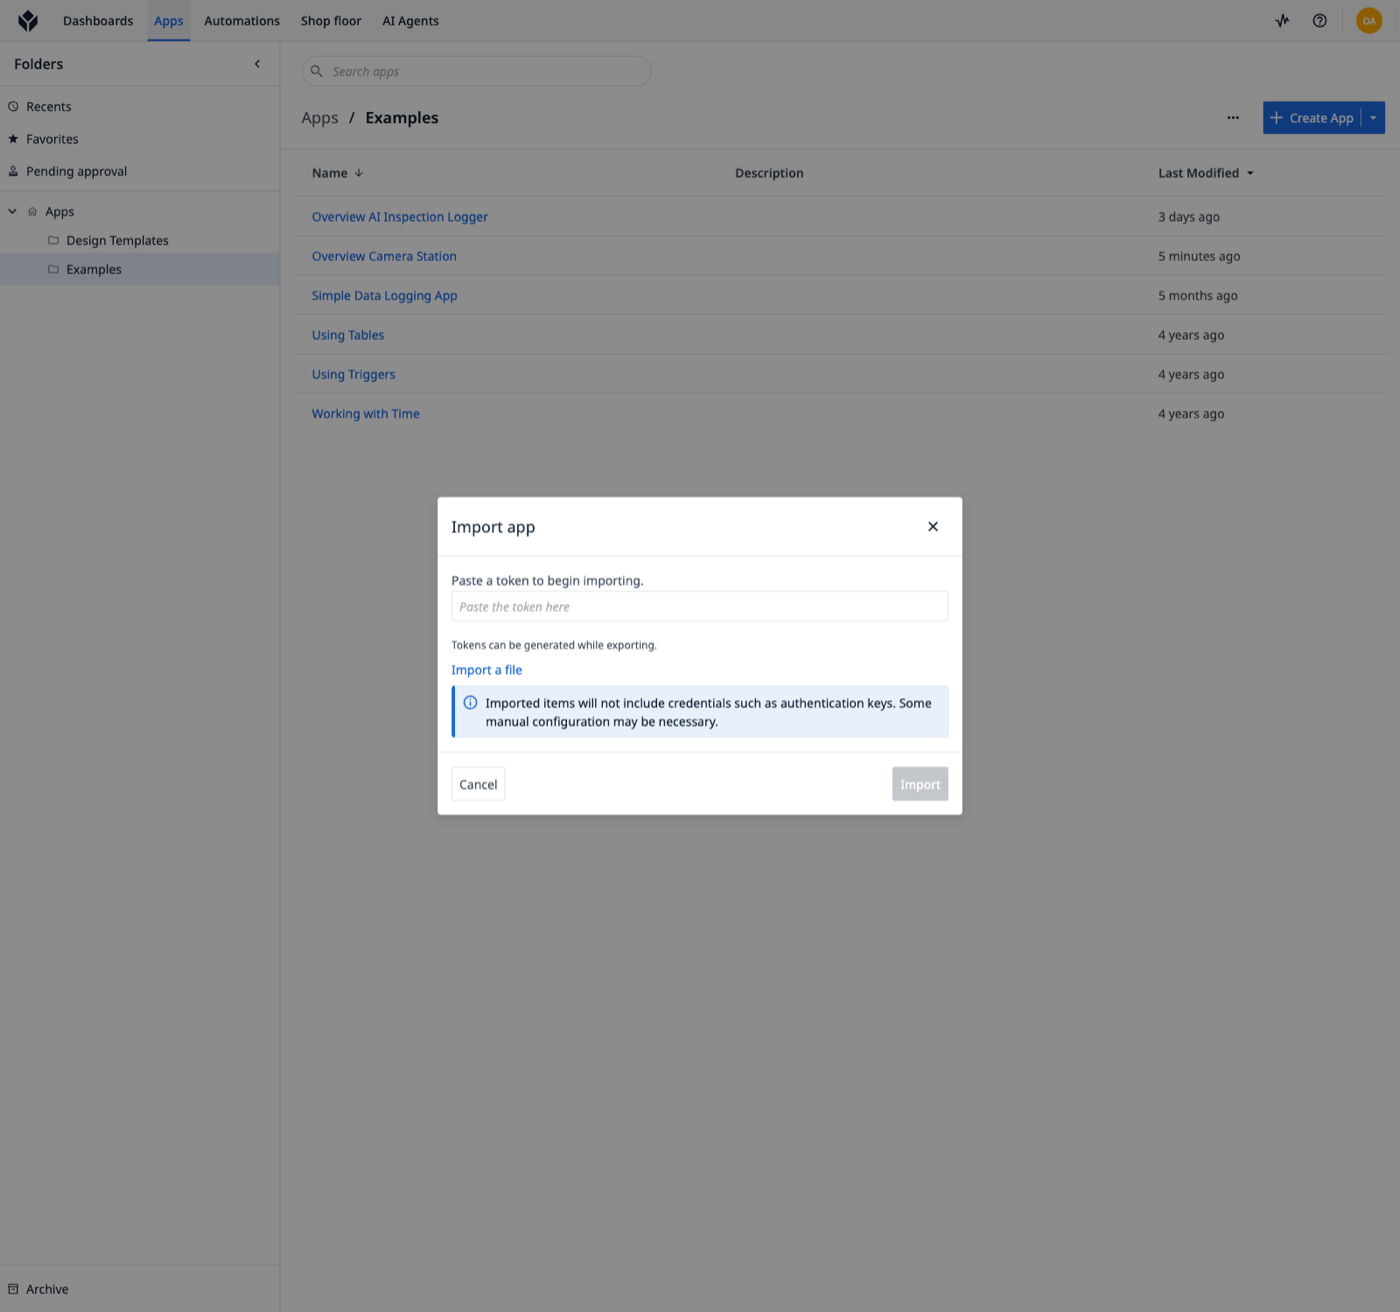
The import creates:
- the Overview Camera Station app,
- the OV Camera (Node-RED template) HTTP connector with six functions,
- the Overview AI Inspection Results table.
Tulip imports a file only into an instance with a matching version. If the import is refused, build the connector by hand using the table in Step 3 and the screenshots below; the app layout is shown at the top of this page.
Step 3: Point the connector at your camera
Exports never carry hosts or credentials, so the connector needs your camera's address.
-
Go to Apps → Connectors and open OV Camera (Node-RED template).
-
Open Edit environments (or the connector's connection settings) and set:
Setting Value Running on Your Tulip Edge device or On-Premise Connector Host Server address Your camera IP, for example 192.168.0.100Port 80TLS No Base path /node-red/tulip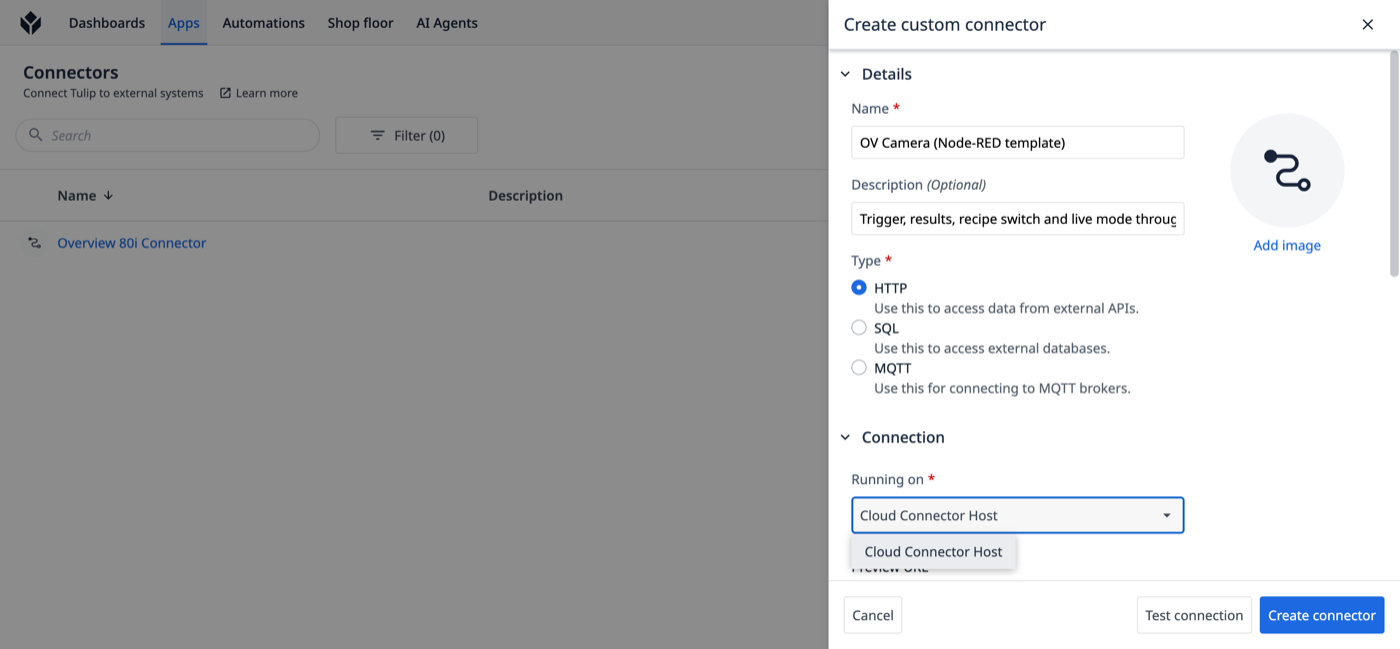
-
Click Test connection, then save.
The connector already has these functions:
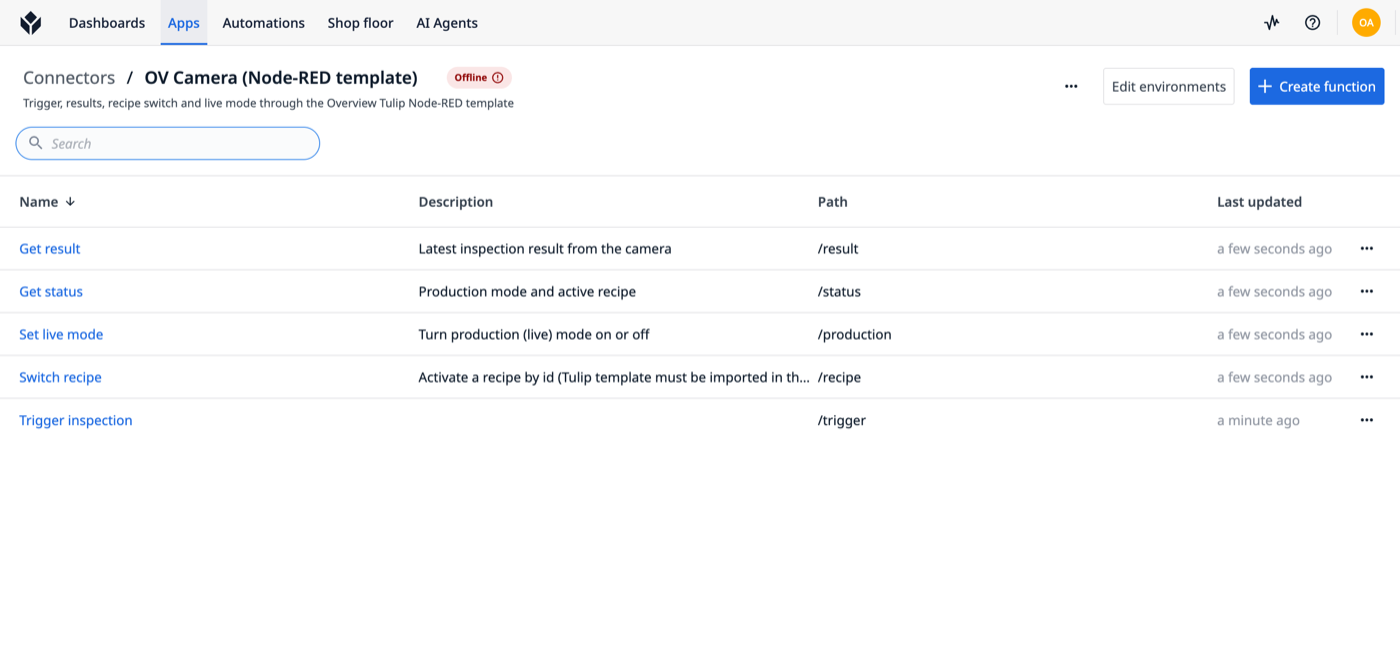
| Function | Method and path | Inputs | Outputs |
|---|---|---|---|
| Trigger inspection | POST /trigger | serial (text) | accepted |
| Get result | GET /result | pass, judgment, capture_id, recipe_id, recipe_name, inspection_time, image_url, serial | |
| Get result image | GET /result | image (Image URL from image_data, for an Image widget) | |
| Switch recipe | POST /recipe | id (integer) | switching_to |
| Set live mode | POST /production | enabled (boolean) | production_mode, active_recipe_id, active_recipe_name |
| Get status | GET /status | production_mode, active_recipe_id, active_recipe_name |
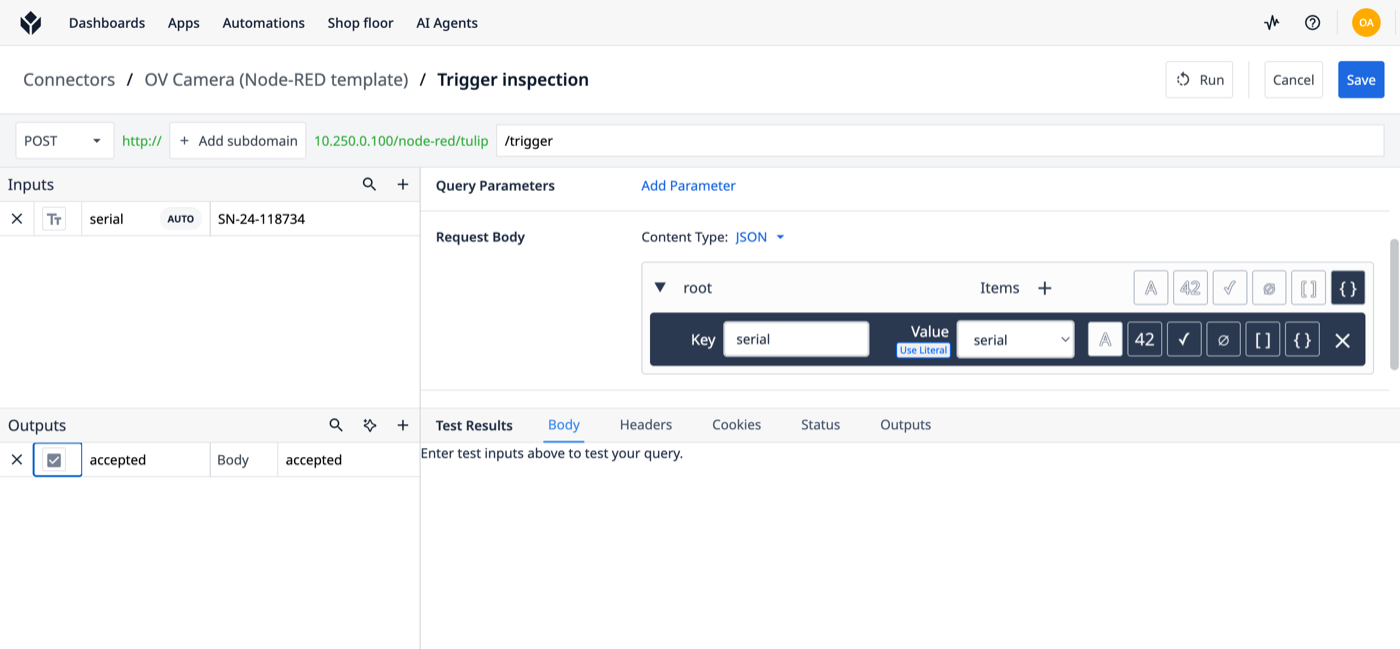
For example, Trigger inspection sends the serial number in a JSON body and reads back accepted:
Get result maps each field of the result to an output:
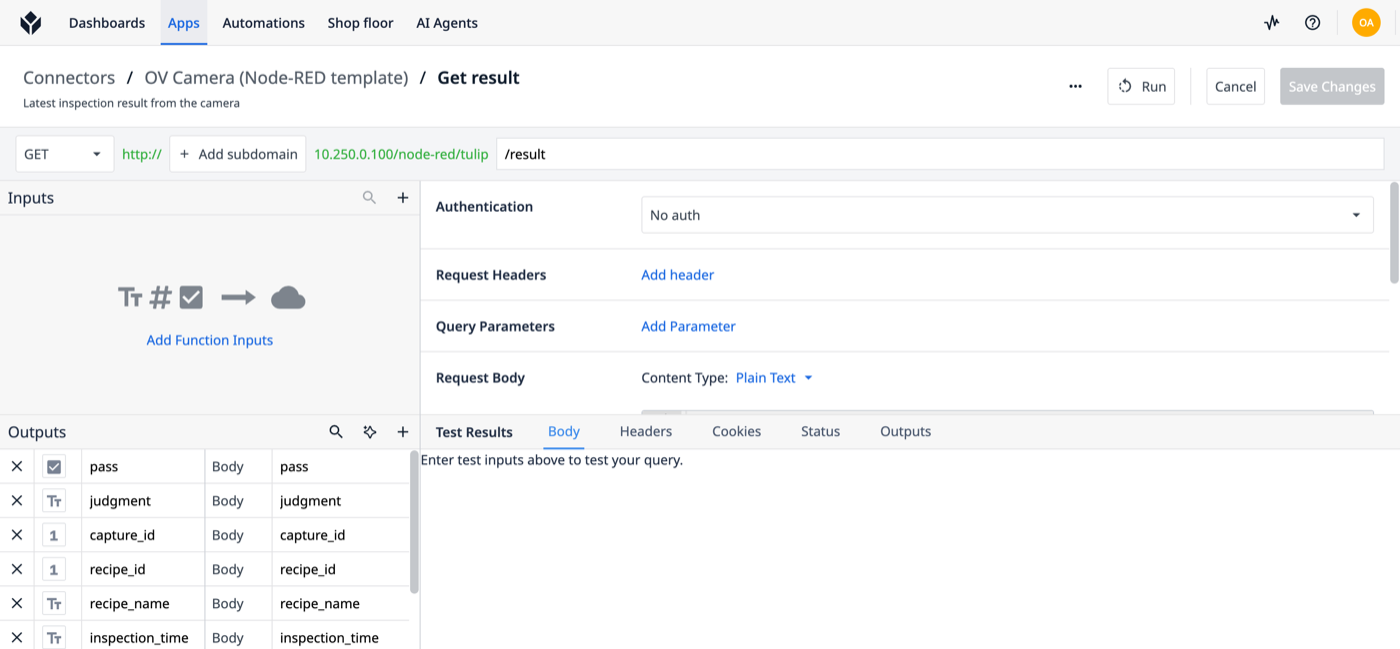
To pass work order, operator or station with each trigger, add more inputs to Trigger inspection and add them to the JSON body. Any string or number field is saved with the image and comes back in trigger_data.
Step 4: Run the station
Open Overview Camera Station and click Run (or Test to try it in the editor).
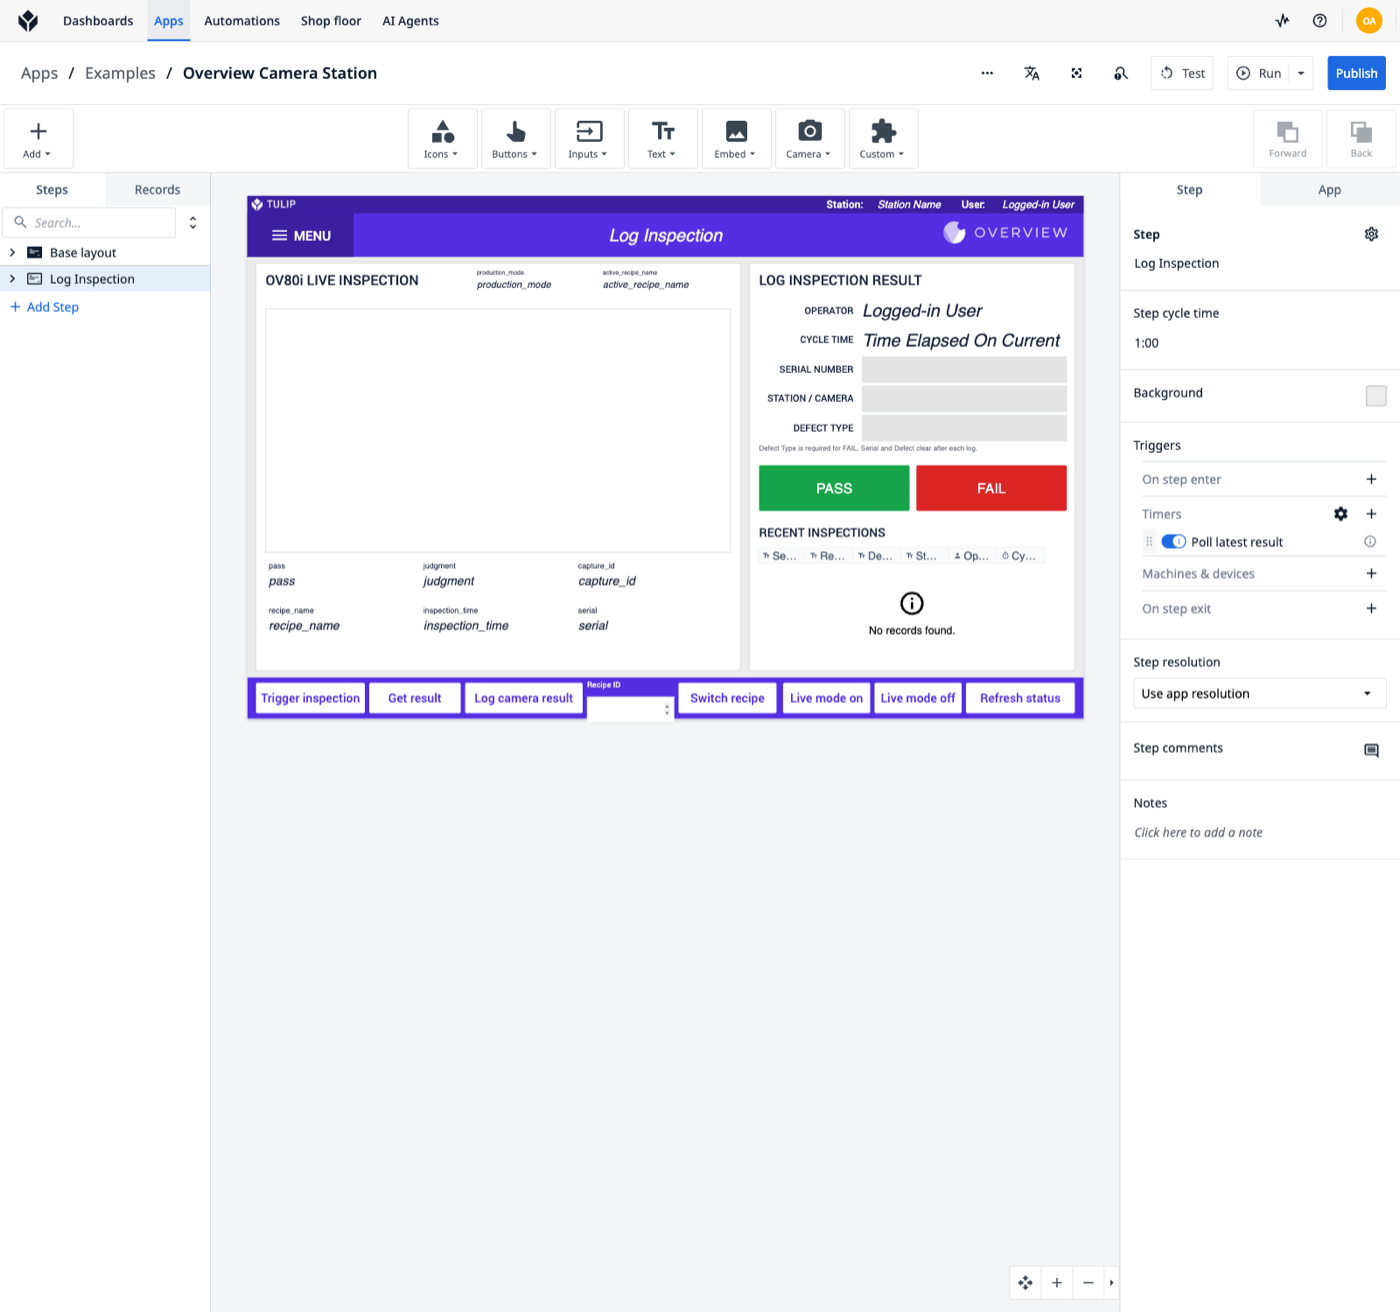
| Control | What it does |
|---|---|
| Serial Number field | The part serial. Trigger inspection sends it with the trigger. |
| Trigger inspection | Fires one inspection. |
| Get result | Reads the latest result and a 640 px picture of the capture into the left panel. The panel also refreshes on its own every 30 seconds. This is the last captured image, not live video. |
| Log camera result | Writes the camera's result (serial, result, station, operator, cycle time) to the results table, so it appears under Recent Inspections. |
| Recipe ID + Switch recipe | Activates the recipe with that ID. |
| Live mode on / off | Turns production mode on or off. |
| Refresh status | Shows whether live mode is on and which recipe is active. |
| PASS / FAIL | The original manual buttons, for logging a result by hand. |
The camera writes pass / fail; the manual buttons write PASS / FAIL. If you count or filter on the Result column, account for both, or change the buttons to match.
Tulip does not allow a timer shorter than 30 seconds, so the automatic refresh can lag. Press Get result after a trigger for an immediate result, or use MQTT (below), which pushes each result as soon as it is ready.
Add a dashboard
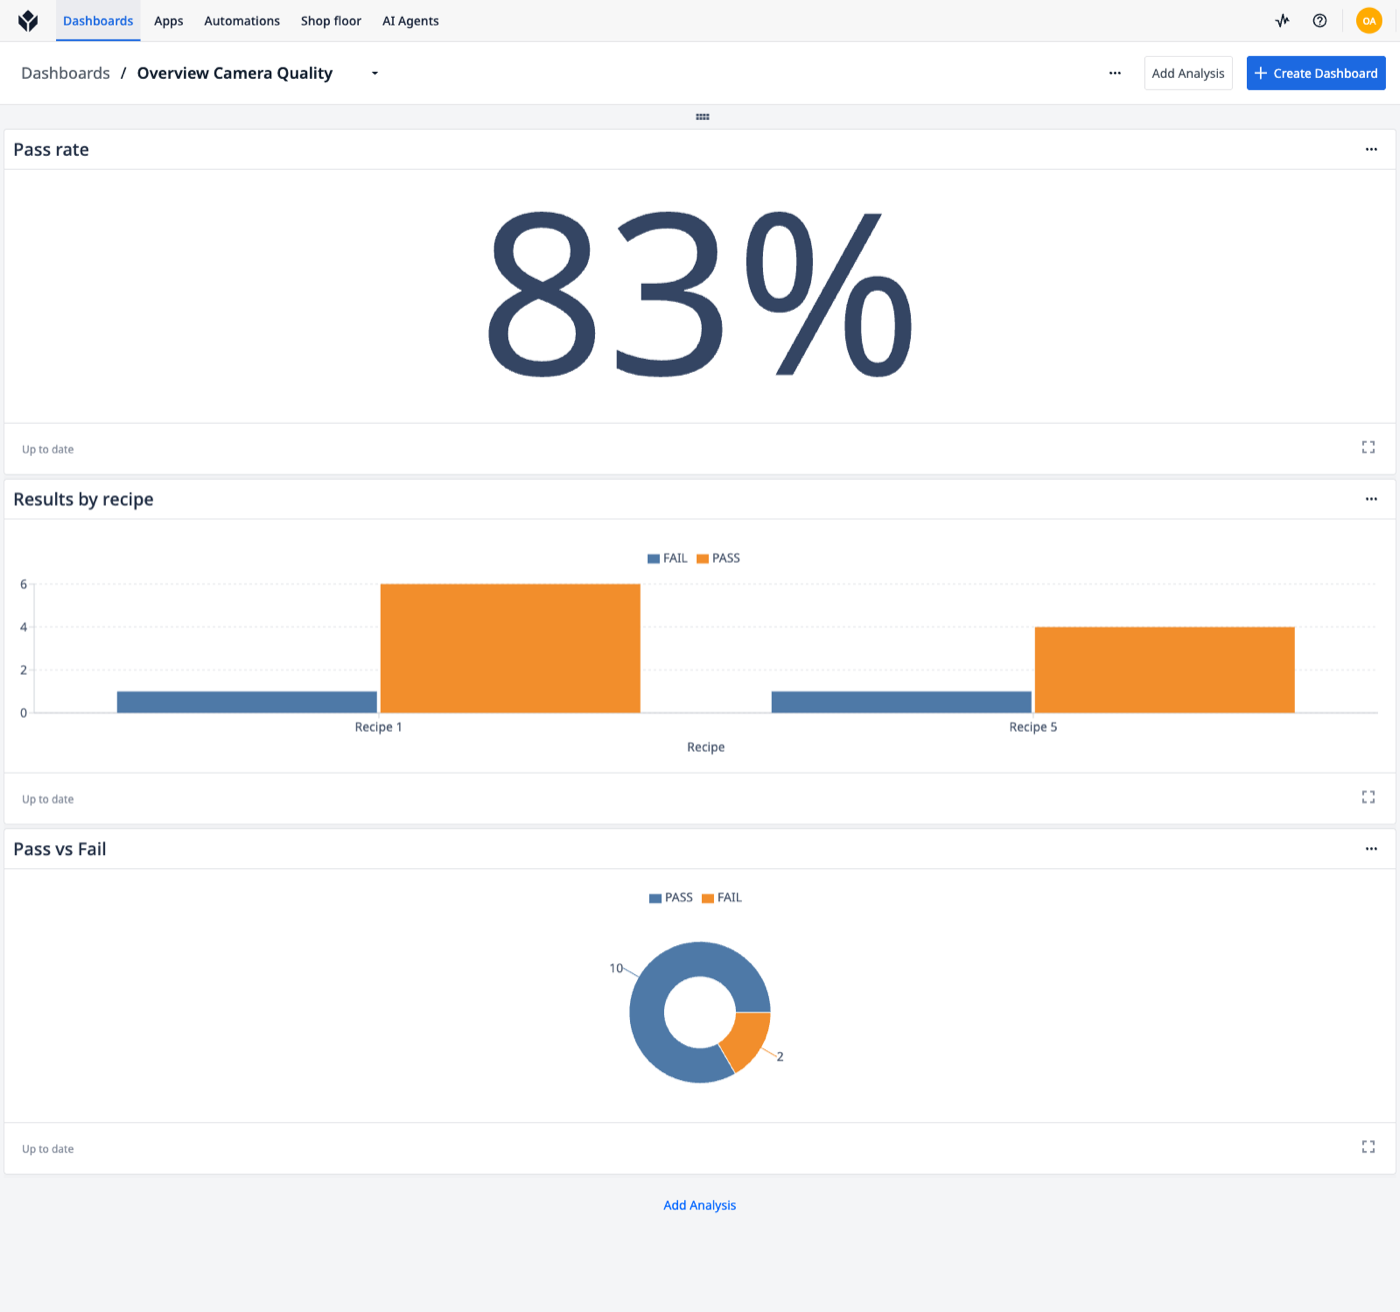
To watch quality over a shift, build a Tulip dashboard on the results table. For example:
- Pass vs Fail: Donut, grouped by Result, operation Count of Records.
- Results by station: Bar, grouped by Station / Camera and Result, Count of Records.
- Inspections per hour: Line, grouped by the record's created time, Count of Records.
The example below was built the same way on a results table with a boolean pass column, which also allows a Pass rate single value (Percent Where True).
Optional: Use MQTT instead of polling
MQTT gives lower latency than HTTP polling: every result is published about 1.3 seconds after the trigger, with no polling. The flow's section 5 handles it. It is disabled by default.
| Topic | Direction | Content |
|---|---|---|
ov/<serial>/result | camera → broker | The same JSON as GET /result, for every inspection (QoS 1). |
ov/<serial>/status | camera → broker | {production_mode, active_recipe_id, active_recipe_name, at}, retained. Published when the flow starts, so also after every recipe switch. |
ov/<serial>/cmd | broker → camera | {"action":"trigger","serial":"SN-1"}, {"action":"recipe","id":5} or {"action":"production","enabled":true} |
<serial> is the camera serial number shown in the top bar of the camera UI. Commands addressed to another serial are ignored, so several cameras can share one broker.
Turn on MQTT on the camera
-
In the Tulip integration tab, double-click Publish, then the pencil next to Server.
-
Set your broker's address, port, TLS and login (the template uses
broker.example.local:1883). Click Update, then Done.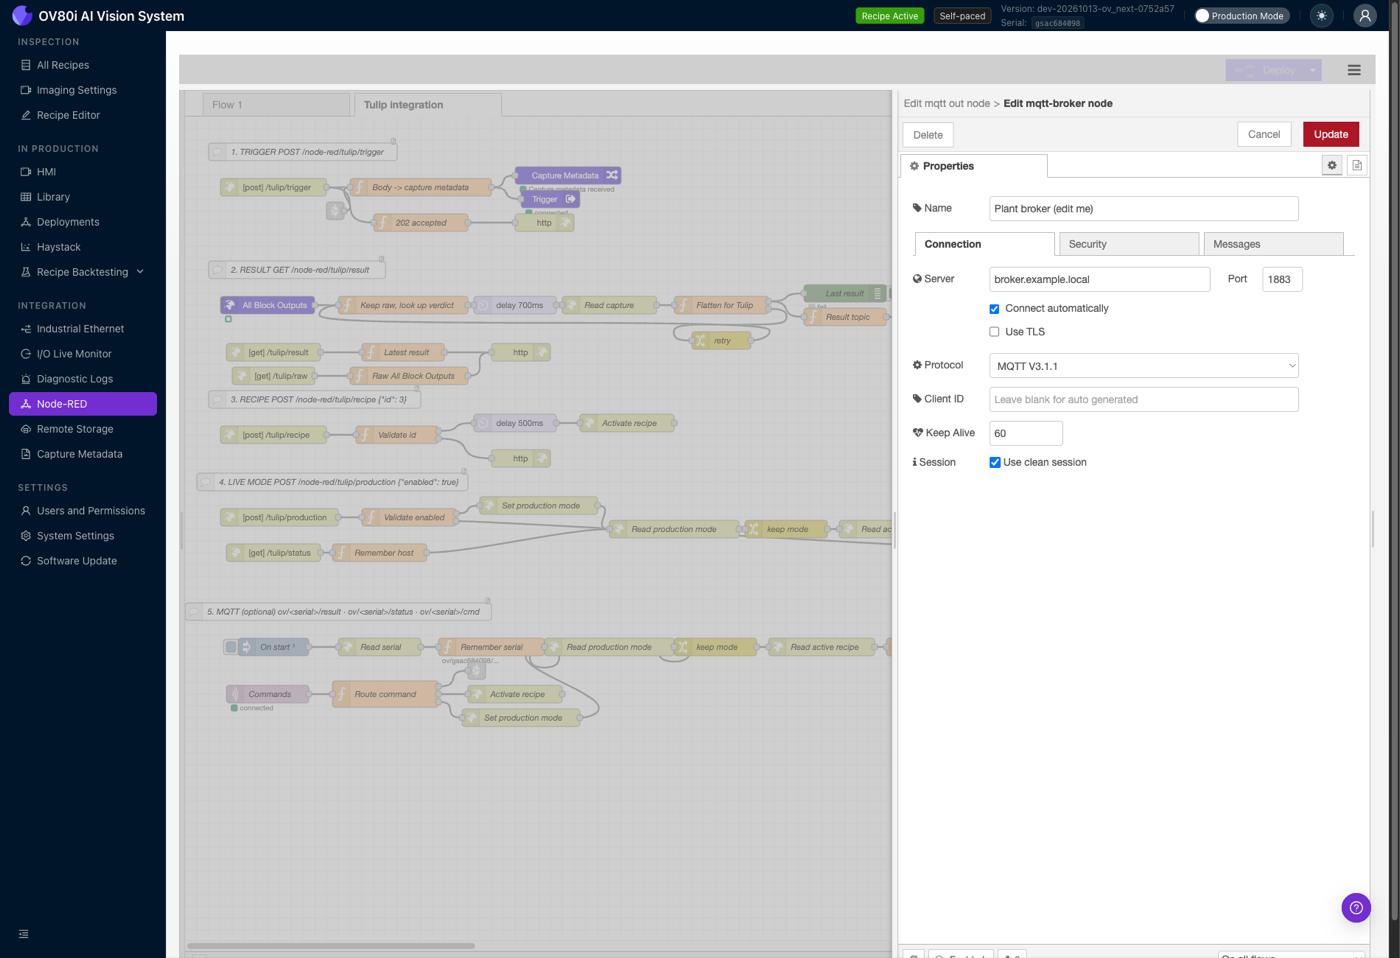
-
Select the Publish and Commands nodes and press Ctrl+E (Cmd+E on Mac) to enable them.
-
Click Deploy. Both nodes show connected when the broker is reachable.
The camera runs its own MQTT broker on port 1883. Set the server to 127.0.0.1 to try the flow before your plant broker is ready. Do not use it for production.
Tulip side
-
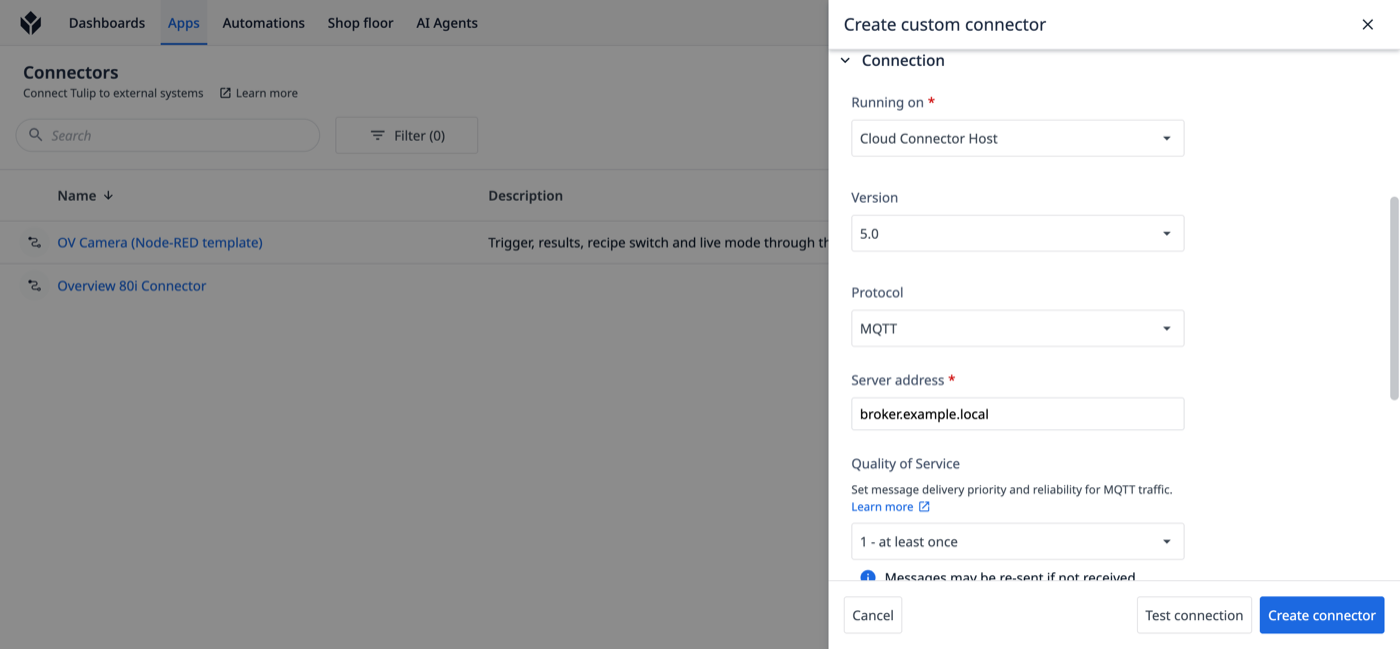
Create an MQTT connector with your broker's address and port, QoS 1, running on the same Edge device or On-Premise Connector Host.
-
To send commands, add write functions with topic
ov/$camera_serial$/cmdand a JSON message, for example{"action":"trigger","serial":"$part_serial$"}.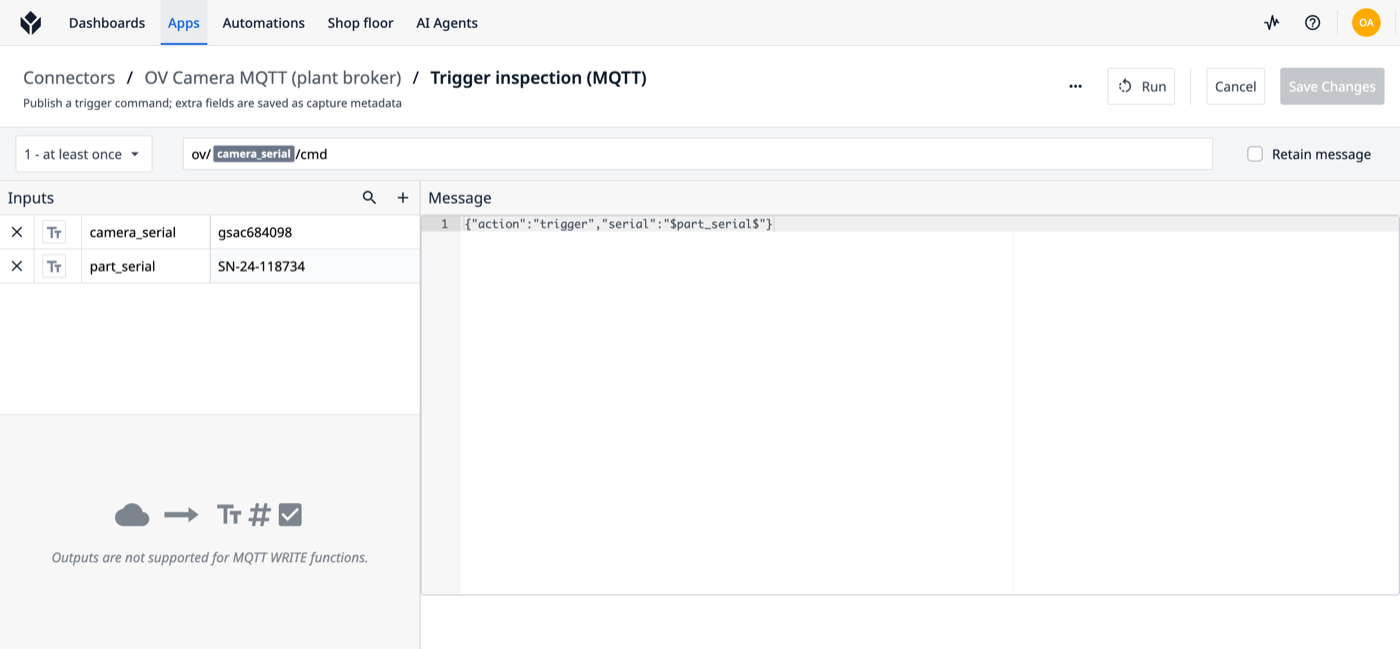
-
To receive results, add the broker as a Machine data source subscribed to
ov/+/resultandov/+/status, and use a Machines & devices trigger in your app.
A Tulip MQTT connector function can send messages but cannot read them. Results and status come in through the Machine data source.
Limitations
Know these before you roll the kit out to a line:
- No live video in Tulip. The panel shows the last captured image (a 640 px picture), refreshed when the operator presses Get result and by the 30 second timer. The camera's own live view is an H.264 stream drawn in the camera's web page, with no MJPEG or snapshot URL a Tulip Image widget can show. Embedding the camera's
http://CAMERA_IP/live-feedpage needs Tulip's Web Page widget (enabled by Tulip support) and an https address for the camera, because Tulip pages are https and the camera serves plain http only. - Full-size images do not open inside Tulip.
image_urlis a plainhttplink to the camera. Browsers block or breakhttpimages on Tulip's https pages, and the iPad Player refuses them. Use it from a device on the camera's network, or put an https reverse proxy in front of the camera. - Tulip needs a path to the camera. Connectors on Tulip's Cloud Connector Host cannot reach private addresses. Use a Tulip Edge device or an On-Premise Connector Host on the camera's network.
- Refresh rate. Tulip timers run every 30 seconds at the fastest. For results as soon as they are ready, press Get result after a trigger or use MQTT.
- One flow per recipe. The flow must be imported into every recipe Tulip switches to, or the endpoints disappear after a switch.
- Result size. The embedded picture adds about 13 KB to each result, including MQTT messages. That is fine for Tulip variables and brokers with default limits.
- Tested on. OV80i firmware
dev-20261013with Tulip r393. Endpoints and node names may differ on other camera models and firmware.
Troubleshooting
| Symptom | Cause and fix |
|---|---|
| Connector test fails with "... which is forbidden" | The connector is running on the Cloud Connector Host. Set Running on to your Tulip Edge device or On-Premise Connector Host. |
| App shows "Connector function failed to connect to its target server" | Same as above, or the camera is off or unreachable from the connector host. Check the camera IP and try the curl test from that network. |
Trigger returns 202 but no new result | The recipe's trigger is not set to Node-RED, or the recipe is not loaded. Check the camera top bar and the recipe's trigger setting, then trigger again. |
Endpoints return 404 after a recipe switch | The recipe you switched to has no Tulip integration tab. Import the flow into that recipe too. |
GET /result returns 404 | No inspection has run since the flow was deployed. Trigger once. |
| Serial number missing in the Library | The recipe's own Capture Metadata overwrote it. Read it from trigger_data in the result instead. |
| Image does not show in Tulip | The image comes from image_data, filled after each inspection. Check that Get result image returns a value starting with data:image/jpeg;base64. If it is empty, re-import the flow (older versions only returned image_url, which Tulip's https pages cannot load from the camera). |
| MQTT nodes show disconnected | Wrong broker address, port, TLS or login, or the broker is not reachable from the camera. |
What's next
- Environment Variables: keep deployment-specific settings out of the flow.
- Setting Up Outputs: how Node-RED fits into the pass/fail flow, and PLC outputs alongside Tulip.