AI-POWERED DOCS
What do you want to know?
Step 4: Train Your AI Model
Your regions of interest (ROIs) are set. Now it's time to teach the AI what "good" and "bad" look like.
The three cardinal rules of training
Before anything else, internalize these three rules. They apply whether you're training a classifier or a segmenter, with 5 images or 500.
Rule 1: Label from the image only
Never look at the physical part (or put it under a microscope) to decide whether it's good or bad. If you can't see the defect in the camera image, the AI cannot learn it.
The AI is not magic. It can only work with what the camera sees. If you label a part as "defective" based on something you noticed by touching it or zooming in under a magnifier, but the camera image looks fine, you're teaching the AI to see something that isn't there.
If you can't label it from the image alone, go back to the Install step and fix the physical setup: better lens, better lighting, closer mounting, different angle.
Rule 2: Double and triple check your labels
Mislabels happen to everyone; experienced engineers do it too. But one bad label in a small dataset can destroy your results.
With 5 training images, one mislabel corrupts 20% of your training data. That's catastrophic.
Before every training run: Click View All ROIs and verify every single annotation. This is the easiest thing to fix and the most impactful.
Rule 3: Start small, iterate fast
Don't label 50 images and hit train. Instead, create a tight loop: Label 10-15 images per class, train (approximately 30 seconds), test and try to break it, then add targeted data where it fails. Repeat this cycle 2-4 times.
This loop is your fastest path to a good model.
Step-by-step training workflow
1. Capture initial training images
With your recipe active and parts flowing (or placed manually), capture images. You need a minimum of 10-15 images per class to start.
For a simple pass/fail inspection:
- 10-15 images of good parts
- 10-15 images of defective parts
2. Define your classes
Pick the model type you're training, then read the matching instructions. The toggle below stays in sync between Step 2 and Step 3, and your choice is preserved in the URL so it survives a refresh or share.
- Classifier
- Segmenter
In the labeling interface, add the classes each inspection type needs. Common classifier class sets:
- Pass / Fail
- Present / Absent
- Good / Scratched / Cracked
Keep it simple at first. You can always add classes later.
In the labeling interface, add classes for the defects (or features) you want the AI to mask. Common segmenter class sets:
- Defect / Background
- Scratch / Crack / Stain
- Foreground / Background
Keep the class list short at first. Each class needs its own brush color and its own labeled examples, so adding more classes upfront multiplies your labeling work.
3. Label the images
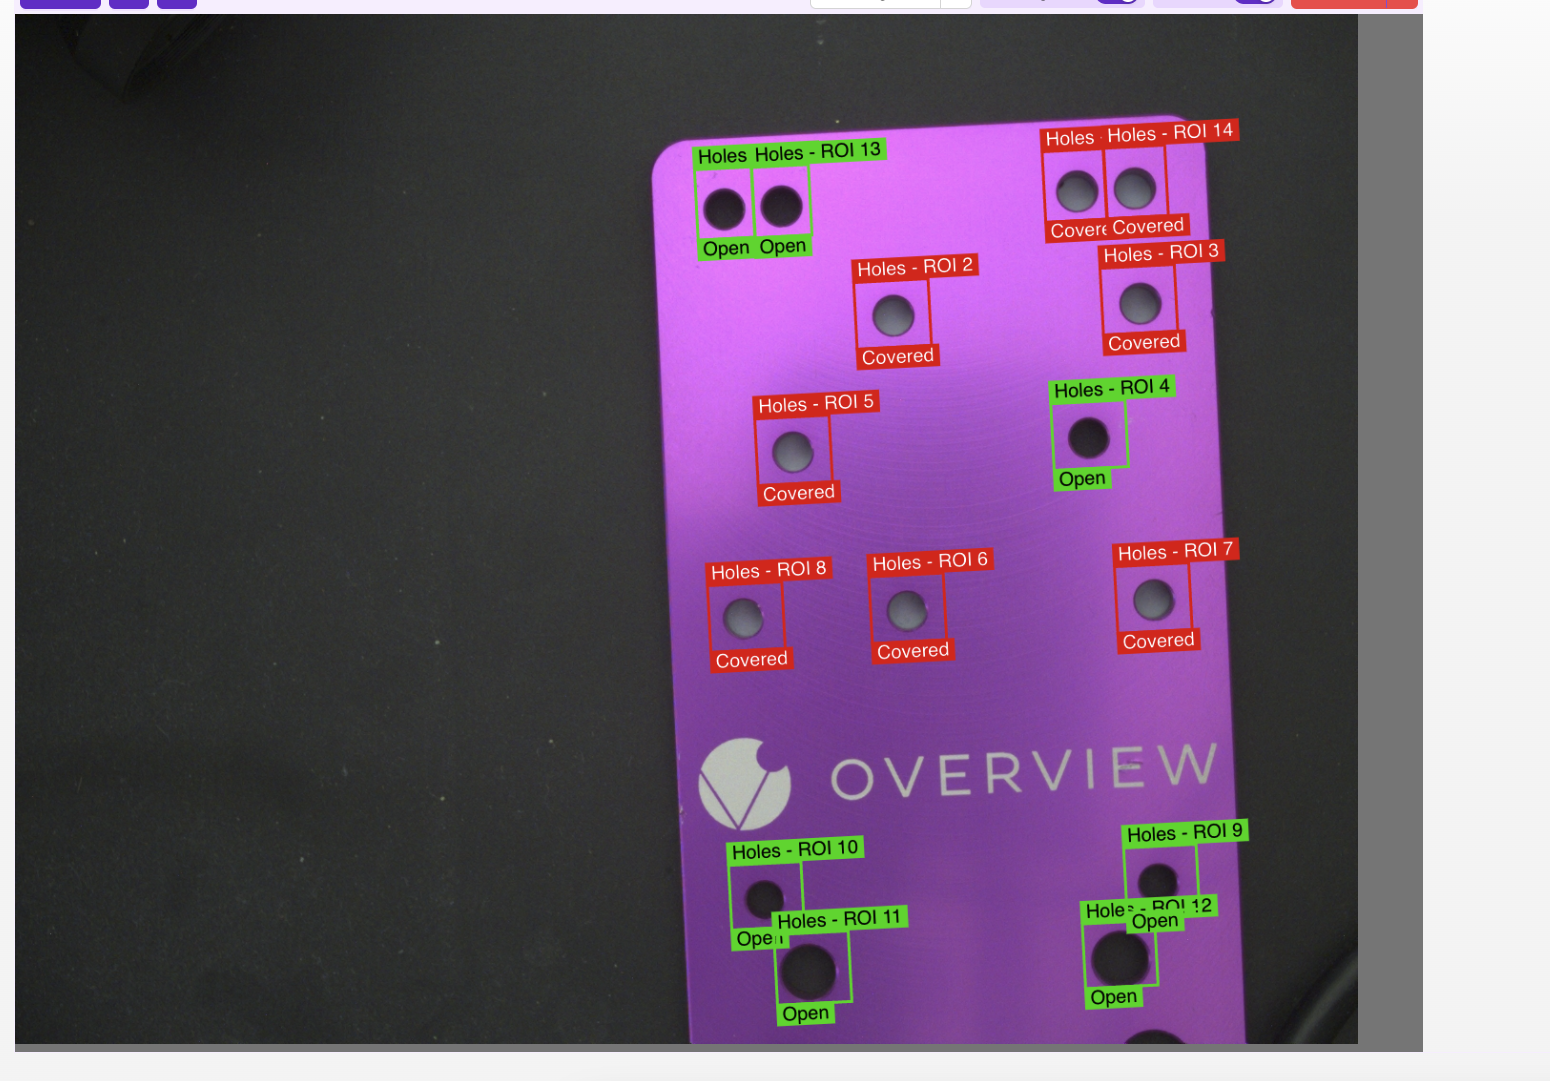
- Classifier
- Segmenter
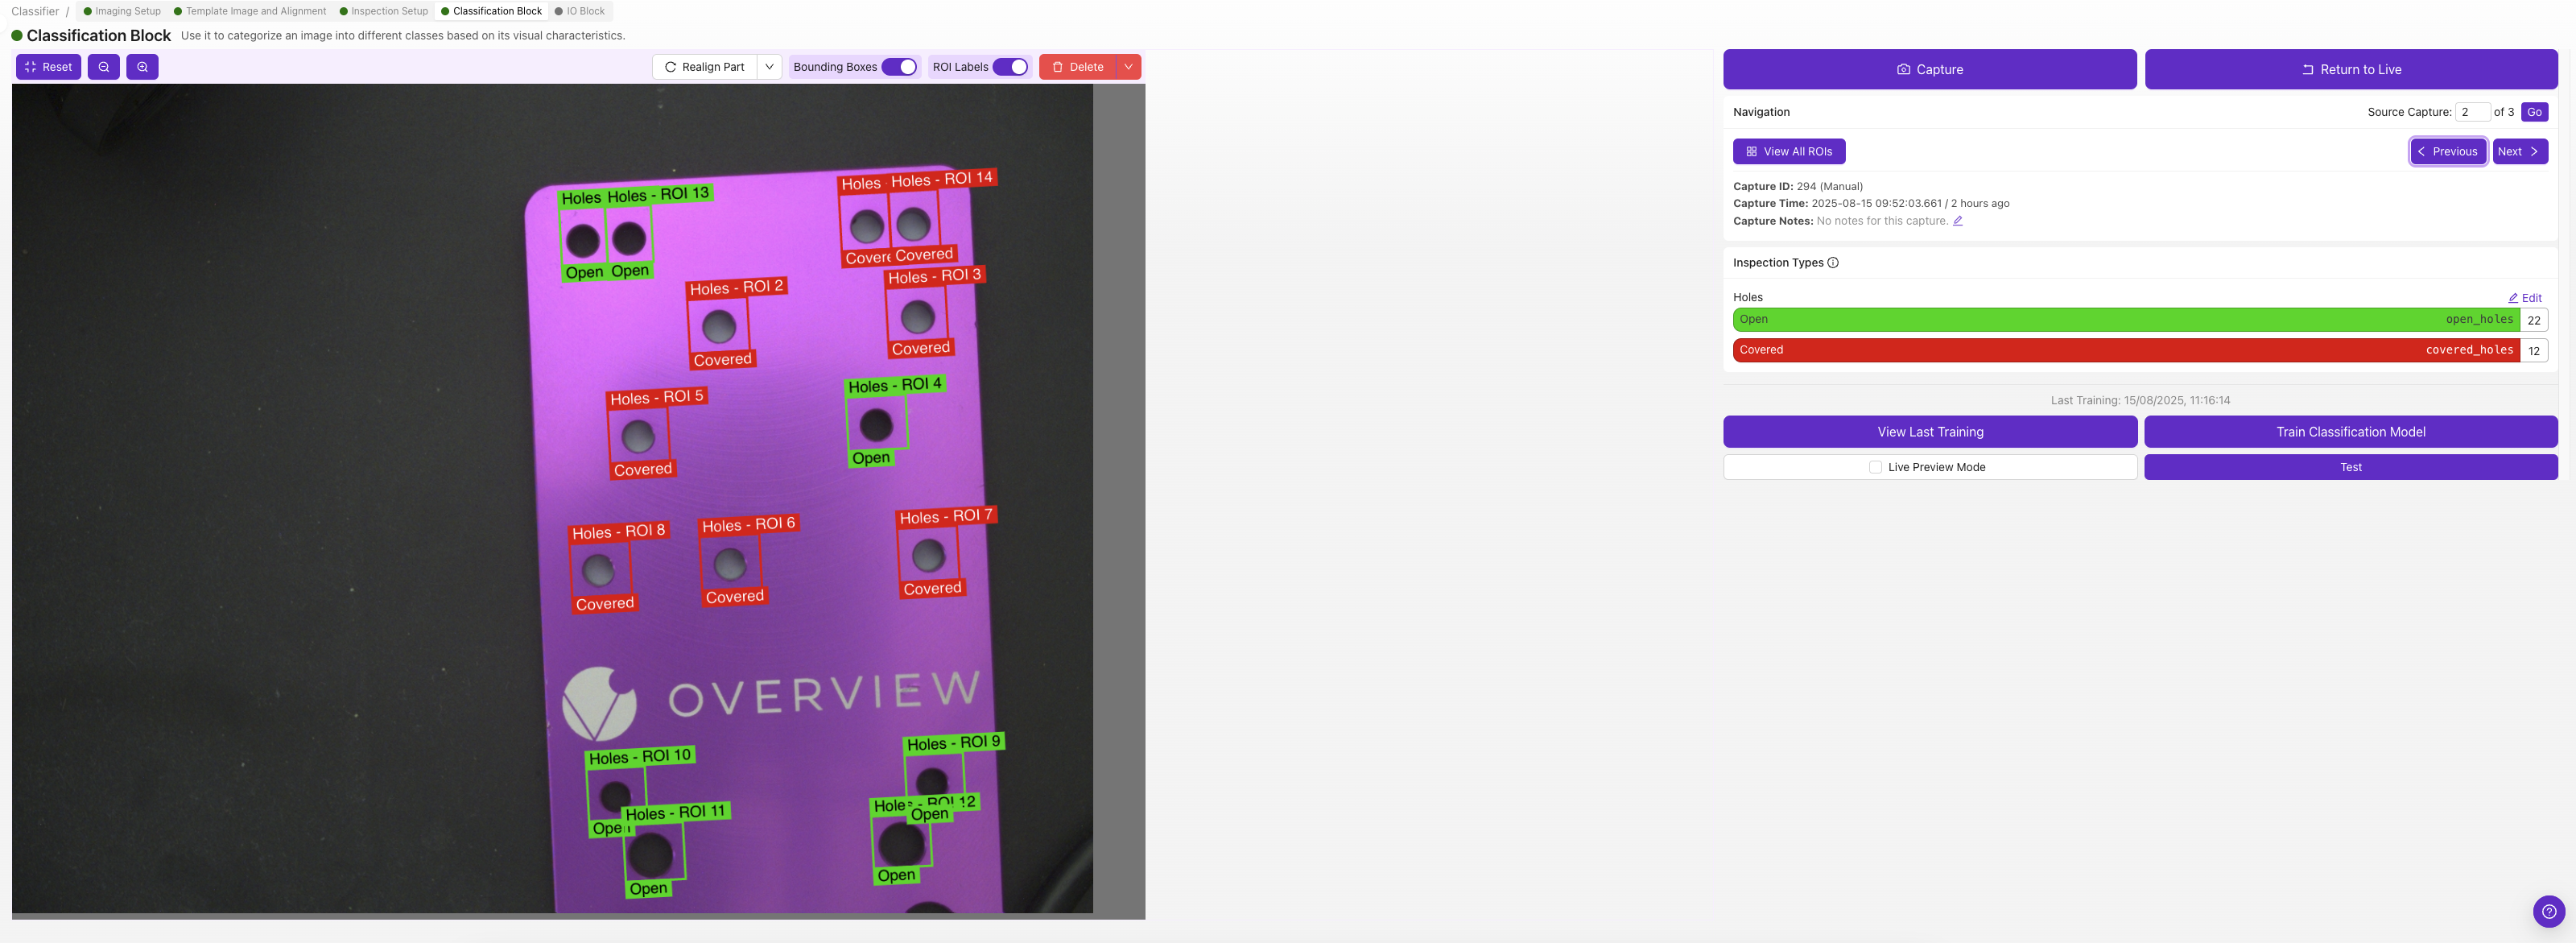
Each ROI gets its own classification class — pick the class that describes that ROI in that image (e.g., "pass" or "fail").
If you're not sure whether to use classification or segmentation, start with classification. It's much faster to label and good for most pass/fail scenarios. See Classifier vs. Segmenter for guidance.
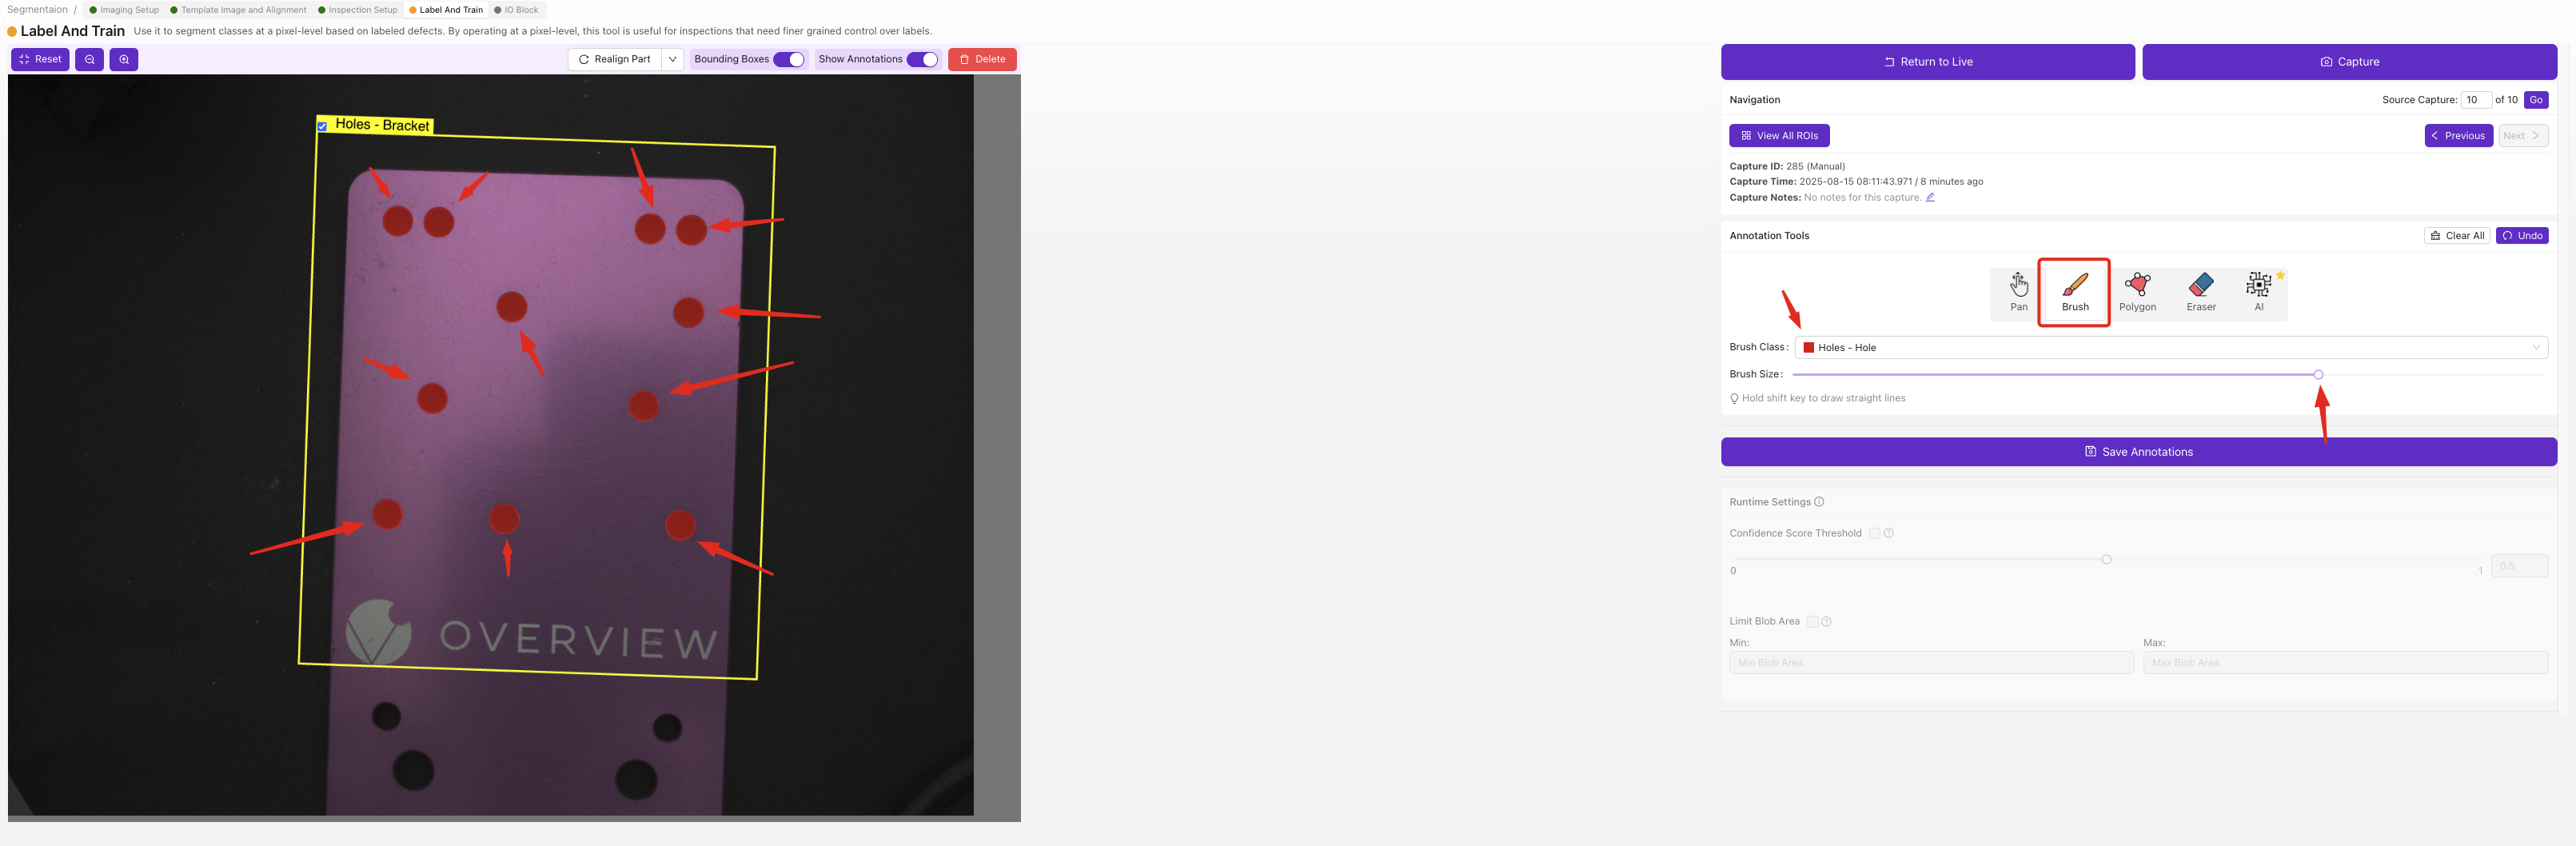
For each ROI in each image, use the brush tool to paint the defective areas pixel by pixel. The painted regions are what the AI learns to detect — anything you don't paint is treated as background.
Segmenter labels require pixel-level brushwork, which is slower than classifier dropdown selections but gives you precise defect maps with location and shape. Start with a small set of clearly-defined defects, and only add more classes once your first model is working.
4. Train the model
- Classifier
- Segmenter
Click Train. The classifier offers two training modes:
- Fast mode — about 30 seconds to a minute. Best for quick iteration during setup, sanity-checking your labels, and easy/well-separated parts. Accuracy is lower than production mode but it lets you see the signal fast.
- Production mode — takes longer but produces a noticeably more accurate model. Always use Production mode before deploying to the line. For tricky parts, hard-to-distinguish defects, or anything you'll trust in production, Production mode is the right answer.
A good rhythm: iterate in Fast mode while you're cleaning up labels and adding data, then run Production once the result looks good — and again before deploying.
Click Train. Segmentation has only one training mode — Production — because pixel-level masks need the more thorough training pass to be reliable. Training time scales with the number of images and the number of ROIs you've labeled, so a small initial set (10-15 images per class) trains in a few minutes; bigger datasets take longer.
There's no "fast" sanity-check option here, so make sure your labels are clean before you train (use View All ROIs to review every mask).
Segmenters only learn the size and texture of defects they were shown. If your training set has nothing but small contaminants and then a large piece of the same defect class arrives in production, the model will outline only the parts of the large defect that resemble the small examples — leaving the bulk of it uncovered. The mask looks patchy or only marks edges and corners of the real defect.
Fix: include training examples that span the full range of defect sizes you expect on the line. A handful of large-contaminant captures alongside your small ones is usually enough. Same principle applies to texture and color variation — train on the variety you'll see.
Don't have large-defect samples? Use the Defect Creator Studio to generate synthetic training images of the same defect at different sizes, locations, and orientations — no need to wait for a real large contaminant to come down the line.
5. Test with Live Preview
Click Live Preview Mode and run parts through. Watch the results:
- Is it getting easy cases right?
- Where does it struggle?
- What are the borderline cases?
Try to break it. Find the cases where it fails. These failures are your roadmap for improvement.
- Classifier
- Segmenter
The Test panel shows the predicted class and confidence score for each ROI. Run a few captures through and look for low-confidence verdicts (often under 70%) — those are your borderline cases and the parts most worth labeling next.
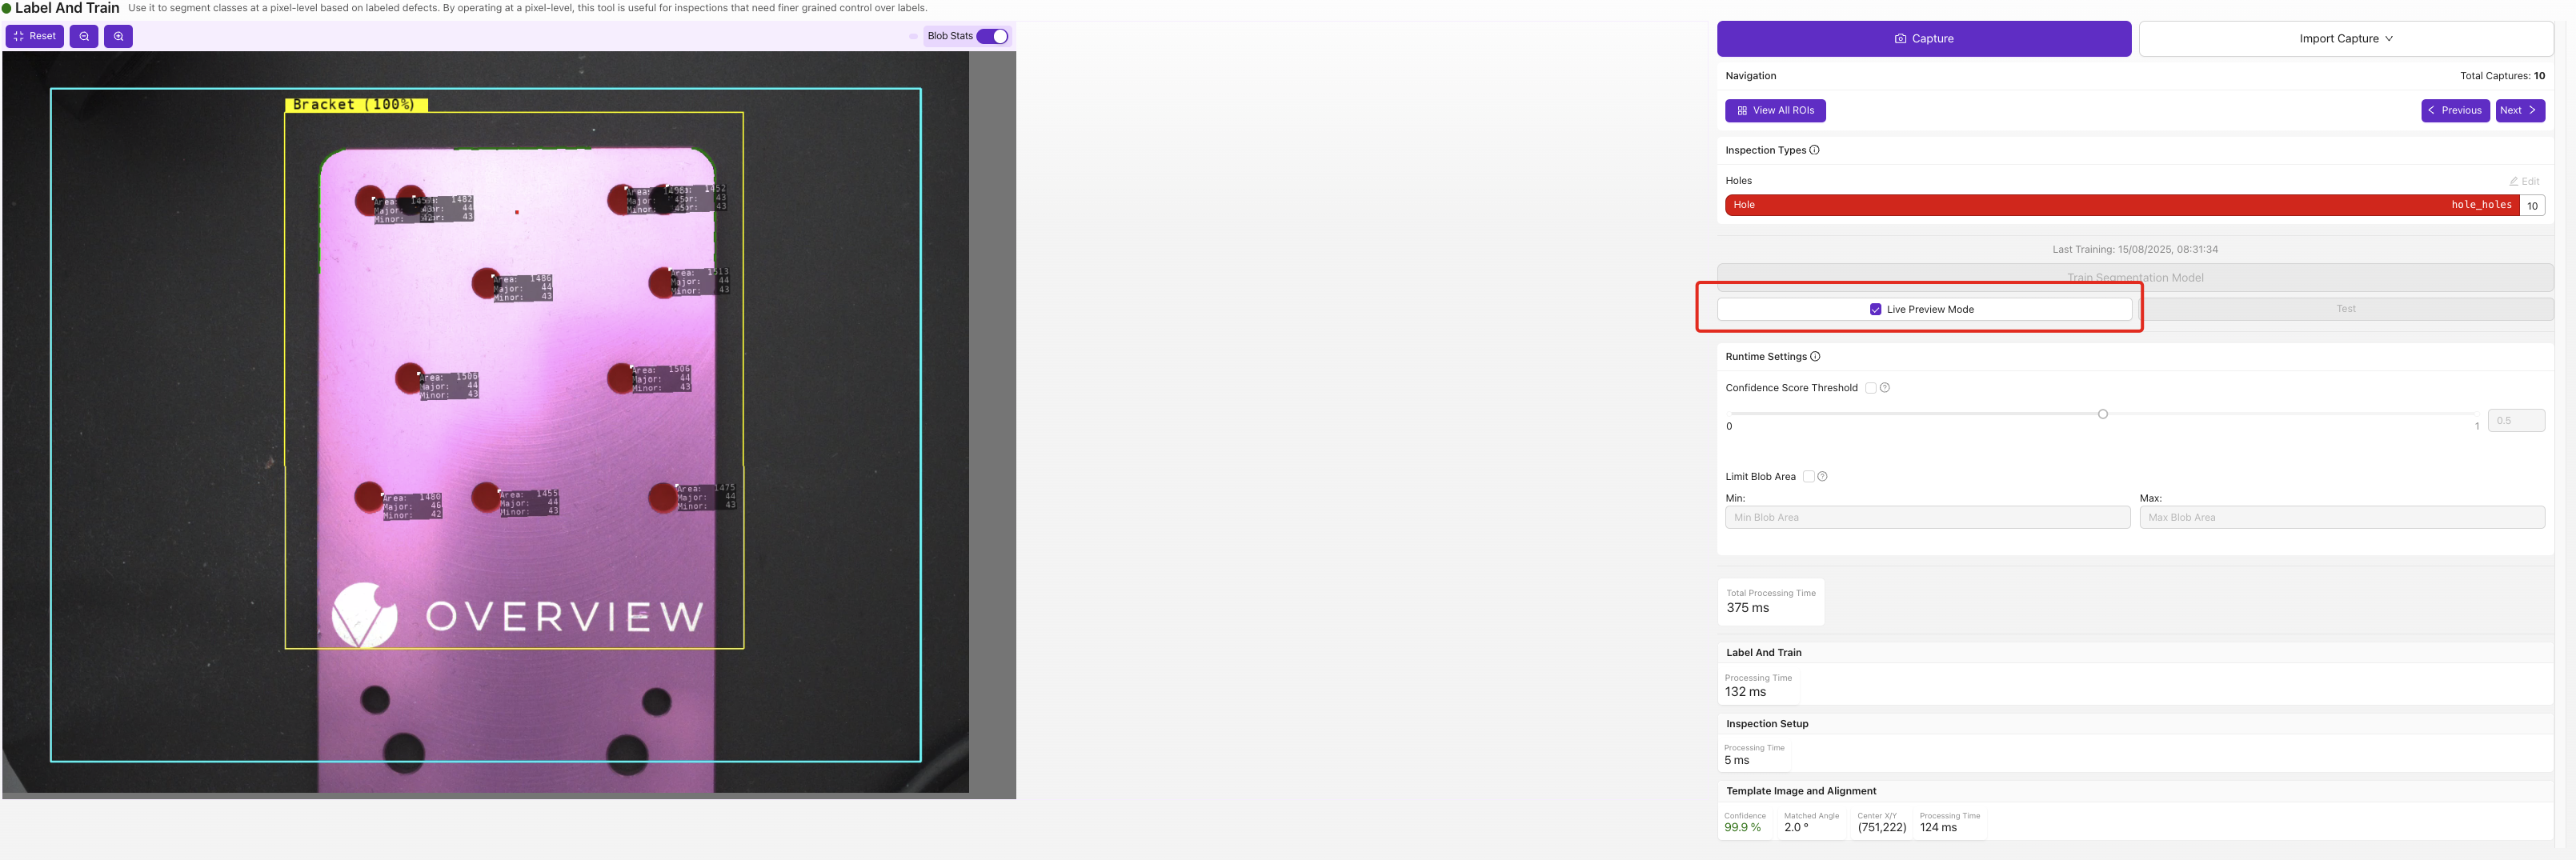
Live Preview overlays the predicted defect mask directly on the image. Watch for masks that are too small, too large, or appearing where there's no real defect — those are the failure modes you'll target with the next round of labeled data.
6. Add targeted data
Don't add random new images. Add images specifically targeting the failure modes you found:
- If it confuses scratches with reflections, add more examples of both
- If it misses small defects, add more images of small defects
- If it fails on parts in the corners, add more corner examples
7. Retrain and retest
Repeat steps 4-6 two to four times. Each iteration should improve accuracy. For a deeper walkthrough — including how to add new images to an existing model without losing your previous training — see Adding Data & Retraining.
Augmentations: teaching the AI to handle variation
Augmentations randomly modify your training images during the training process — adjusting brightness, adding rotation, tweaking contrast, etc. Each image gets fed to the AI hundreds of times with slightly different augmentations, but the label stays the same. This is how you make a model robust to real-world conditions without having to capture an example of every possible variation.
What to turn on by default
A small amount of brightness variation is almost always worth turning on — even the most controlled factory has overhead lights that flicker, shadows that shift through the shift, and minor LED drift over time. Brightness augmentation makes the model resilient to all of that essentially for free.
Rotation: useful, but watch your ROI shape
Rotation augmentation is great if your parts can actually arrive at different angles (loose screws on a conveyor, hand-placed parts, anything not held in a fixture). But it interacts with ROI shape:
- Square ROI: rotation augmentation works cleanly — the rotated image still fits inside the ROI box.
- Non-square ROI on a classifier: rotation can clip the image. When a tall, narrow ROI gets rotated 45°, the corners of the rotated content fall outside the box and the model trains on a partial image. If your part can rotate, either make the ROI square or rely on the Aligner to handle rotation upstream so you don't need rotation augmentation here.
- Segmenter: the same clipping concern applies, but segmentation is less sensitive because it learns from pixel masks rather than the whole ROI shape.
When NOT to use a specific augmentation
The general rule: don't augment the property you're inspecting. If you're trying to detect orientation, rotation augmentation will teach the model that upside-down parts are still "good."
- Inspecting for color consistency? Don't use saturation augmentation.
- Inspecting for blur/focus? Don't use motion blur augmentation.
- Inspecting for orientation? Don't use rotation augmentation (and probably don't use the Aligner either).
Data diversity matters
Your training data should represent the full range of what the AI will see in production:
- Different times of day (if lighting varies)
- Different part batches (surface finish may vary slightly)
- Parts in different positions within the frame
- Both easy and hard cases
Focus on the hardest cases. If your training data includes the 10 most difficult-to-classify parts, then the 90% of easy parts will be trivial for the AI.
High learning capacity
The OV camera's AI is designed to keep improving with more data. Unlike many AI systems that plateau after 20 images, this model continues to improve with 50, 100, even 500+ images. Most inspections work great with 5-10 images, but if you have a complex multi-defect problem, don't hesitate to keep adding data.
Accelerate with synthetic data: Defect Studio
What if you need to train for a defect you rarely see? A missing screw you'd have to intentionally remove, a scratch you'd have to create, a crack that happens once per thousand parts? Waiting months to collect enough examples isn't practical.
The OV Auto-Defect Creator Studio at tools.overview.ai solves this. It generates photorealistic synthetic defect images, up to 10,000x faster than waiting for real defects to appear on the production line.
How it works: 5 simple steps
- Upload a good image of your part
- Mark the area where the defect should appear
- Describe the defect in plain English (e.g., "deep scratch across the surface" or "missing solder joint")
- Generate the defect variations (the AI creates photorealistic results)
- Export the synthetic images directly into your training set
Why synthetic data works
The generated images aren't just "pasted on" artifacts. They're photorealistic variations that match your actual lighting, camera angle, and part surface. The AI understands the physics of how defects look under your specific imaging conditions.
Use cases:
- Rare defects: Train for failure modes you've never (or rarely) seen
- New product launches: Build an inspection before the first defective part rolls off the line
- Edge cases: Generate borderline examples to improve the AI's decision boundary
- Data augmentation: Supplement small datasets with synthetic variety
See it in action
The best approach: train with your initial 3-5 real images first, identify where the AI struggles, then use Defect Studio to generate targeted synthetic examples for those specific failure modes. Real data teaches the baseline; synthetic data fills the gaps.
Training checklist
Before moving on, confirm:
- Initial images captured, 10-15 per class minimum
- All labels double-checked (View All ROIs)
- Trained and tested with Live Preview
- Failure modes identified and targeted data added
- 2-4 iterations of label → train → test completed
- Results meet expectations
Model trained and looking good? Move to Step 5: Setting Up Outputs.