AI-POWERED DOCS
What do you want to know?
Create Your First Recipe (OV20i)
This is where your camera becomes an AI inspector. A recipe is a complete package (image settings, alignment, regions of interest (ROIs), AI model, and output rules) bundled together for one specific inspection task.
You can have as many recipes as you want on a camera. Each one can be saved, backed up, transferred to other cameras, and version controlled.
Before you start: remember the waterfall
Everything in this section follows the Waterfall Principle. You'll go through six steps in order. Don't skip ahead. Verify each step works before moving to the next.
Image Settings
Exposure, Gain, LEDs
Template & Aligner
Capture, Align
Regions of Interest (ROIs)
Draw ROIs
AI Training
Label, Train
Output Rules
Pass/Fail, IO
Deploy!
Activate, Verify
Choose a recipe type
Each recipe uses one model type, a classifier or a segmenter. Pick based on the decision you need:
What do you want this recipe to do?
Each OV20i recipe uses one model type. Pick based on the question you need answered. You can change this later.
Decide whether each part, or each region of interest, belongs to a category.
Best for: verdicts and known categories, where the answer is one label per region.
Find and outline features, defects, or regions at the pixel level.
Best for: locating, measuring, or counting features whose shape and position matter.
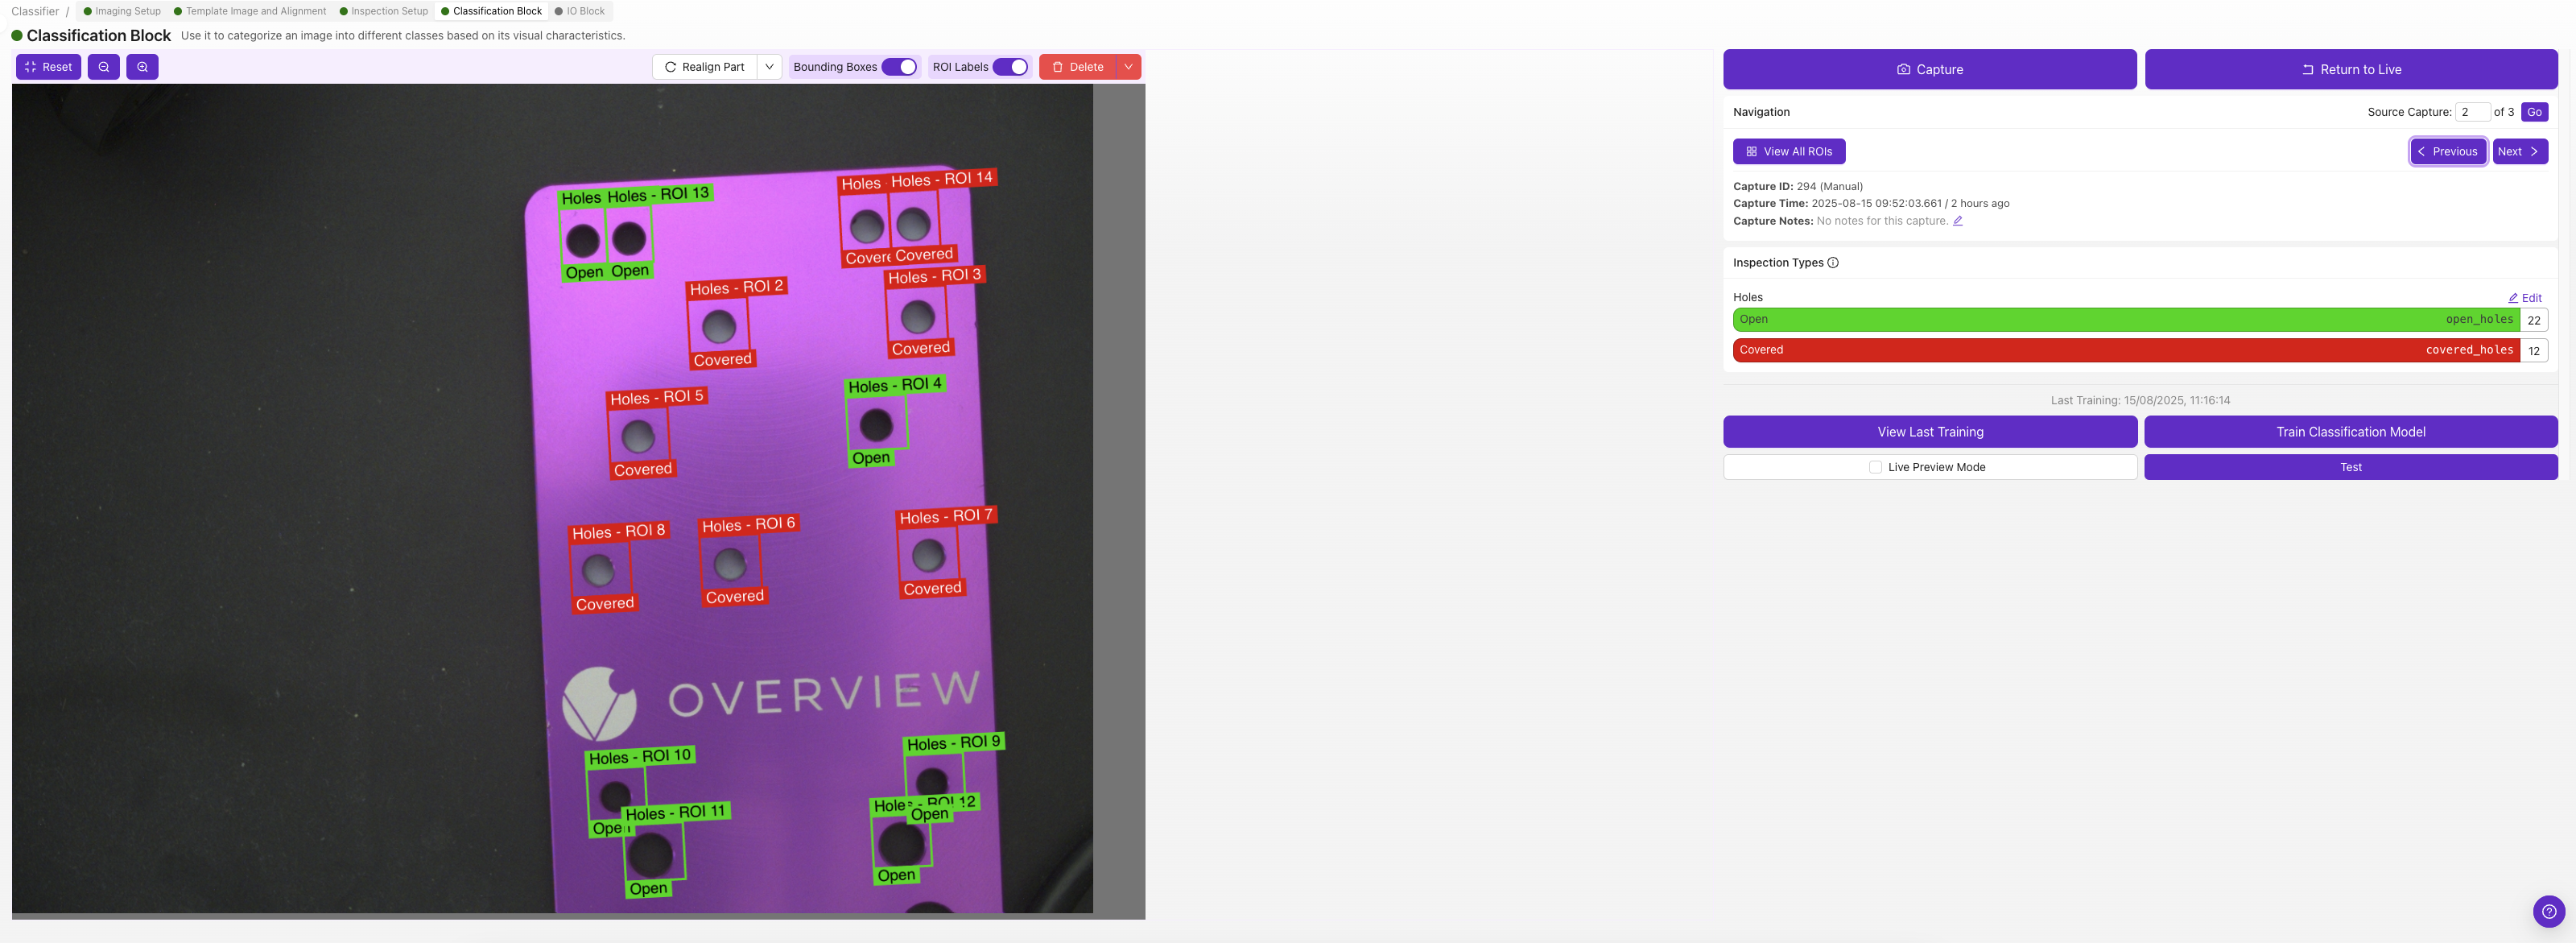
Classification, in 60 seconds
Read Understanding Classifier →A classifier looks at each region you draw and assigns one label from a list you define. The model returns one verdict per ROI: this region is a "pass", or "missing", or "scratched". Most OV20i recipes start here.
Example, missing fastener
Four ROIs over four screw locations. Two classes: present and missing. The model returns one label per ROI.
Example, surface pass / fail
One ROI over the panel surface. Two classes: clean and blemished. The model returns one label for the panel.
Want a side-by-side breakdown? See Classifier vs. Segmenter. Want a deeper walkthrough of either model type? Read Understanding Classifier for verdicts and labels, or Understanding Segmenter for pixel-level masks, counts, and measurements.
Choose either a classifier OR a segmenter per recipe (not both). The OV10i supports classifiers only. Segmentation requires an OV20i.
Not sure which to choose? See Classifier vs. Segmenter or ask the AI Assistant at tools.overview.ai.
The OV20i supports both classifiers and segmenters, but each recipe uses one type per inspection. Choose based on your inspection needs. If you need both pixel-level detection and classification in the same capture, consider the OV80i which supports multi-model recipes.
See the aligner in action
Alignment (Step 2) is the make-or-break step for accuracy. Before you build your recipe, play with the simulator: toggle the aligner off, then move the sliders to shift and rotate the part, and watch the inspection boxes lose tracking.
Camera Settings
Simulate Real World
Move the part coming down the line.
Legend
Build the recipe
The OV20i web interface was redesigned in v2026.5. Check your software version in the top-right corner of the camera UI and pick the matching tab. Your choice carries across every page in this setup flow.
- Older versions
- v2026.5 and newer
Create a new recipe
- Go to All Recipes in the left sidebar (this is also the landing page when you open the camera).
- Click + New.
- Give it a name (for example, "Screw Presence Check").
- Choose the recipe type (Classification or Segmentation).
- Click Activate to enter the recipe editor.
![]()
The Recipe Editor groups everything into three sections (Imaging Setup, AI Blocks, IO Block) that map directly to the waterfall steps:
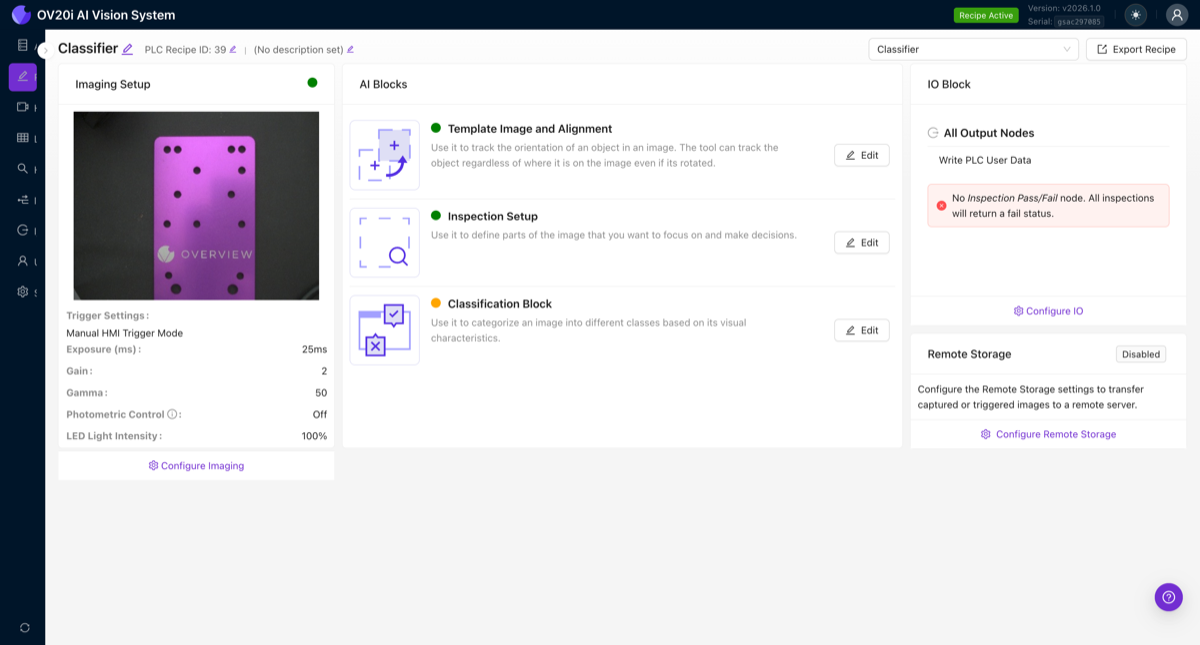
Now work through the six steps in order.
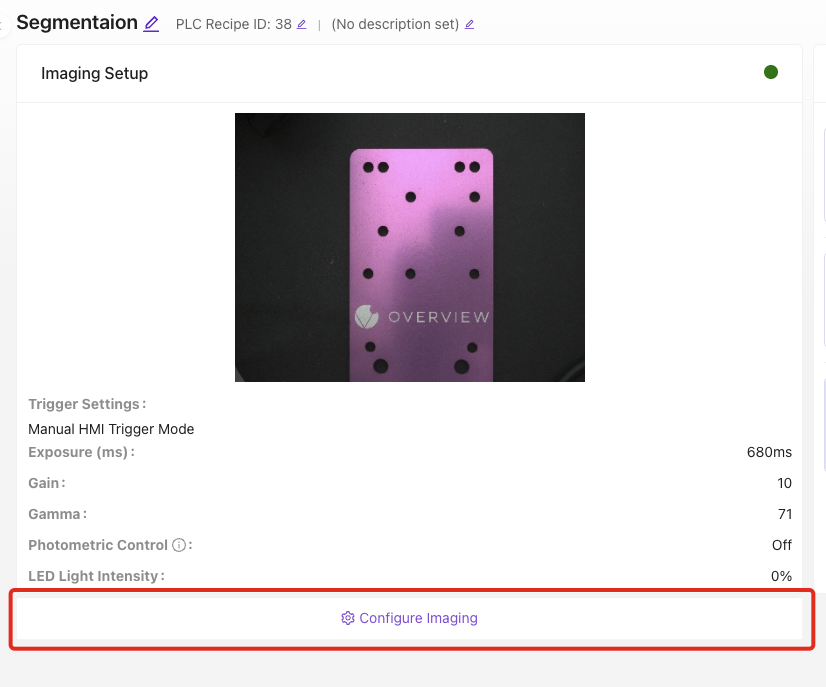
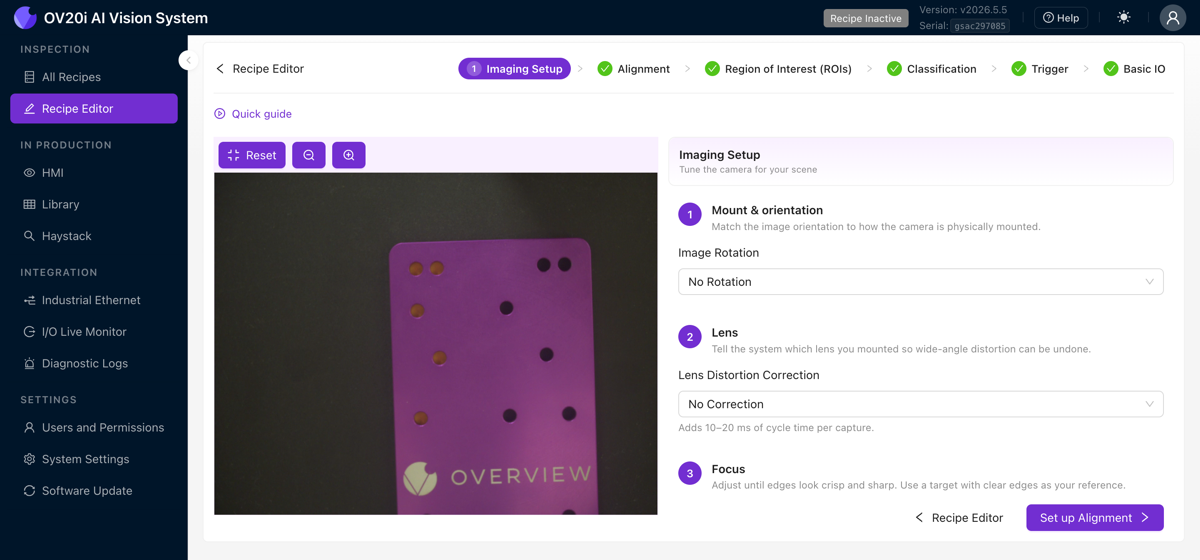
Step 1: Image Settings
Get your camera image clean and consistent: exposure, gain, white balance, and lens distortion correction if you use a wide lens.
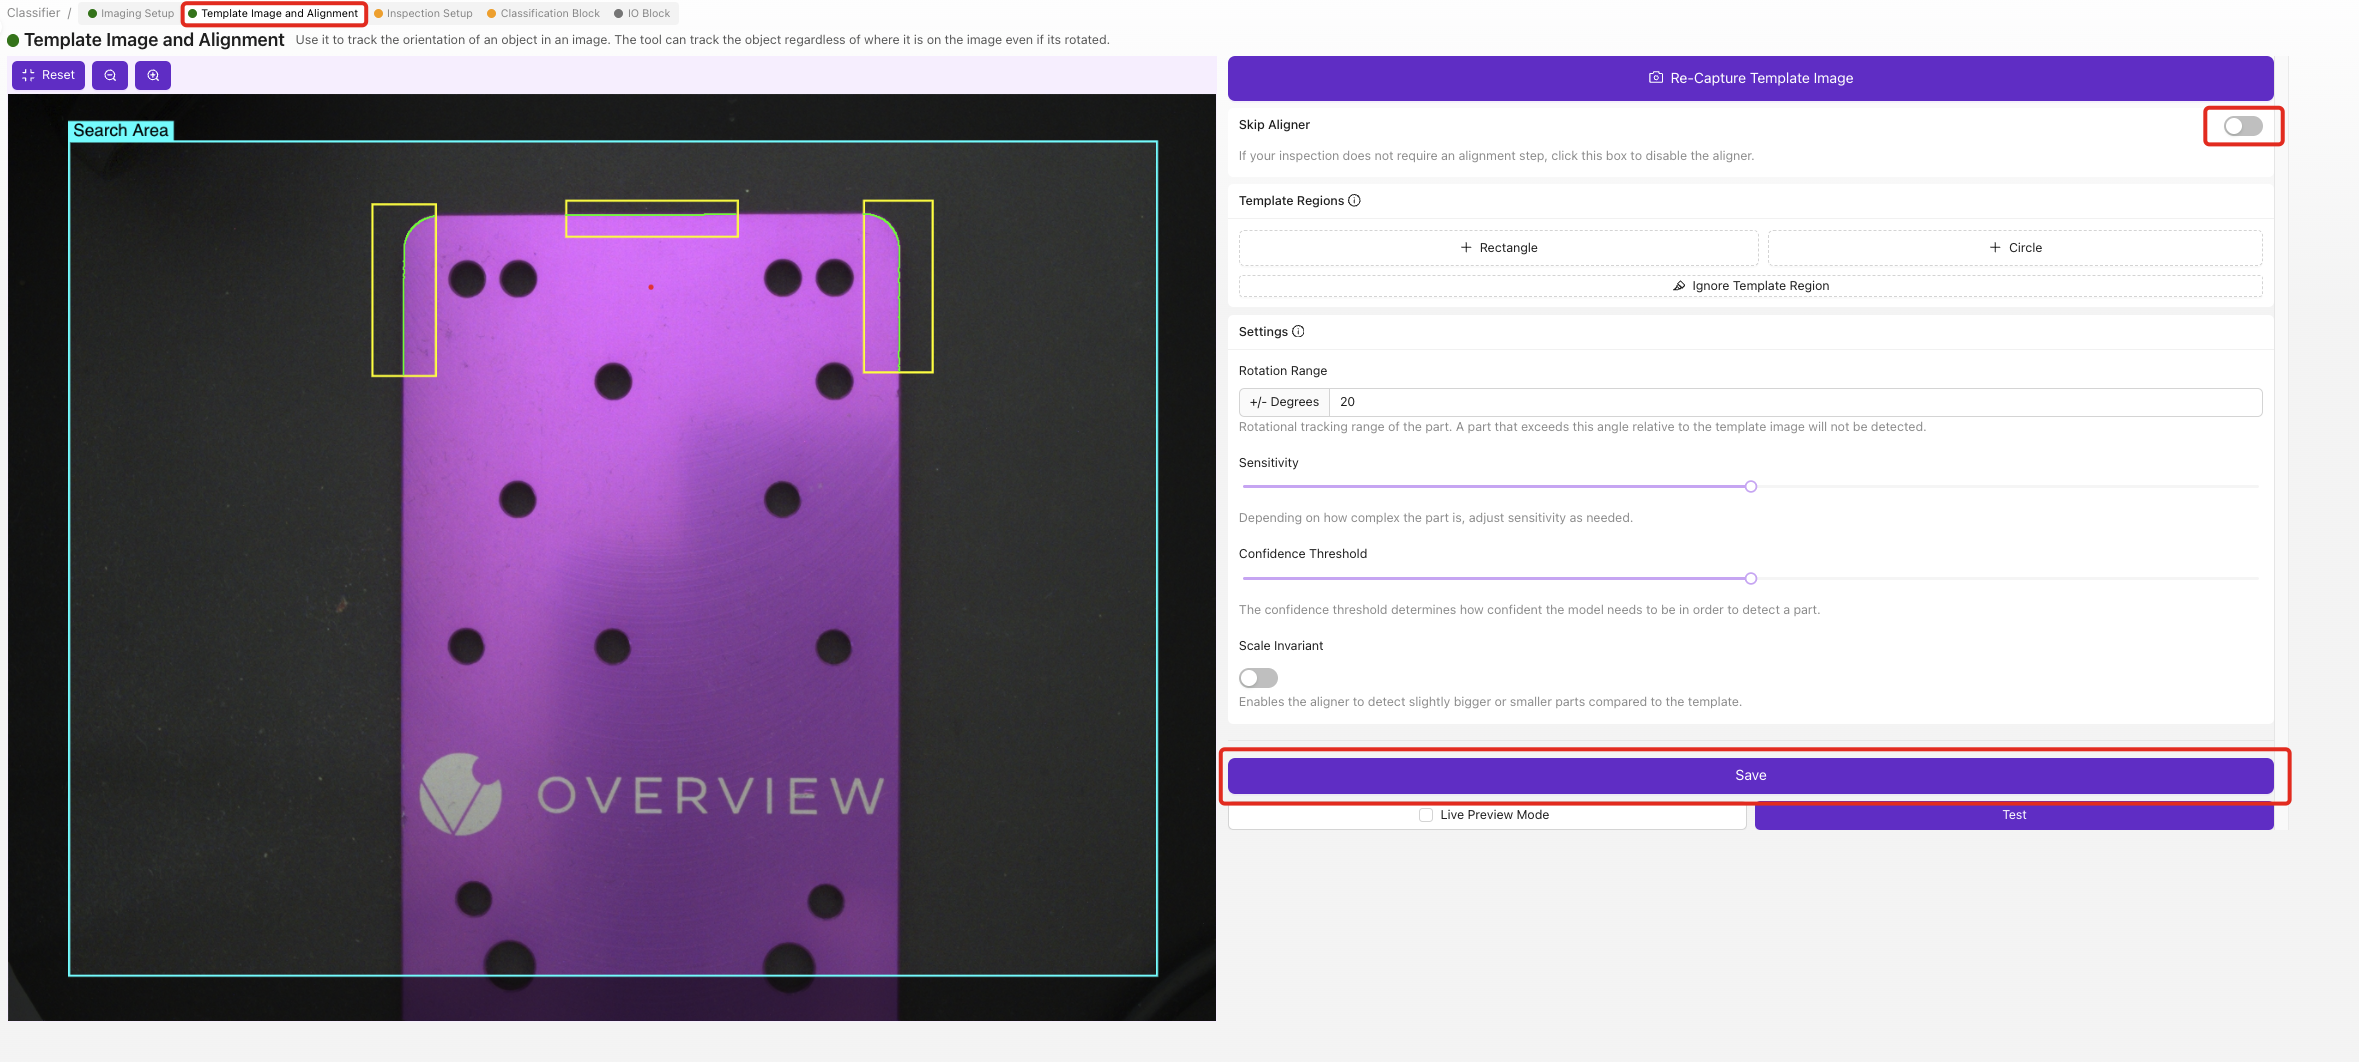
Step 2: Template Image & Alignment
Capture a template image of a good part, place 2 to 3 small template regions on features that never change, clean up noisy edges, then test that the aligner tracks the part.
Never anchor the aligner to defects, labels, stickers, or anything that can move independently of the part. Only align to permanent, rigid features (machined edges, drilled holes, PCB outlines).
Full guide: Alignment Explained
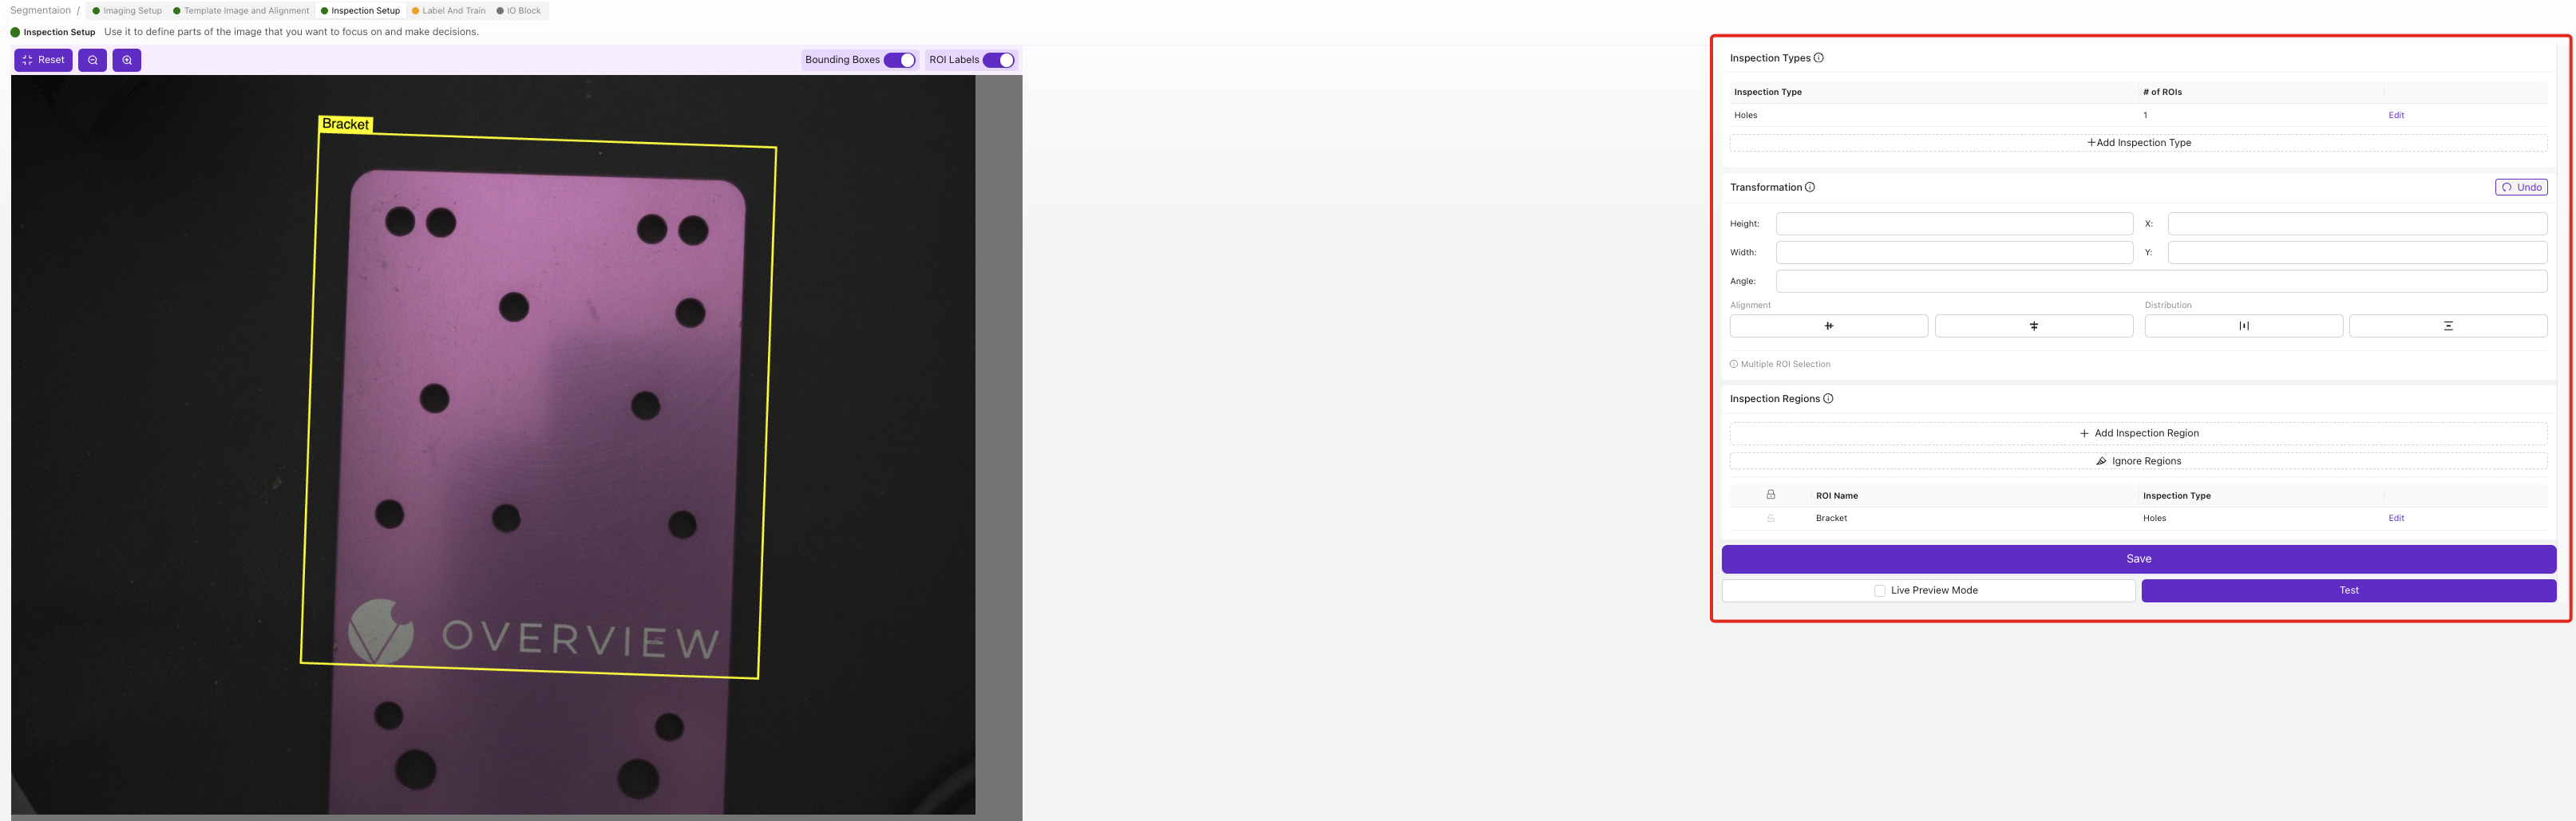
Step 3: Regions of Interest (ROIs)
Draw the areas the AI inspects. Keep them as small as possible; see Why ROI Size Matters.
Full guide: Regions of Interest (ROIs)
Step 4: Train Your AI Model
Label 10 to 15 images per class, double-check every label, train, test with Live Preview, then add targeted data where it fails.
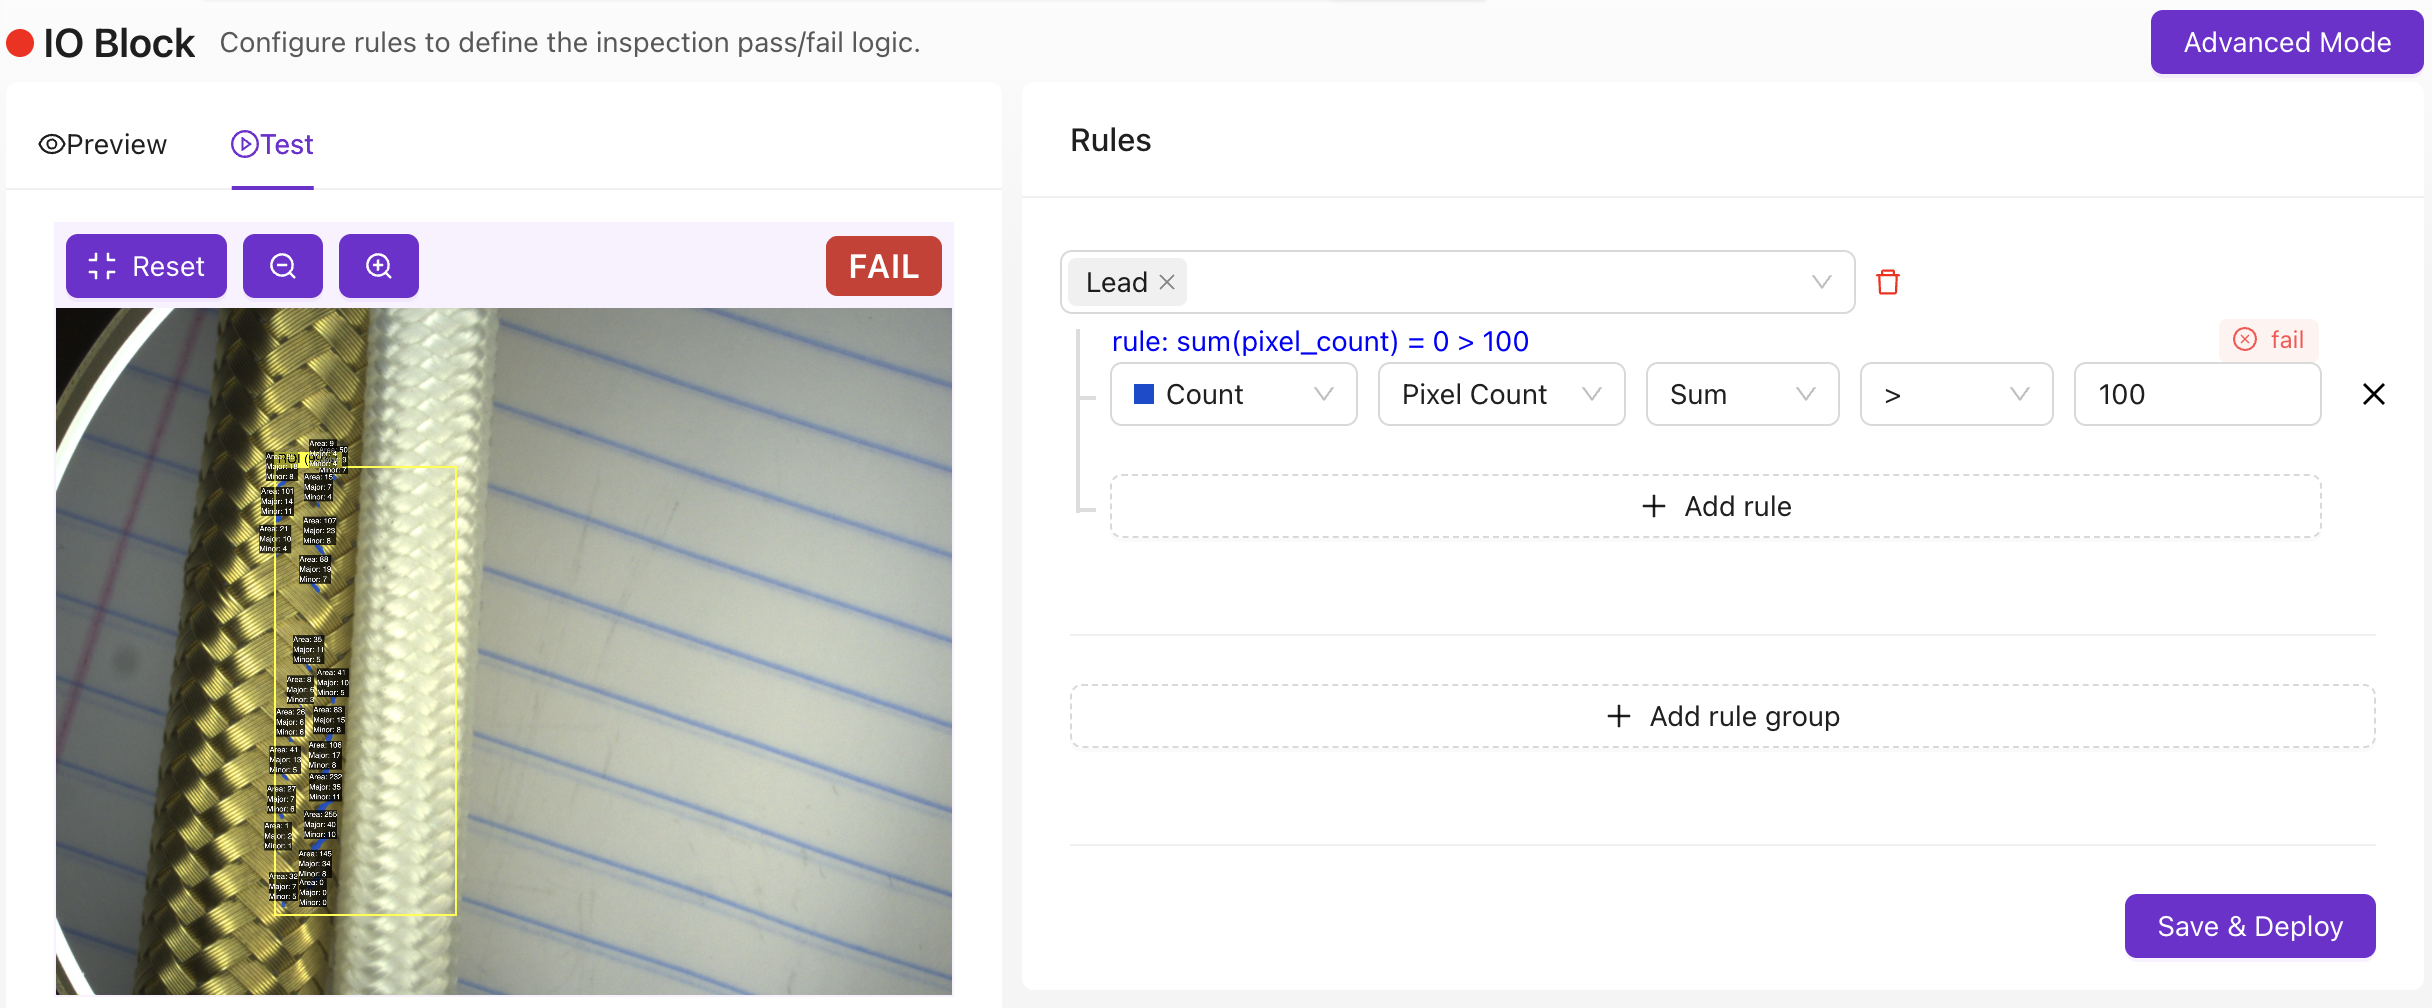
Step 5: Output Rules
Set the pass/fail rules in the IO Block (Basic mode), or open Advanced mode (Node-RED) for anything more complex.
Full guide: Setting Up Outputs
Step 6: Deploy and verify
Activate the recipe, set the trigger mode, run test parts, and confirm the pass/fail output matches expectations, including on the hardest parts.

Create a new recipe
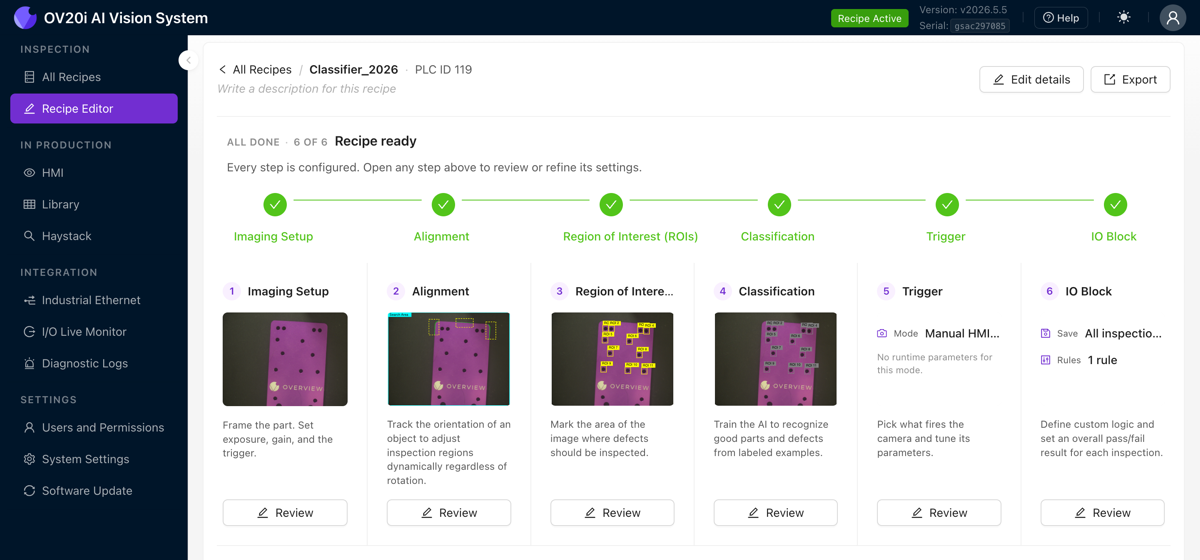
Start from the All Recipes page (the landing page when you open the camera). Each recipe is a card showing its thumbnail, model type, PLC Recipe ID, and trigger mode.

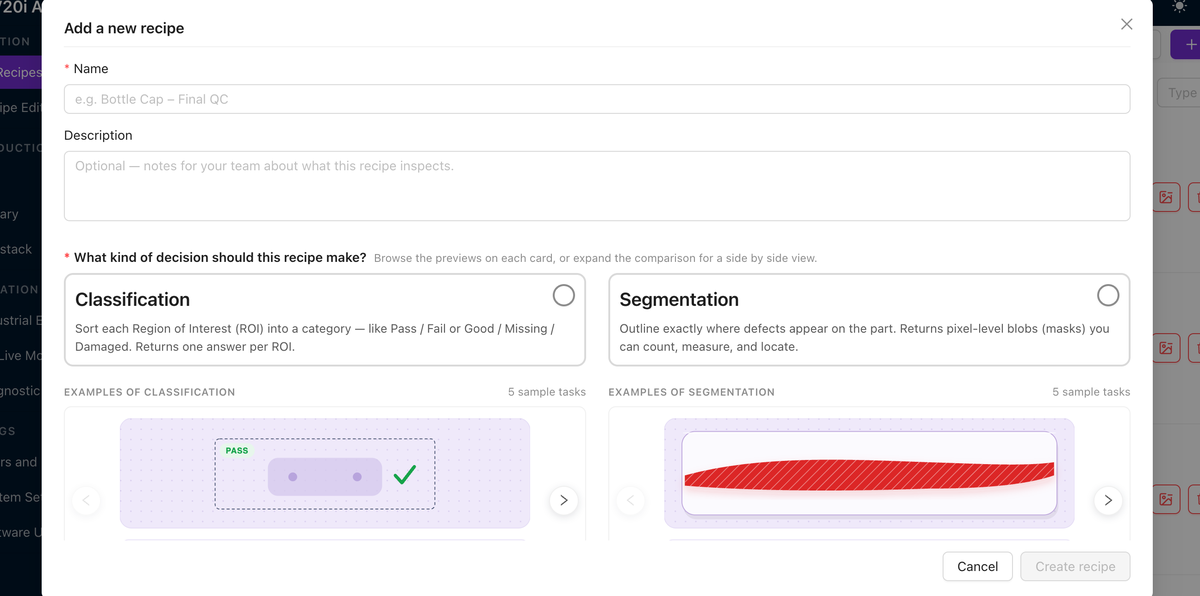
Click + New to open the Add a new recipe dialog, then:
- Enter a Name (for example, "Bottle Cap, Final QC") and an optional Description.
- Under What kind of decision should this recipe make?, choose Classification (one answer per ROI) or Segmentation (pixel-level masks).
- Click Create recipe.
The recipe opens in a guided six-step wizard. Click Review on any step (or a step in the tracker), and use Back and Next to move between them.
Step 1: Image Settings
Frame the part, then dial in exposure, gain, focus, and lighting until the image is sharp, well-lit, and consistent.
Step 2: Alignment
Capture a reference image, add 2 to 3 template regions on features that never change, clean up extra edges with the mask tool, then watch the aligner lock on in Live Preview.
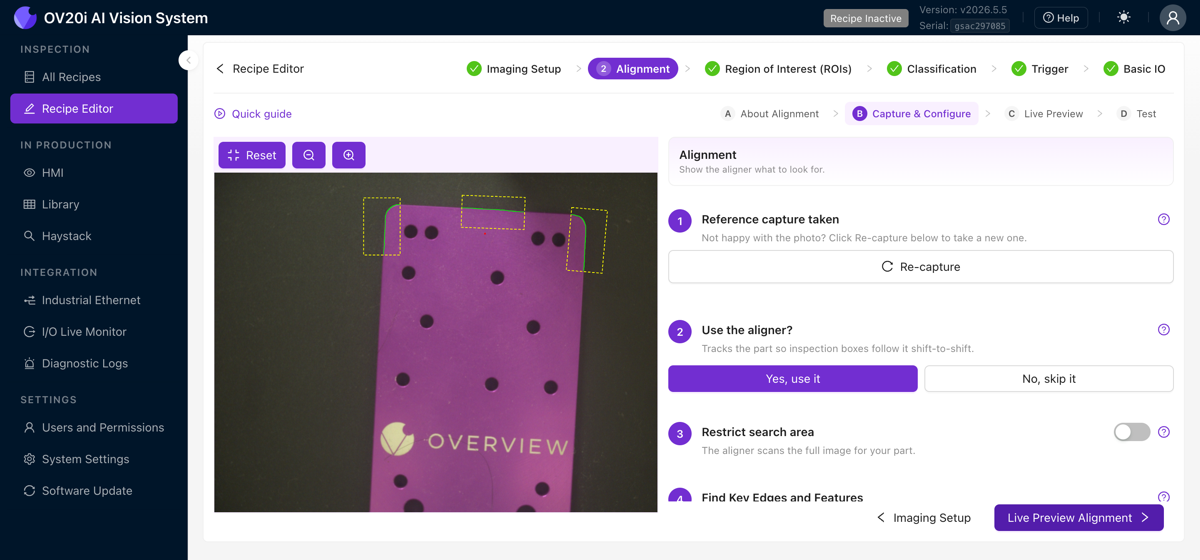
Never anchor the aligner to defects, labels, stickers, or anything that can move independently of the part. Only align to permanent, rigid features (machined edges, drilled holes, PCB outlines).
Full guide: Alignment Explained
Step 3: Region of Interest (ROIs)
Define inspection types and classes, then draw the regions the AI inspects. Keep them small; see Why ROI Size Matters.

Full guide: Regions of Interest (ROIs)
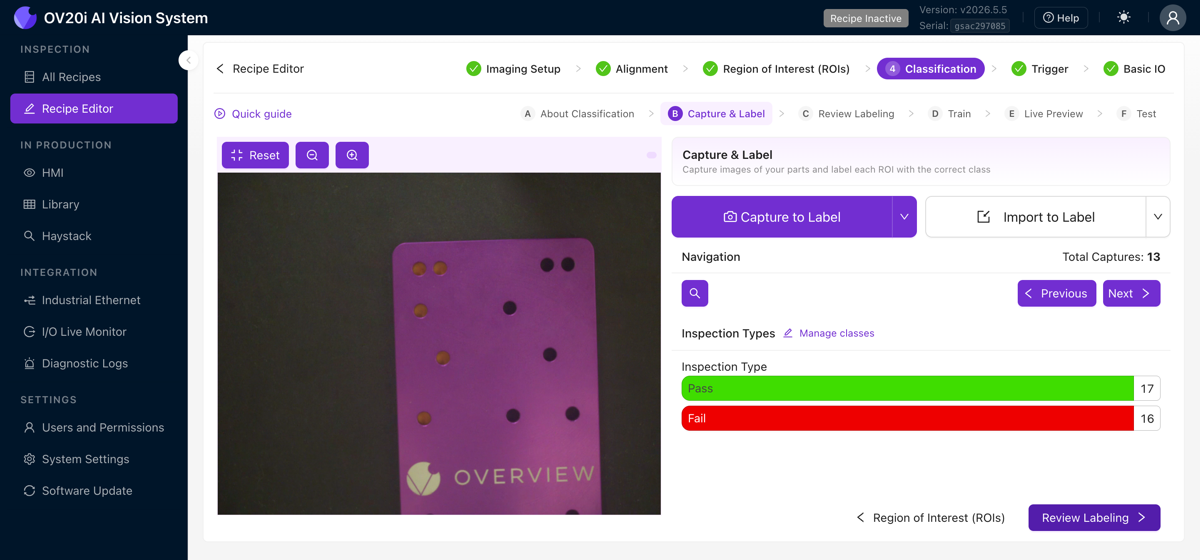
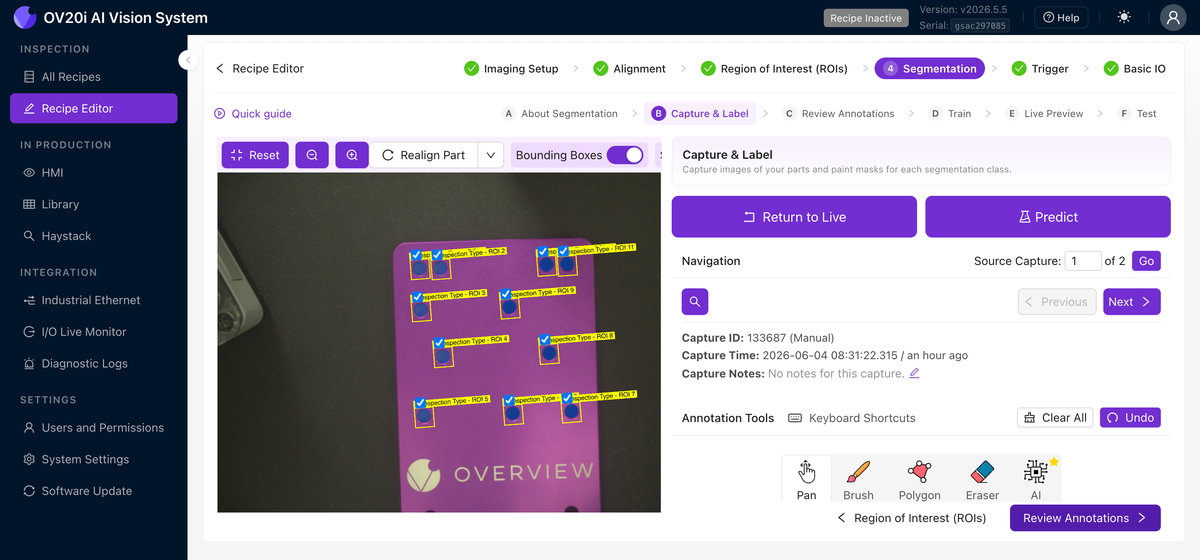
Step 4: Classification or Segmentation
This step is named after the model type you picked: Classification for a classifier, Segmentation for a segmenter. Either way you capture images, label them, train, and test.
- Classifier: assign a class to each ROI, then train (a fast preset for iterating, Production for the model you deploy).
- Segmenter: paint a mask over each defect, then train (Production only).
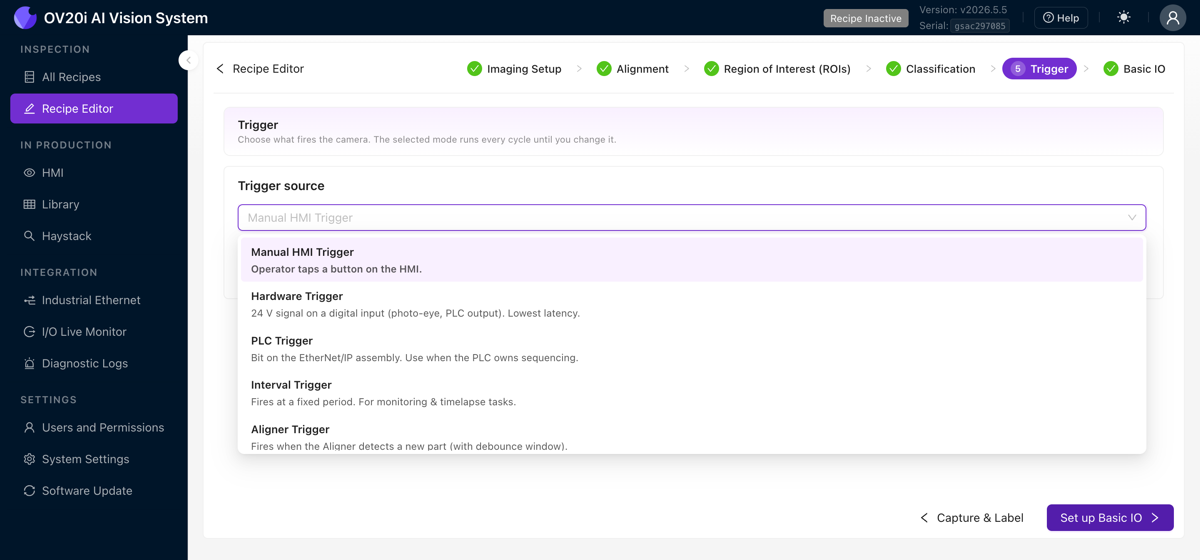
Step 5: Trigger
Choose what fires the camera (Manual, Hardware, PLC, Interval, or Aligner) from the Trigger source dropdown.
Step 6: IO Block and deploy
Build the pass/fail rules in the Basic IO block, map the digital outputs if you need them, then activate the recipe from the All Recipes page. The editor header shows when all steps are configured and the recipe is ready.
Recipe checklist
Before moving on, confirm:
- New recipe created and named
- Image settings configured: sharp, well-lit, consistent
- Alignment set up and tracking reliably
- Regions of Interest (ROIs) drawn: small, well-positioned, named
- AI model trained and tested with Live Preview
- Output rules configured: pass/fail matches expectations
- Recipe activated and deployed with correct trigger mode
What's next?
- Improving Your Model: How to keep your AI getting better over time
- Troubleshooting & FAQ: Common issues and quick fixes
- Classifier vs. Segmenter: Detailed guide on when to use which