AI-POWERED DOCS
What do you want to know?
OCR (Optical Character Recognition)
The OV80i can read printed text, serial numbers, date codes, and other alphanumeric characters directly from camera images using a pre-trained OCR model. Unlike classifiers and segmenters, OCR requires no training data. It works out of the box.
OCR is useful when you need to:
- Verify serial numbers or lot codes match expected values
- Confirm labels are present and readable
- Read date/expiration codes for traceability
- Check part numbers on components during assembly
OCR is available exclusively on the OV80i. The OV20i and OV10i do not support OCR.
How OCR Works
The OV80i uses a two-stage AI pipeline for text recognition:
- Text Detection: Finds where text is located within the ROI. Returns bounding boxes around each detected word or text region.
- Text Recognition: Reads the characters inside each detected bounding box and returns the text string with a confidence score.
This entire process runs on the camera's NVIDIA Jetson Orin NX GPU. No cloud connection is needed.
The model recognizes a broad character set including:
- Digits (0-9)
- Latin letters (A-Z, a-z, accented characters)
- Common punctuation and symbols
- Greek letters
- Currency symbols
- Mathematical operators
The character set is fixed and cannot be customized. The model supports approximately 480 characters covering most printed industrial text in Latin-based languages.
Prerequisites
Before setting up OCR, you need a camera that is:
- Physically mounted and stable
- Connected to your network and accessible in a browser
- Focused on the part with the text you want to read
If you haven't done this yet, follow the getting started guides first:
Step 1: Create a New Recipe
Every inspection starts with a recipe. A recipe is a complete package: image settings, alignment, regions of interest (ROIs), AI models, and output rules.
- Navigate to All Recipes in the left sidebar
- Click + New in the top right
- Give your recipe a descriptive name (e.g., "Serial Number Check", "Label Verification")
- Click Activate to make it the active recipe, then click Edit to open the Recipe Editor
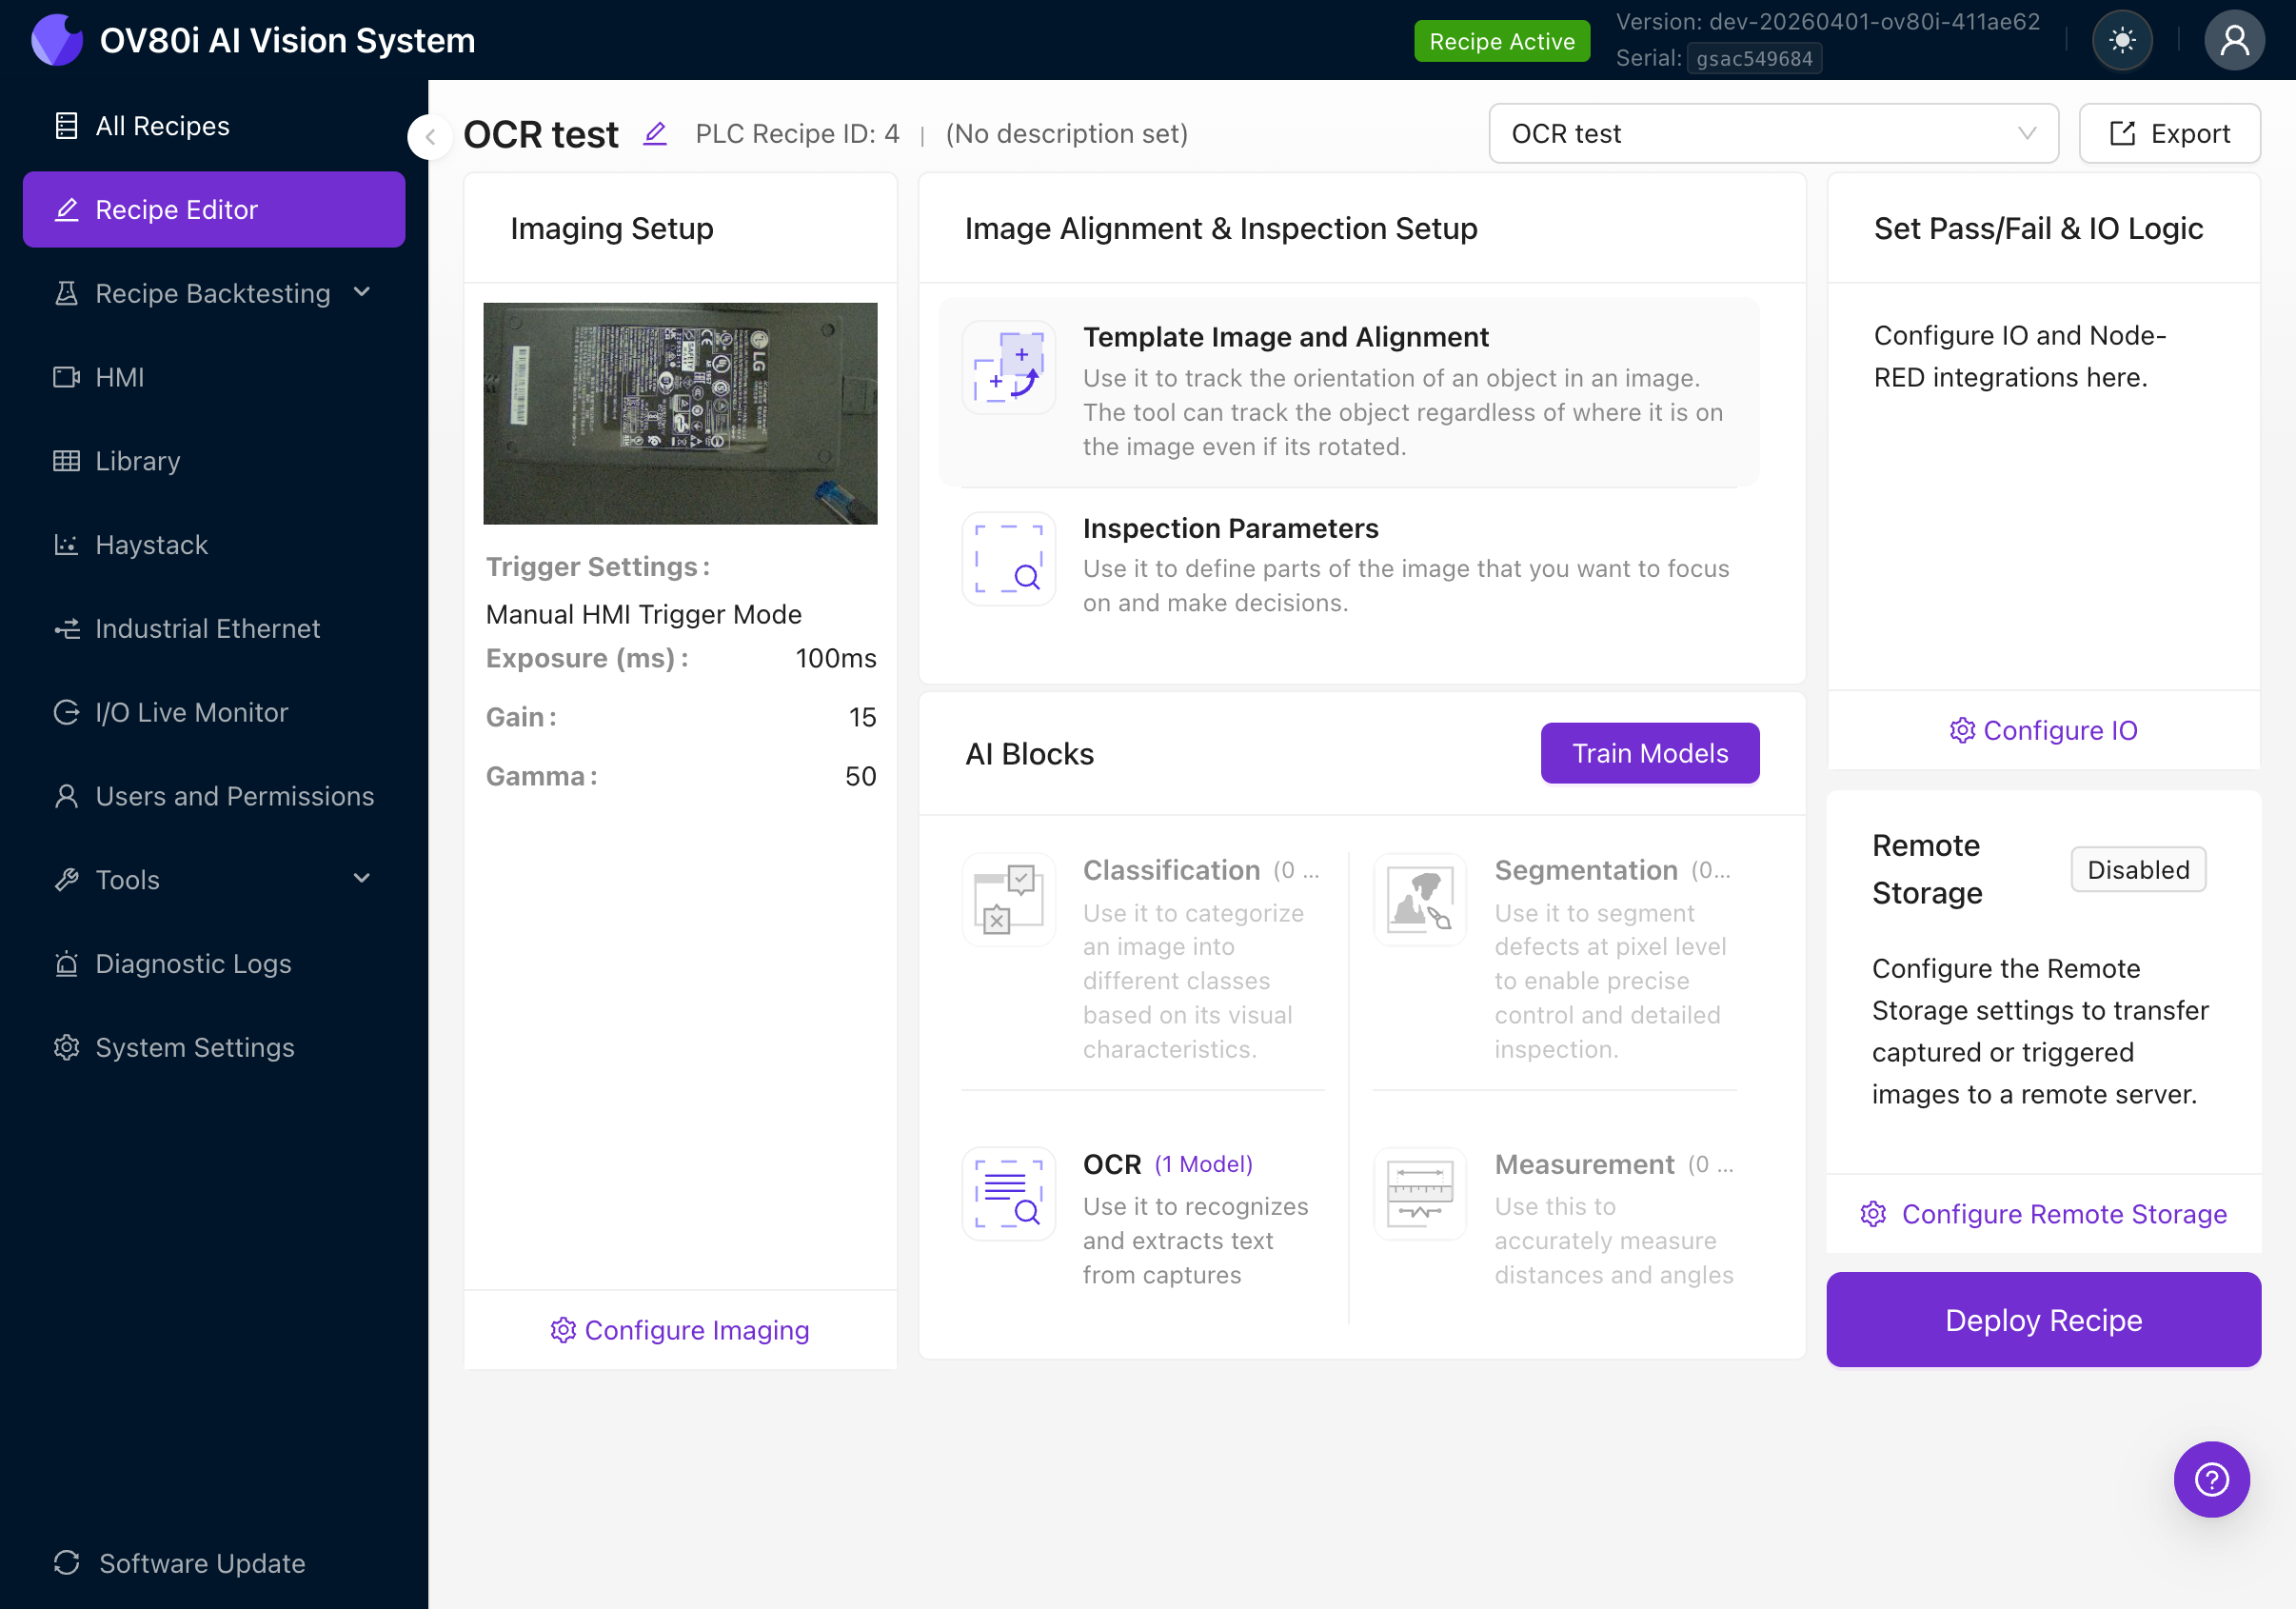
The Recipe Editor shows the full inspection pipeline. You'll work through it left to right:
- Imaging Setup (camera settings)
- Image Alignment & Inspection Setup (template, ROIs)
- AI Blocks (Classification, Segmentation, OCR, Measurement)
- Set Pass/Fail & IO Logic (output rules)
For a detailed walkthrough of recipe creation, see Create First Inspection.
Step 2: Configure Image Settings
Good image quality is the foundation of accurate OCR. Text must be clearly visible with strong contrast.
- Click Configure Imaging or navigate to the Imaging Setup tab
- Adjust the following settings while watching the live preview:
| Setting | Goal for OCR |
|---|---|
| Exposure | Bright enough to clearly see all text. Too dark and characters disappear into the background. Too bright and white labels blow out. |
| Gain | Keep as low as possible. High gain introduces noise that looks like text artifacts to the detector. |
| Gamma | Adjust to improve contrast between text and background. |
| Focus | Text must be sharp. If characters look blurry or fuzzy, adjust the C-mount lens focus ring. |
OCR accuracy depends heavily on image quality. The text must be clearly visible in the camera image with good contrast against the background. Dark text on a light background or light text on a dark background both work well. Avoid:
- Uneven lighting that creates shadows across characters
- Glare on glossy labels
- Under-exposure that makes text hard to distinguish from the background
Zoom in on the text area in the live preview. Can you read every character clearly? If you can't read it, the AI can't either.
For a detailed guide on all imaging settings, see Image Settings.
Step 3: Set Up Template Alignment
Template alignment tells the camera how to track your part's position and orientation. This is essential because parts don't always land in the exact same spot on the conveyor or fixture.
- Navigate to the Template Image and Alignment tab
- Place your part in the camera's field of view
- Click Capture Template to take a reference image
- Draw 2-3 small template regions on features that are always present and easy to identify (e.g., corners, logos, mounting holes)
Place template regions as far apart as possible on the part. This dramatically reduces angular jitter in the alignment. Two regions close together give poor rotational stability; two regions on opposite corners give excellent stability.
If you skip alignment, your OCR ROIs will be fixed to absolute pixel positions. Any movement of the part will cause the ROI to miss the text. Always set up alignment for production use.
For a detailed guide on template alignment, see Alignment.
Step 4: Create OCR Regions of Interest (ROIs)
Now you'll define exactly where on the part the camera should look for text. This is the most important step for OCR accuracy.
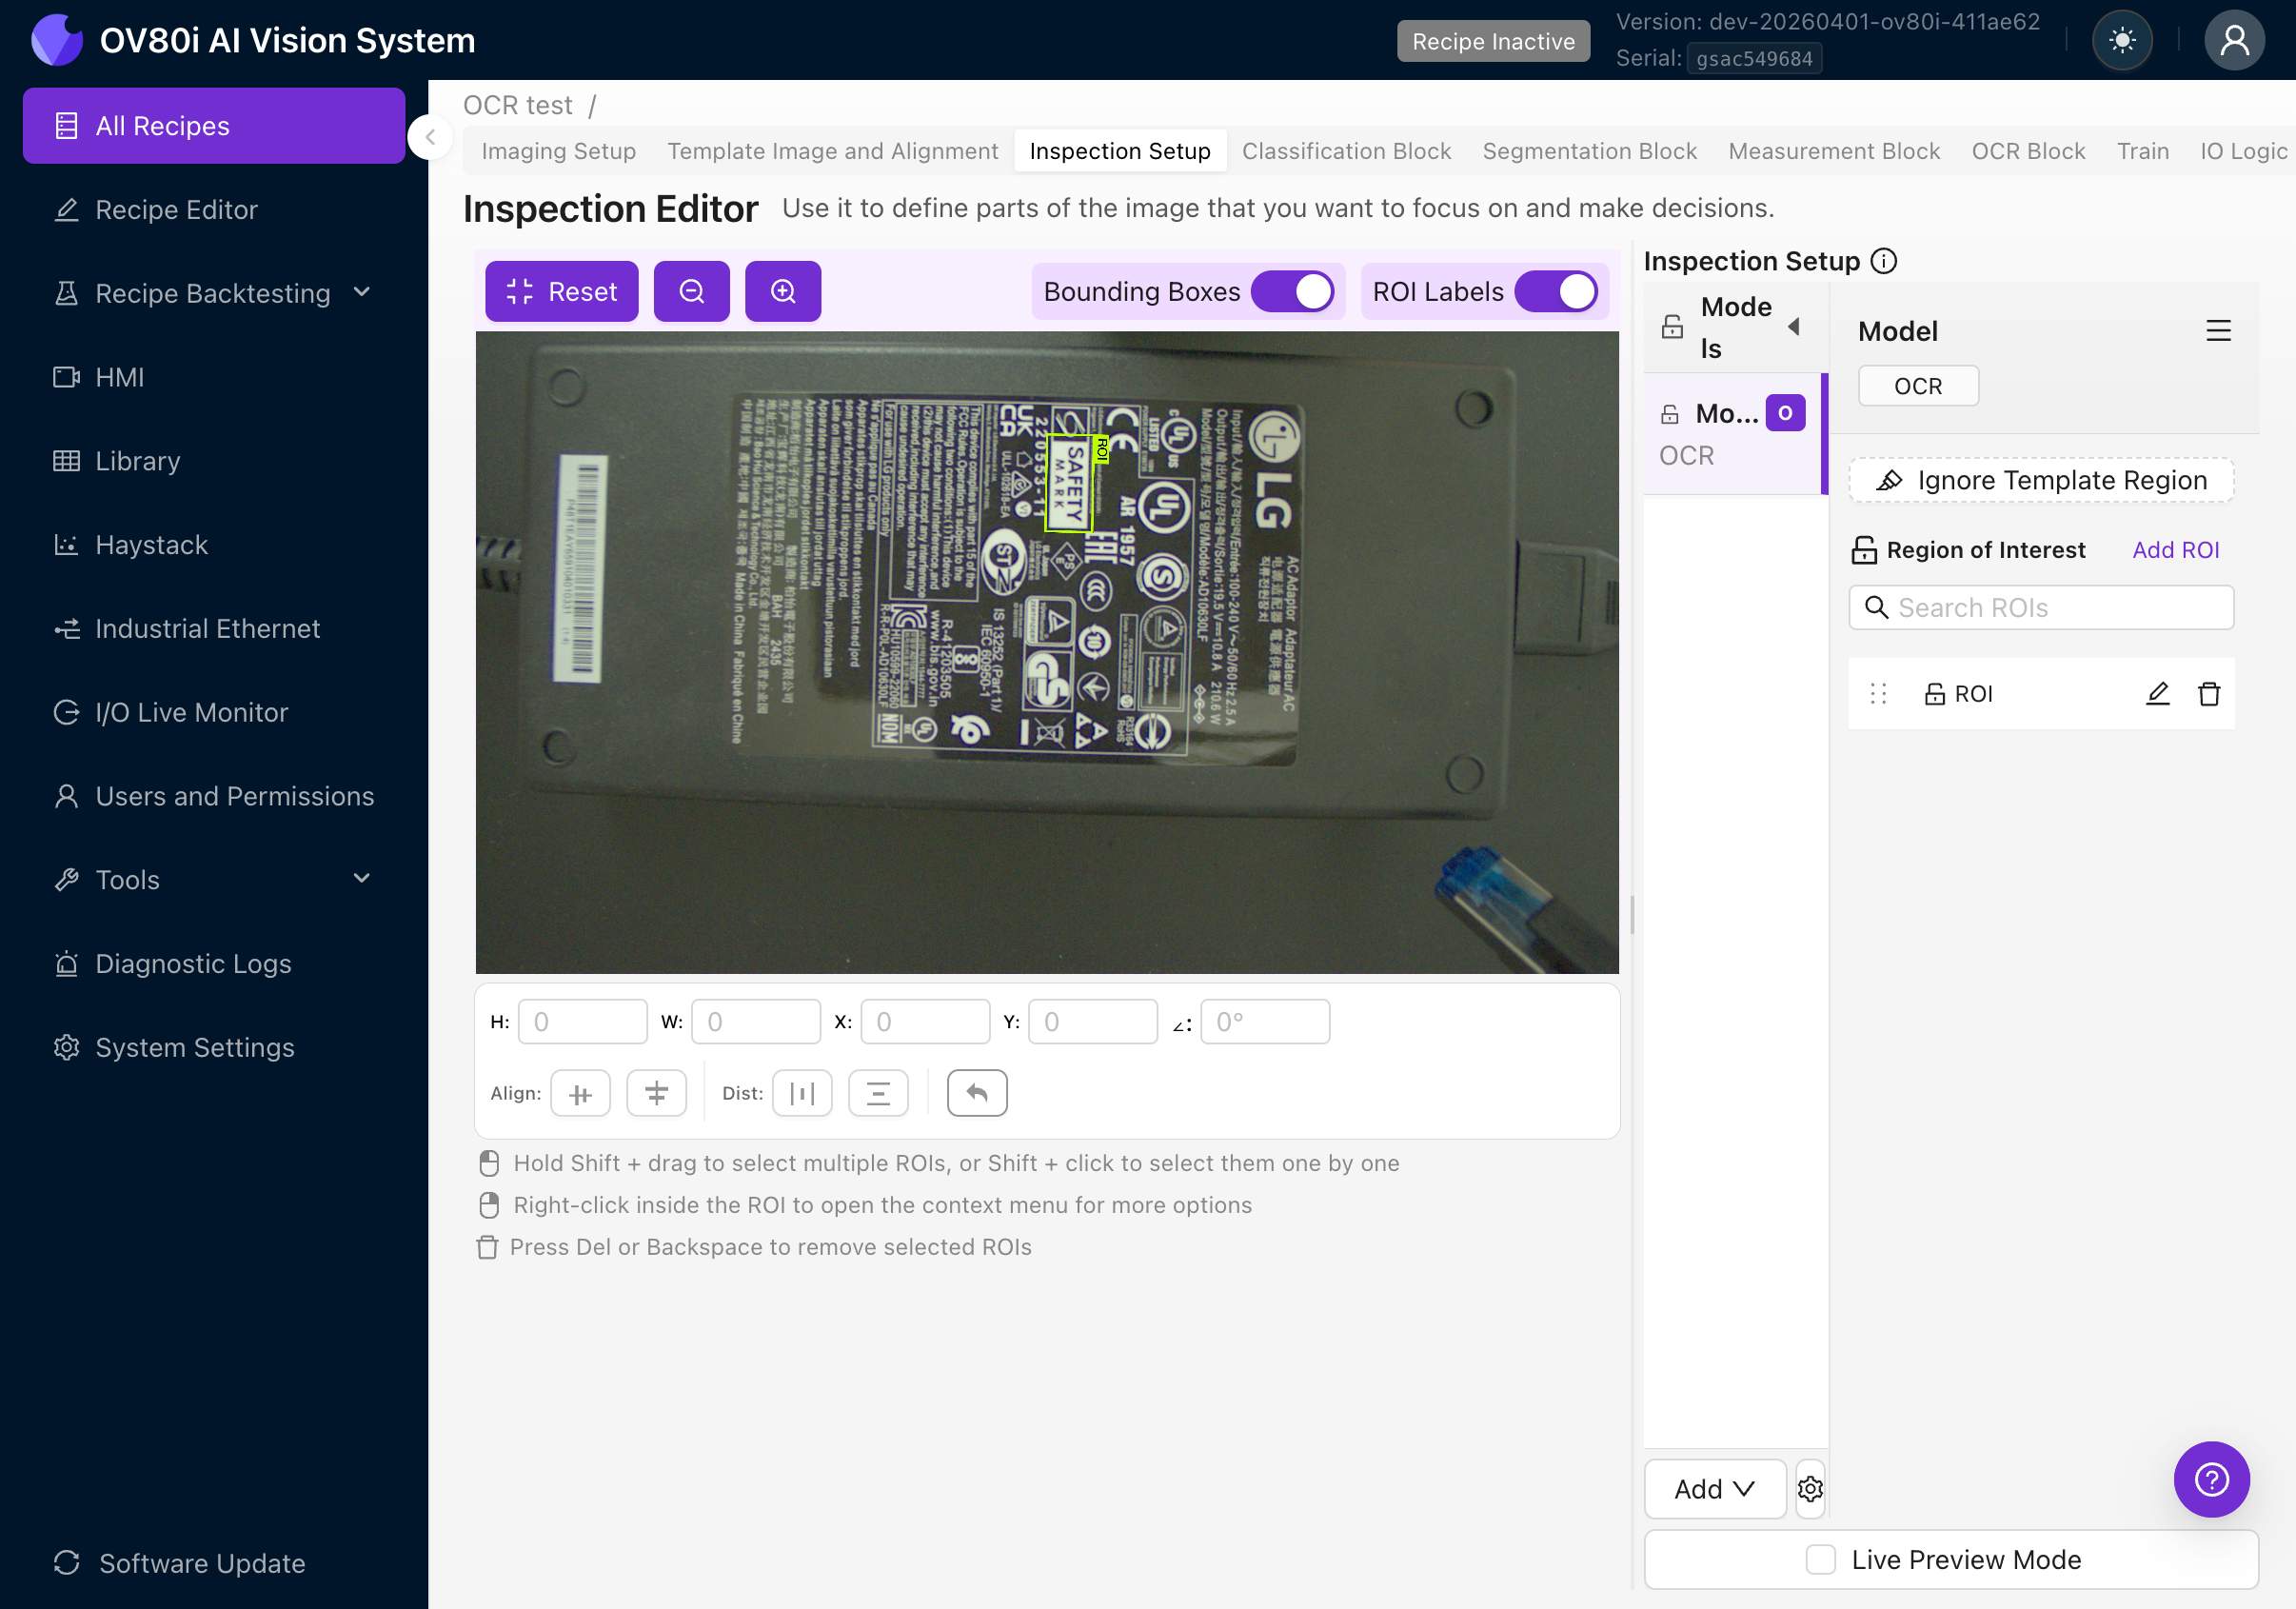
4a. Navigate to Inspection Setup
- Click the Inspection Setup tab in the Recipe Editor
- You'll see the Inspection Editor with your template image
4b. Add the OCR Model
- In the right panel, look for the Models section
- If you don't see an OCR model listed, click the Add button at the bottom and select OCR
- The OCR model will appear in the Models list
You can only have one OCR block per recipe. However, you can create multiple ROIs within that block to read text from different areas of the part.
4c. Create an OCR ROI
- Make sure the OCR model row is selected (highlighted) in the Models list
- Click Add ROI in the Region of Interest section
- A new rectangular ROI will appear on the image
- Drag the ROI to position it over the text you want to read
- Resize it by dragging the corner handles
4d. Set the ROI Orientation
This is the single most important thing to get right. The orientation of your ROI must match the orientation of the text you want to read.
The OCR engine crops the image using the ROI's angle, then processes the crop as if the text were horizontal. If your ROI angle doesn't match the text angle, the engine will try to read rotated text and produce garbage results.
Examples:
- Text reads left-to-right horizontally: ROI angle should be 0 degrees
- Text is rotated 90 degrees clockwise: ROI angle should be 90 degrees
- Text is upside down: ROI angle should be 180 degrees
- Text is at a 45-degree angle: ROI angle should be 45 degrees
How to rotate an ROI:
- Select the ROI by clicking on it
- Use the rotation handle at the corner of the ROI, OR
- Set the angle value directly in the position fields at the bottom of the canvas
The position bar shows: H (height), W (width), X and Y (position), and the angle in degrees.

4e. Size the ROI Correctly
- Make the ROI as tight as possible around the text area. Extra background introduces noise and can cause false detections.
- Include a small margin (10-20 pixels) around the text so characters aren't clipped at the edges.
- Don't include other text you don't want to read. If there are multiple text areas, create separate ROIs for each.
If you need to read text from multiple areas of the part (e.g., a serial number AND a date code), create a separate ROI for each. This gives you independent results and makes pass/fail rules easier to configure.
4f. Create Additional ROIs (Optional)
Repeat steps 4c-4e for each text area you need to read. Each ROI gets its own name in the Region of Interest list. Rename them to something descriptive (e.g., "Serial Number", "Date Code", "Part Label") by double-clicking the name.
Use copy-paste to duplicate ROIs. The names auto-increment automatically (e.g., "ROI", "ROI (1)", "ROI (2)").
Step 5: Configure and Test the OCR Block
5a. Navigate to the OCR Block
Click the OCR Block tab in the Recipe Editor tab bar. You'll see the camera feed on the left and a settings panel on the right.
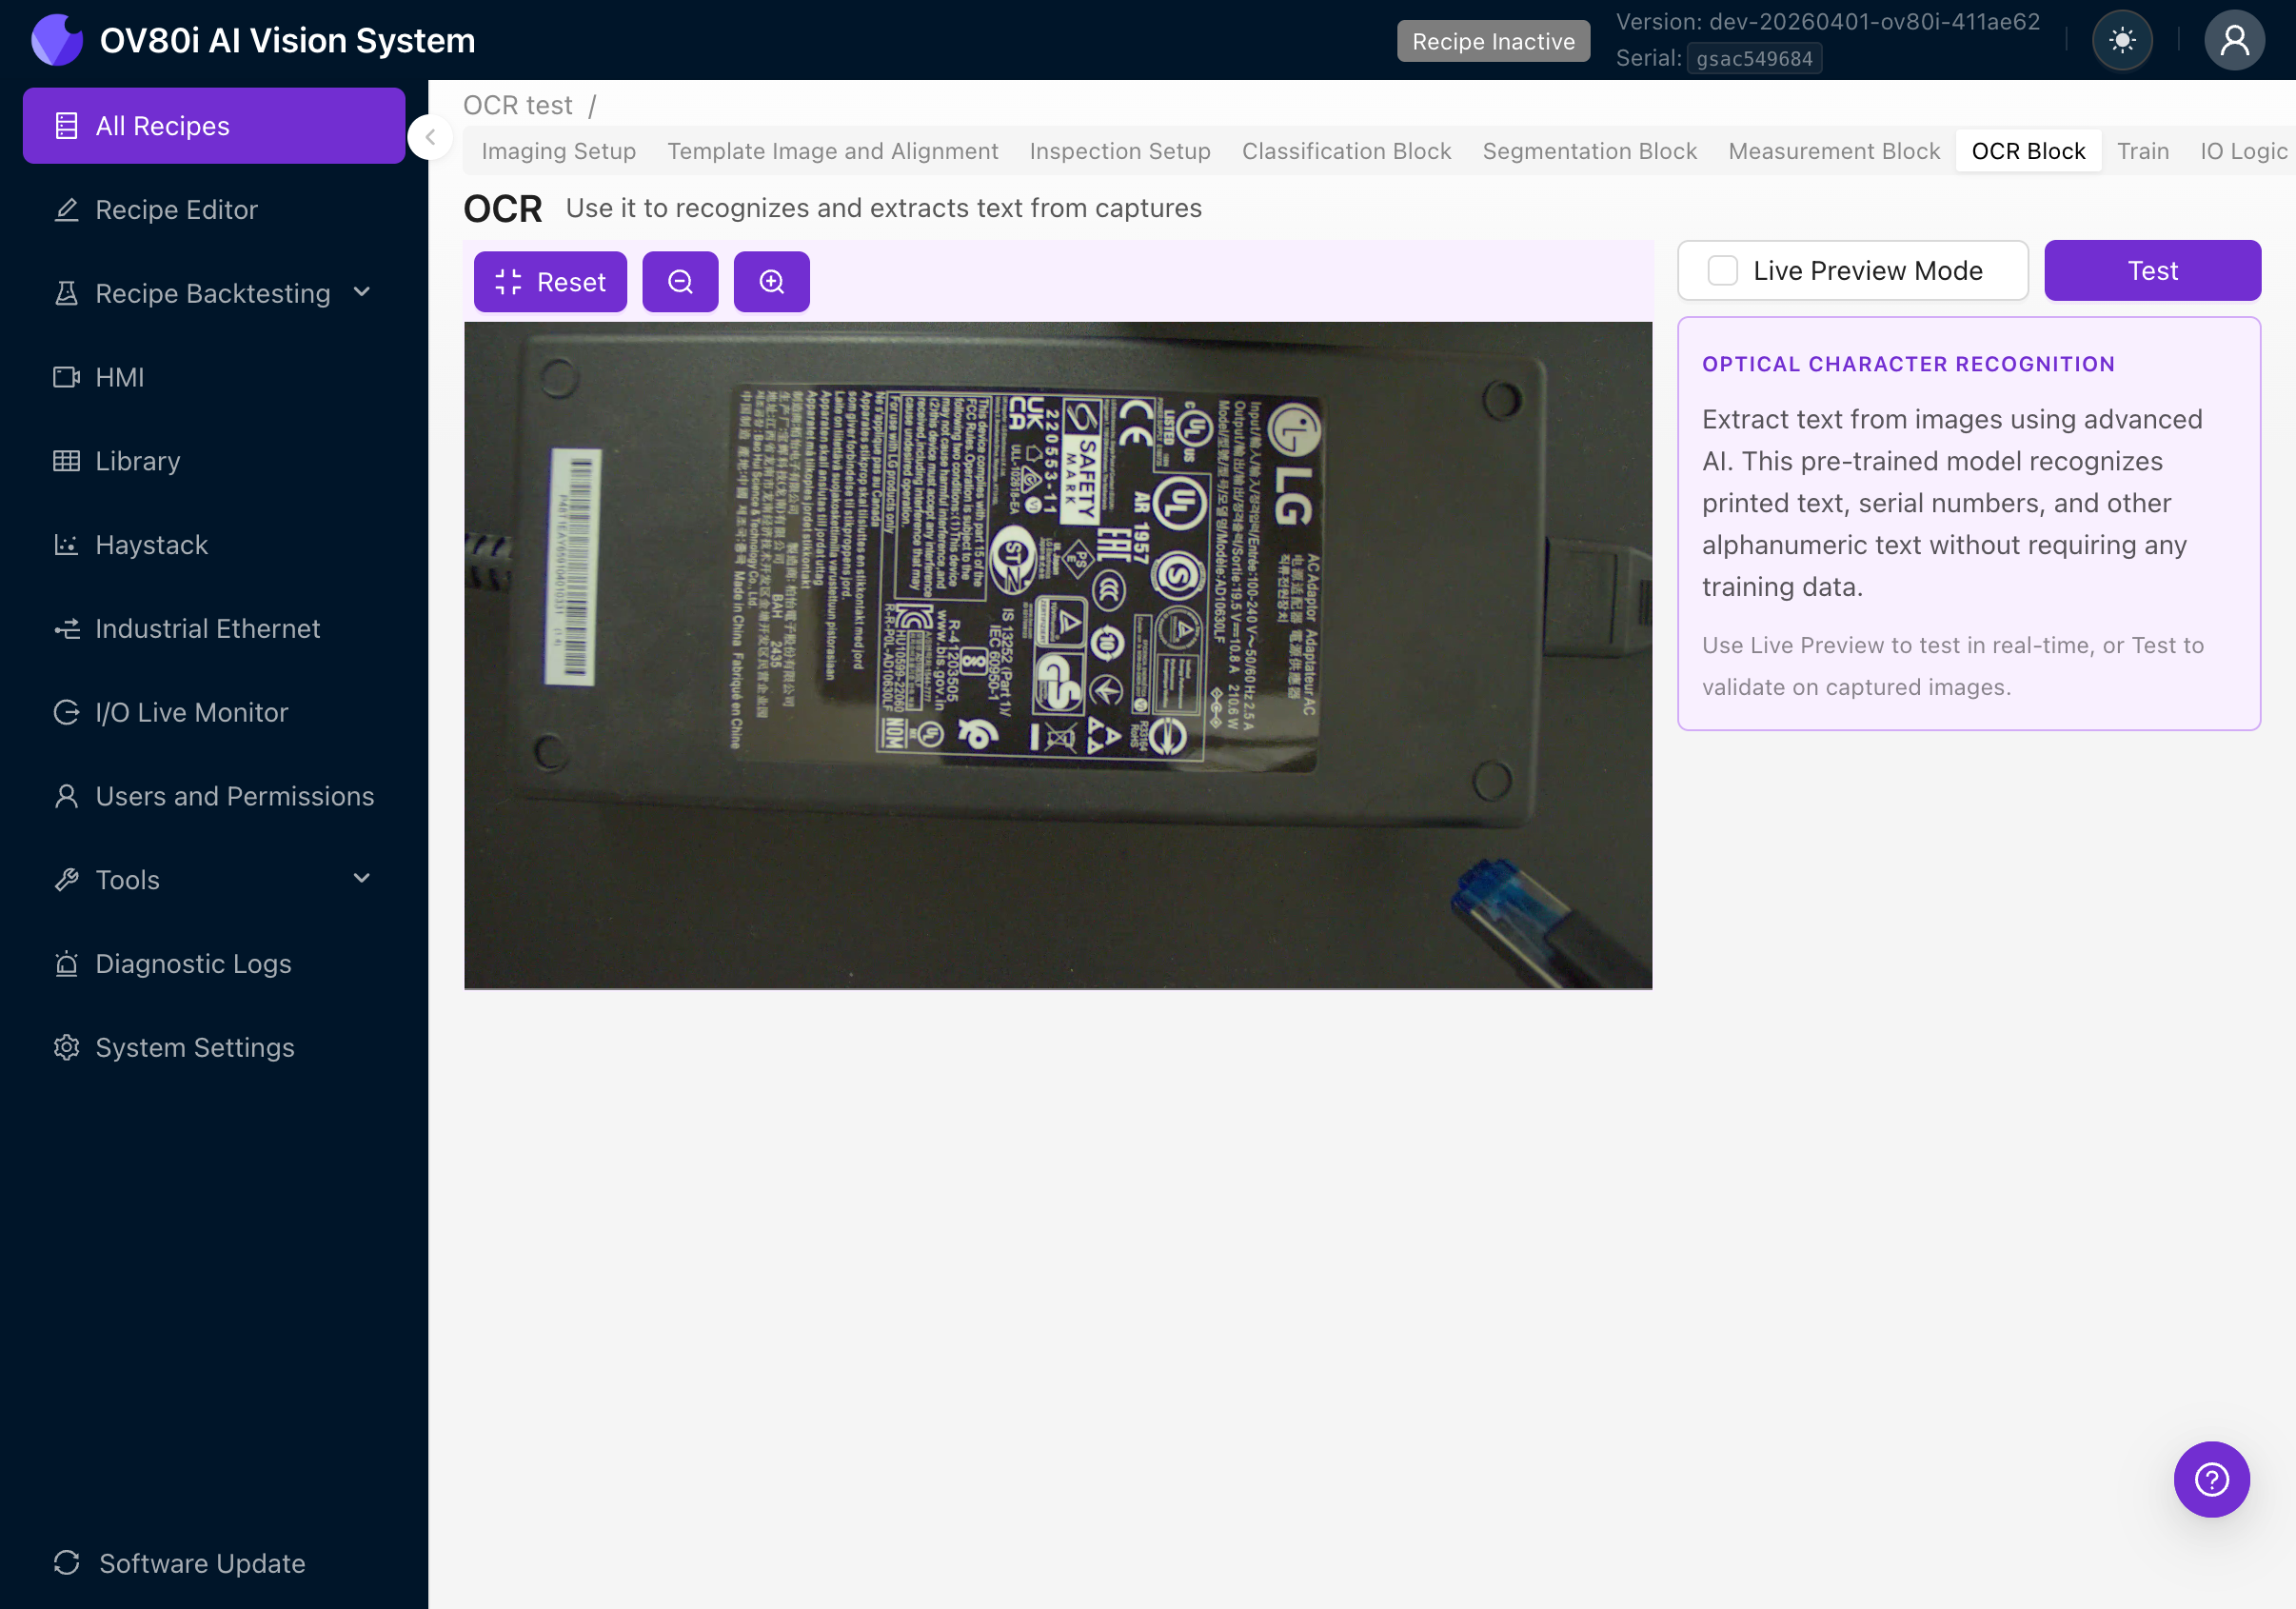
The right panel shows:
- OPTICAL CHARACTER RECOGNITION description
- Explanation that this is a pre-trained model requiring no training data
- Instructions to use Live Preview or Test to validate
5b. Enable Live Preview
Check the Live Preview Mode checkbox at the top right. The camera will start processing frames in real-time.
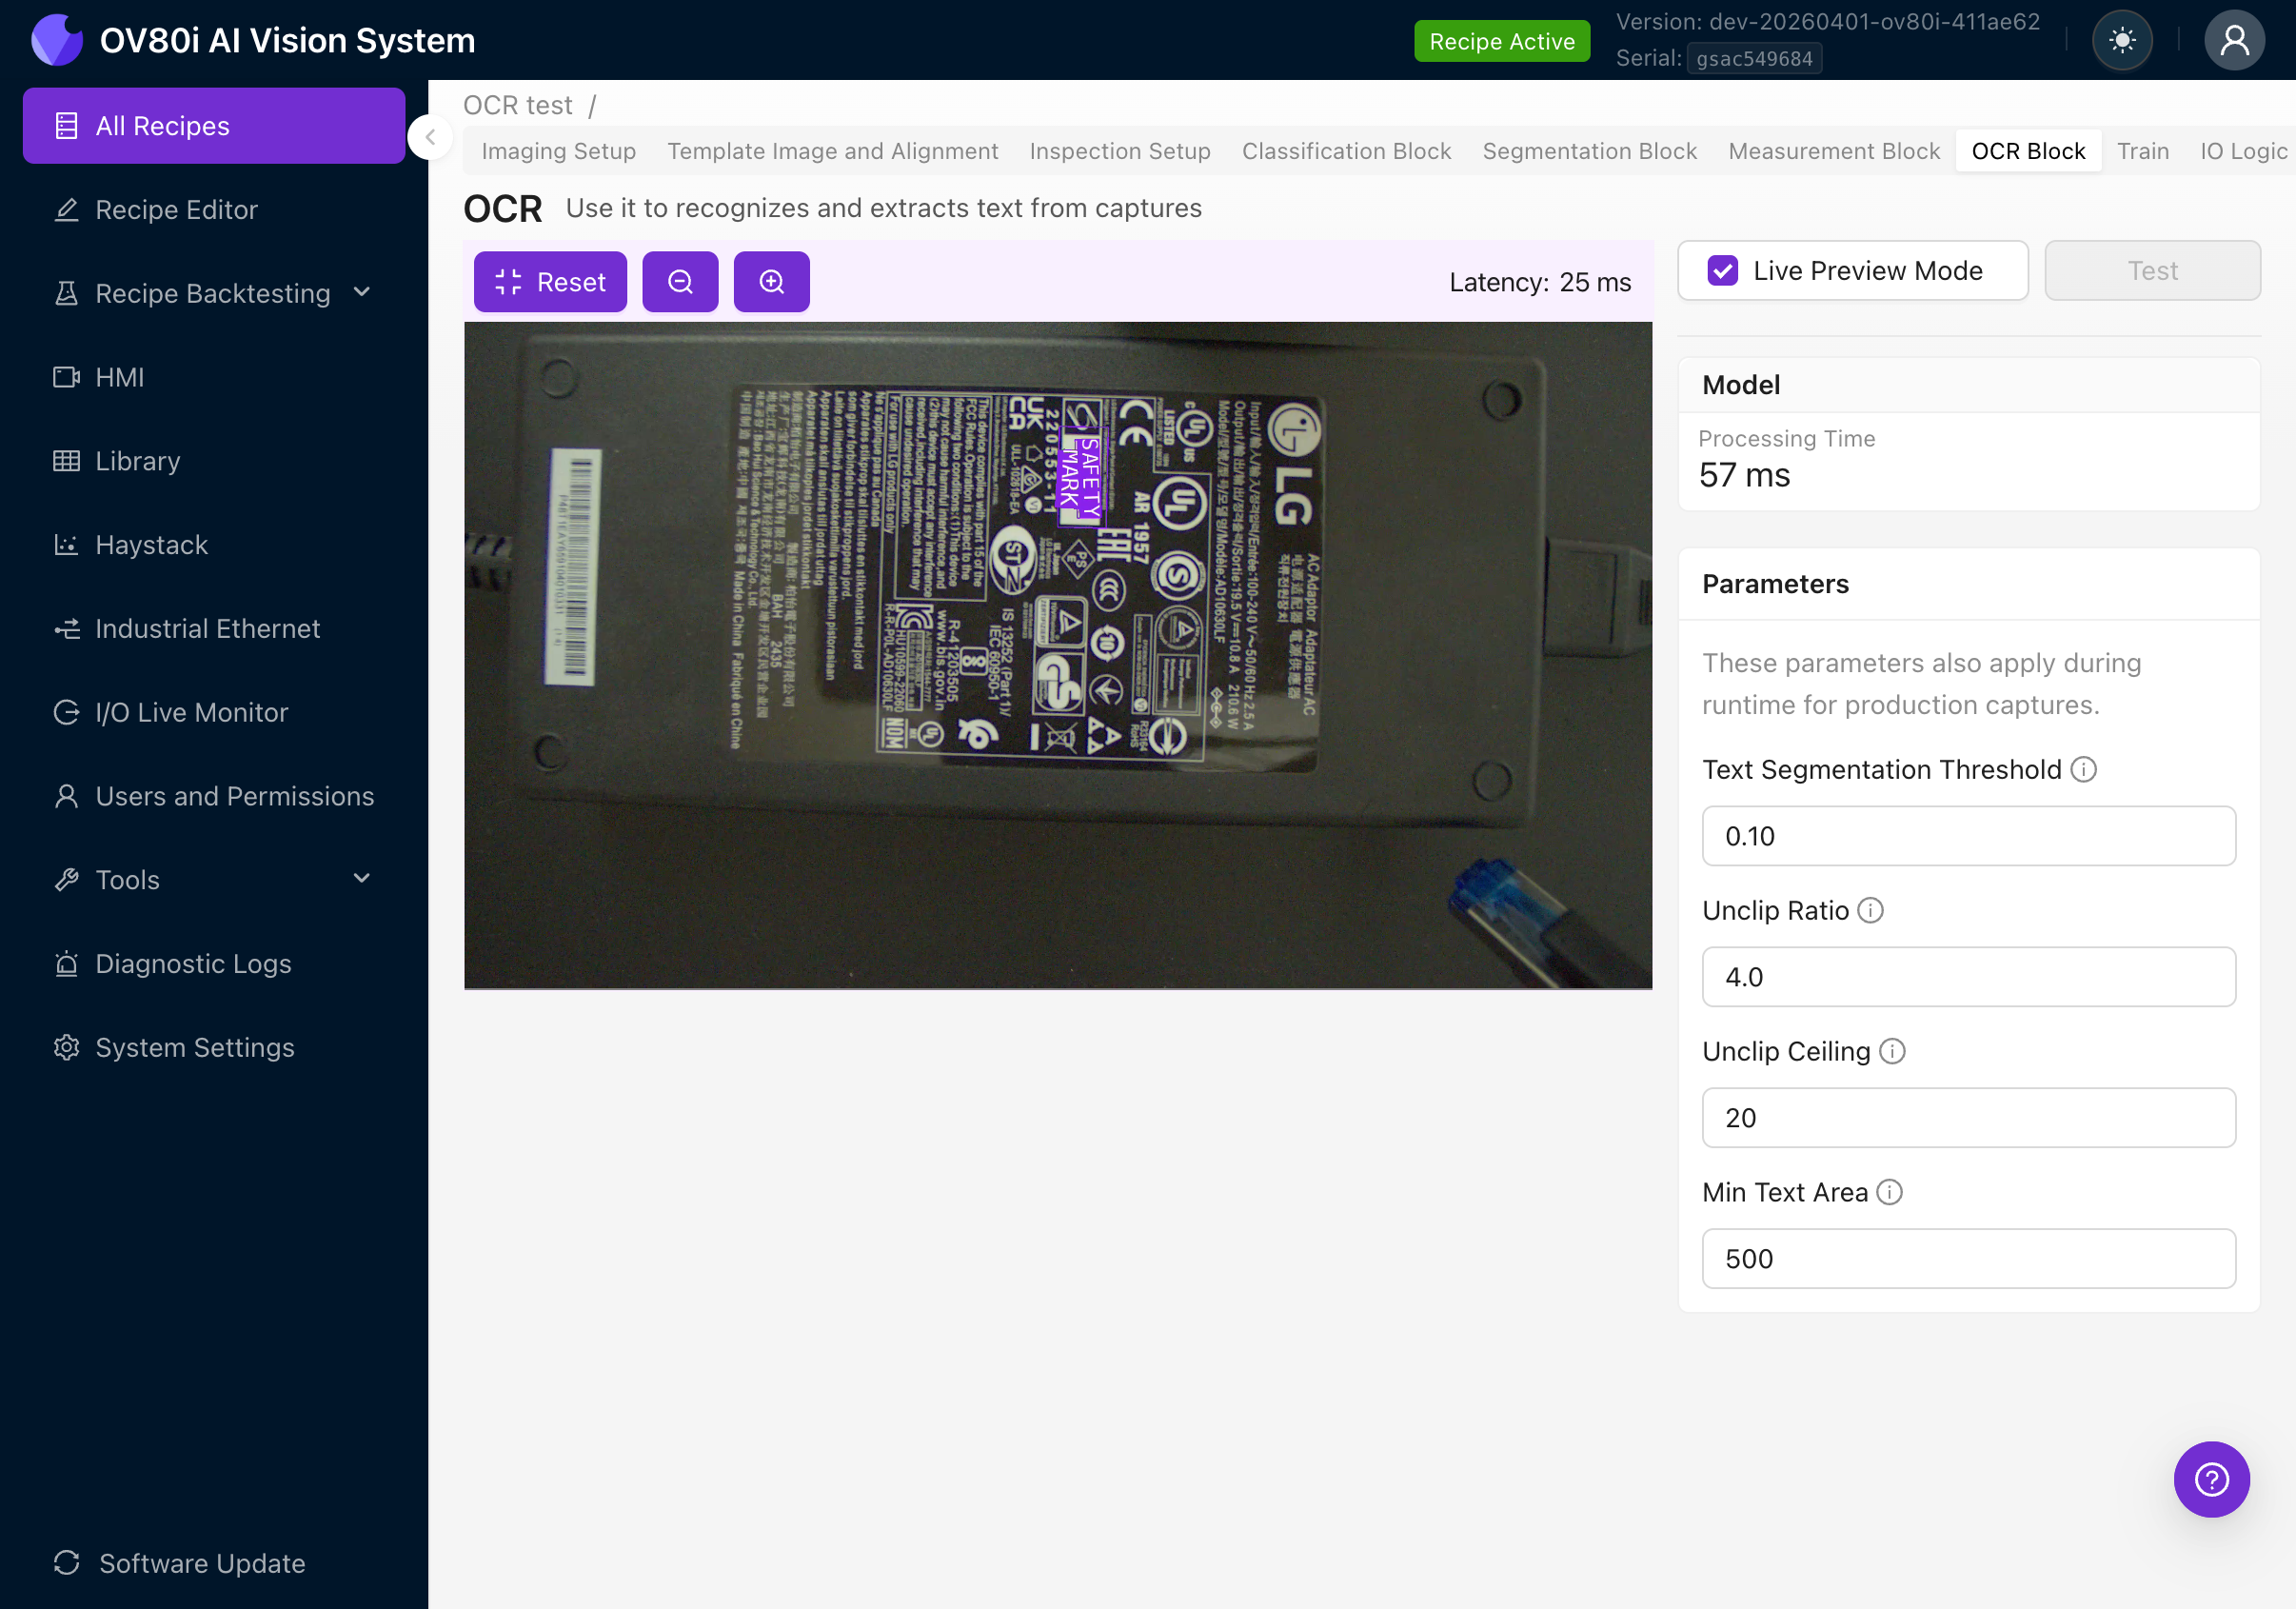
With Live Preview active, you'll see:
- Processing Time: How long the OCR model takes per frame
- Latency: Total round-trip time including image capture and rendering
- Purple bounding boxes around detected text regions overlaid on the camera feed
- Detected text displayed as labels on each bounding box
- Parameters panel on the right for tuning detection settings
5c. Verify OCR is Reading Correctly
With Live Preview on, place your part under the camera and verify:
- Are all text regions detected? You should see purple boxes around each word/phrase in the ROI.
- Is the text being read correctly? The labels should match the actual text on the part.
- Are there false detections? Are non-text areas being incorrectly identified as text?
- Move the part slightly. Does OCR continue to work at different positions (this tests alignment)?
If text is not being detected or is being misread, check:
- ROI orientation matches text orientation (see Step 4d)
- The ROI is positioned correctly over the text
- Image quality is good (sharp focus, good contrast, even lighting)
- Try adjusting the OCR parameters (see next section)
Step 6: Tune OCR Parameters
When Live Preview is enabled, the right panel shows four tunable parameters. These control the text detection stage (finding where text is), not the recognition stage (reading what it says).
| Parameter | Default | What it does |
|---|---|---|
| Text Segmentation Threshold | 0.10 | How confident the detector must be that a region contains text. Higher values = stricter detection, fewer false positives but may miss faint text. Lower values = more sensitive, catches faint text but may have false detections. Range: 0.0 to 1.0. |
| Unclip Ratio | 4.0 | How much to expand detected bounding boxes outward from the text contour. Higher values = bigger boxes. Increase if boxes are clipping the edges of large characters. Decrease if nearby words are merging into one box. |
| Unclip Ceiling | 20 | Maximum pixel expansion from unclipping. This caps growth so large-ratio expansions on big text don't create enormous boxes. Raise if large text is still being clipped even after increasing Unclip Ratio. |
| Min Text Area | 500 | Minimum area (in pixels) for a detected text region. Anything smaller is discarded as noise. Increase if small artifacts are being detected as text. Decrease if small but valid text is being filtered out. |
Start with the defaults. Only adjust if you see specific issues in Live Preview:
| Problem | Parameter to adjust | Direction |
|---|---|---|
| Non-text areas detected as text | Text Segmentation Threshold | Increase |
| Valid text is being missed | Text Segmentation Threshold | Decrease |
| Bounding boxes clip character edges | Unclip Ratio | Increase |
| Nearby words merge into one box | Unclip Ratio | Decrease |
| Boxes grow too large on big text | Unclip Ceiling | Decrease |
| Large text still clipped after raising Unclip Ratio | Unclip Ceiling | Increase |
| Noise/artifacts detected as text | Min Text Area | Increase |
| Small valid text is filtered out | Min Text Area | Decrease |
Parameter changes take effect immediately in Live Preview, so you can tune iteratively. These parameters also apply during production captures, not just during preview.
Step 7: Test with Captured Images
After tuning parameters with Live Preview, validate OCR across a range of production samples.
7a. Using the Test Panel
- Disable Live Preview Mode (uncheck the checkbox)
- Click the Test button
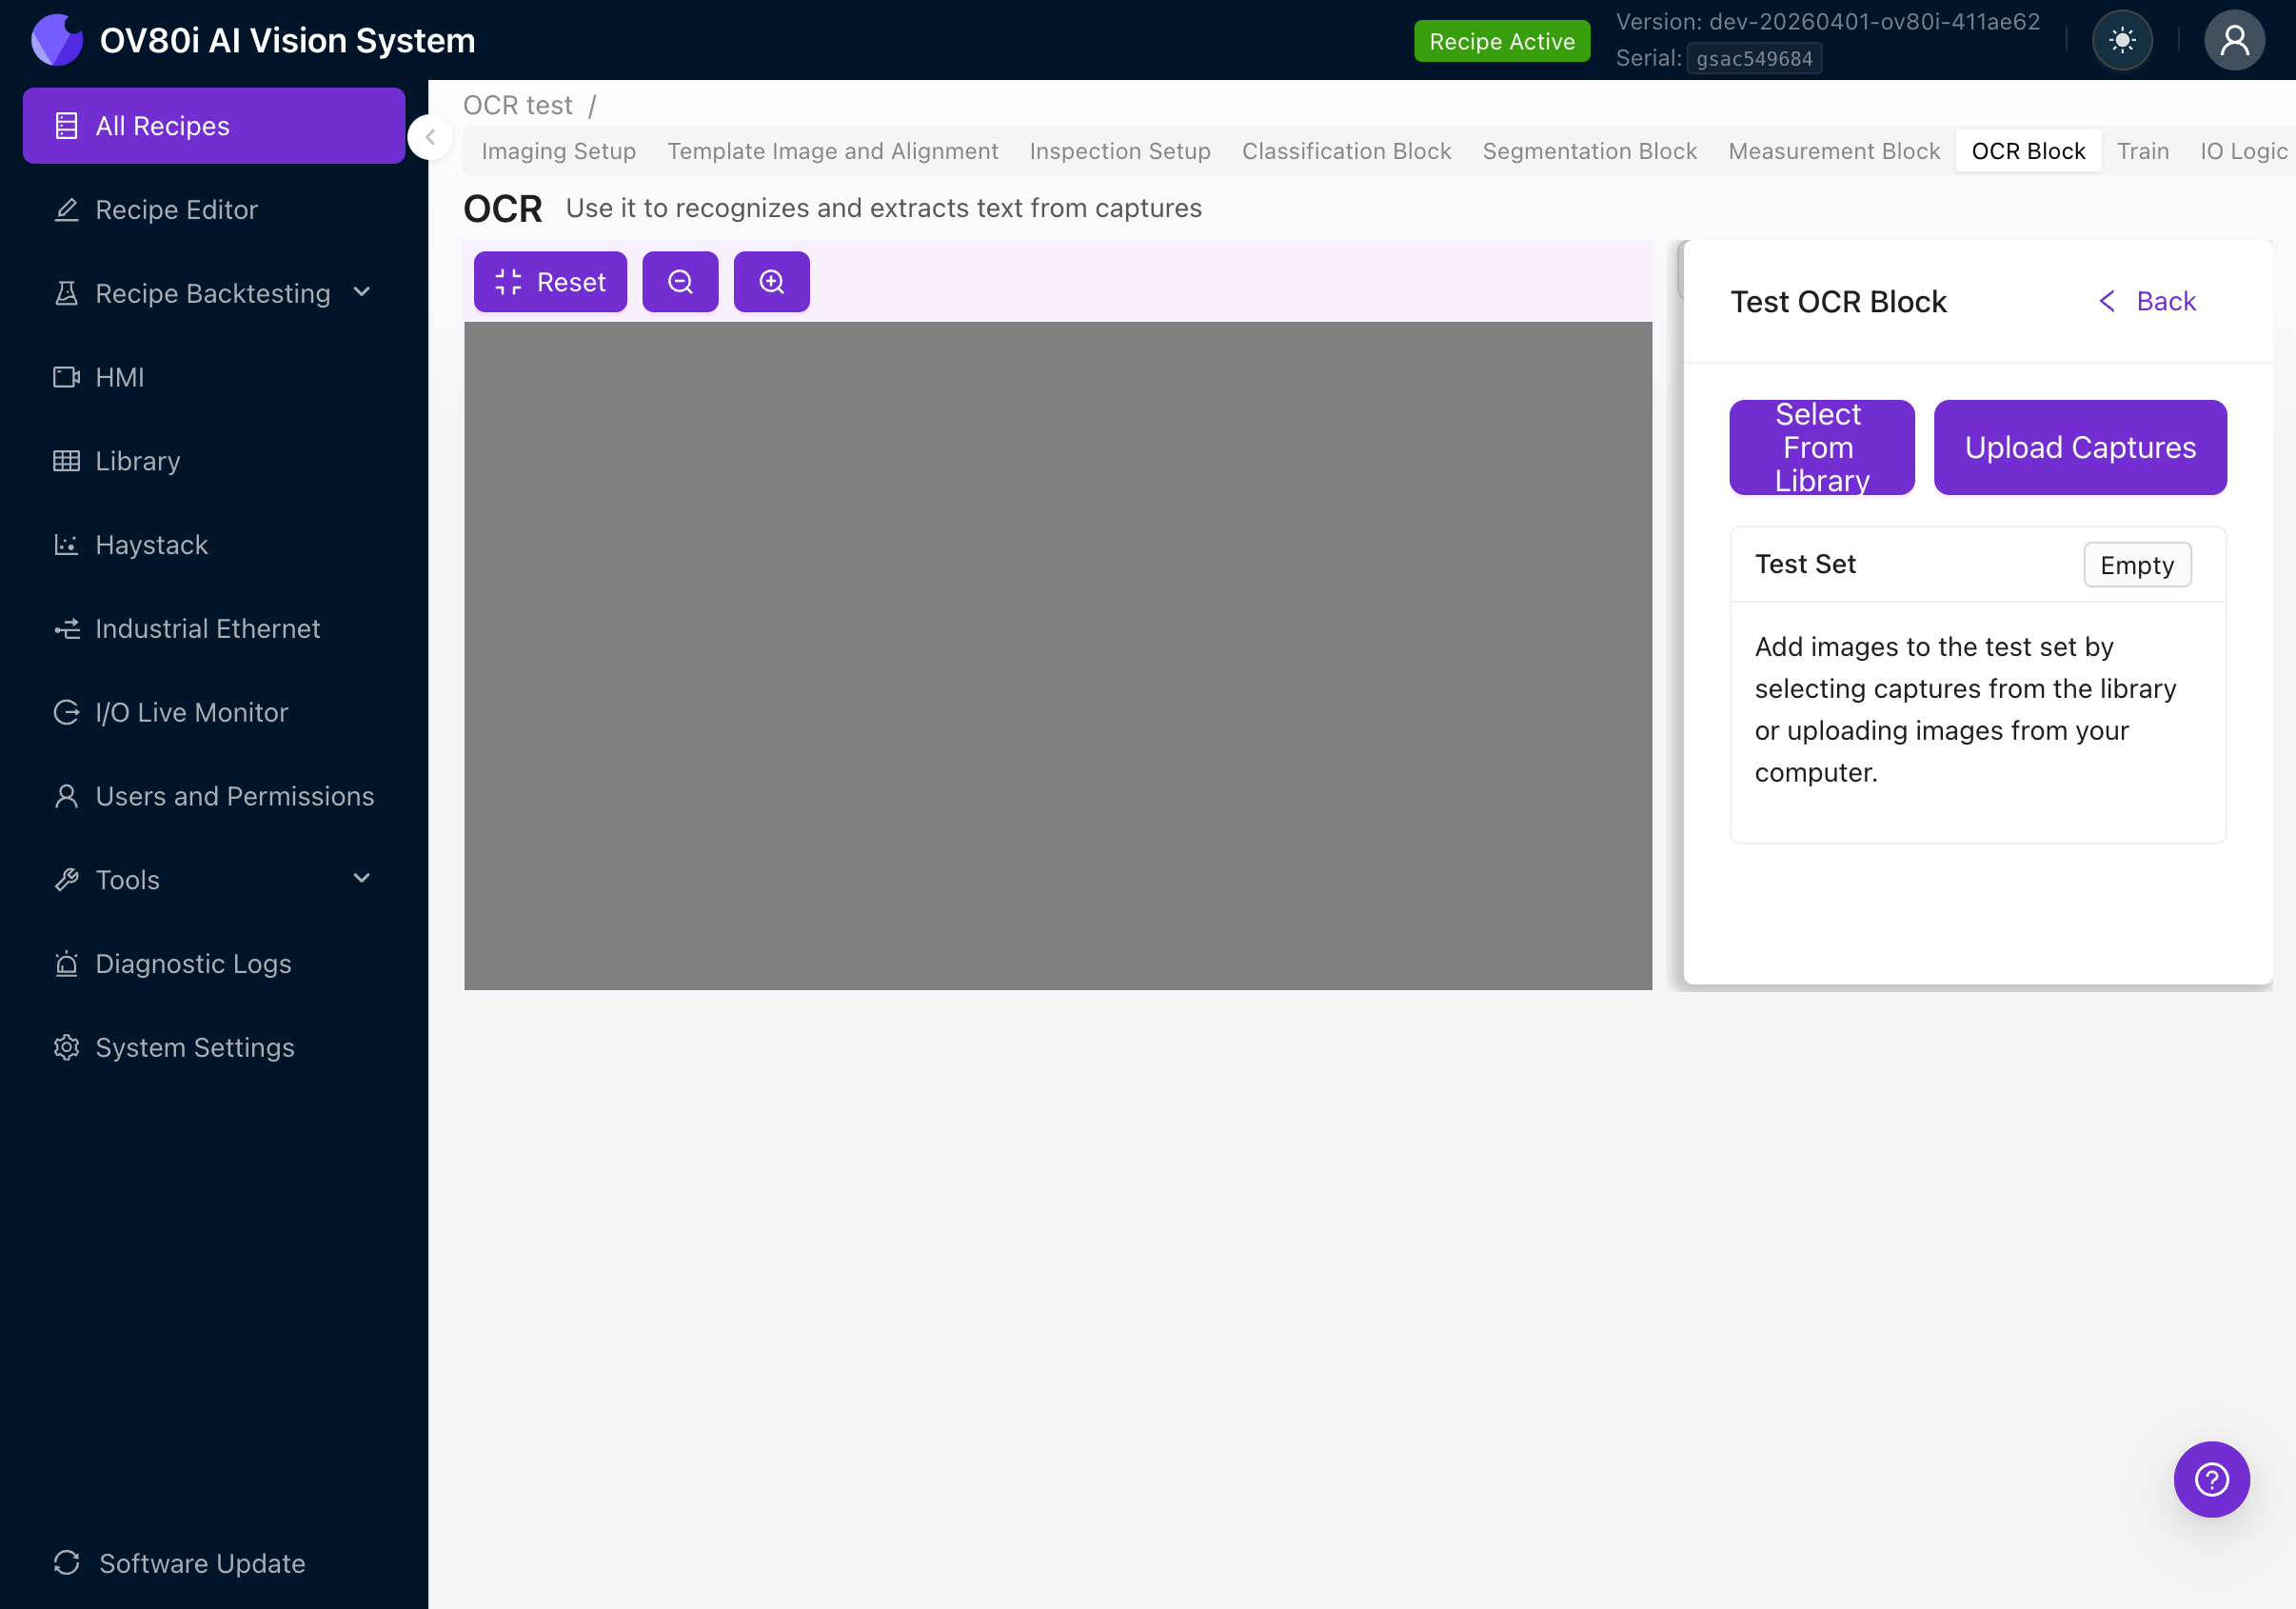
- Click Select From Library to choose images from previously captured inspections, or click Upload Captures to upload images from your computer
- The test results show for each ROI:
- Detected Text (displayed in monospace/code formatting)
- Confidence (color-coded tag: green above 80%, orange above 50%, red below 50%)
- Detection Count (how many text regions were found)
7b. What to Look For
- Consistency: Does the OCR read the same text every time for the same part?
- Accuracy: Do the detected strings match the actual text on the part?
- Confidence scores: Are they consistently above 80%? Low confidence often indicates image quality issues.
- Edge cases: Test with parts that have smudged, faded, or partially obscured text.
If confidence scores are consistently below 80%, revisit your image settings (Step 2). OCR accuracy is directly tied to image quality. No amount of parameter tuning can compensate for a blurry or poorly-lit image.
Step 8: Set Up Pass/Fail Rules (IO Logic)
After OCR is detecting text correctly, you need to define what constitutes a pass or fail. Navigate to the IO Logic tab.
Basic Mode
Basic Mode provides a simple rule-based UI for OCR pass/fail logic. No Node-RED knowledge required.
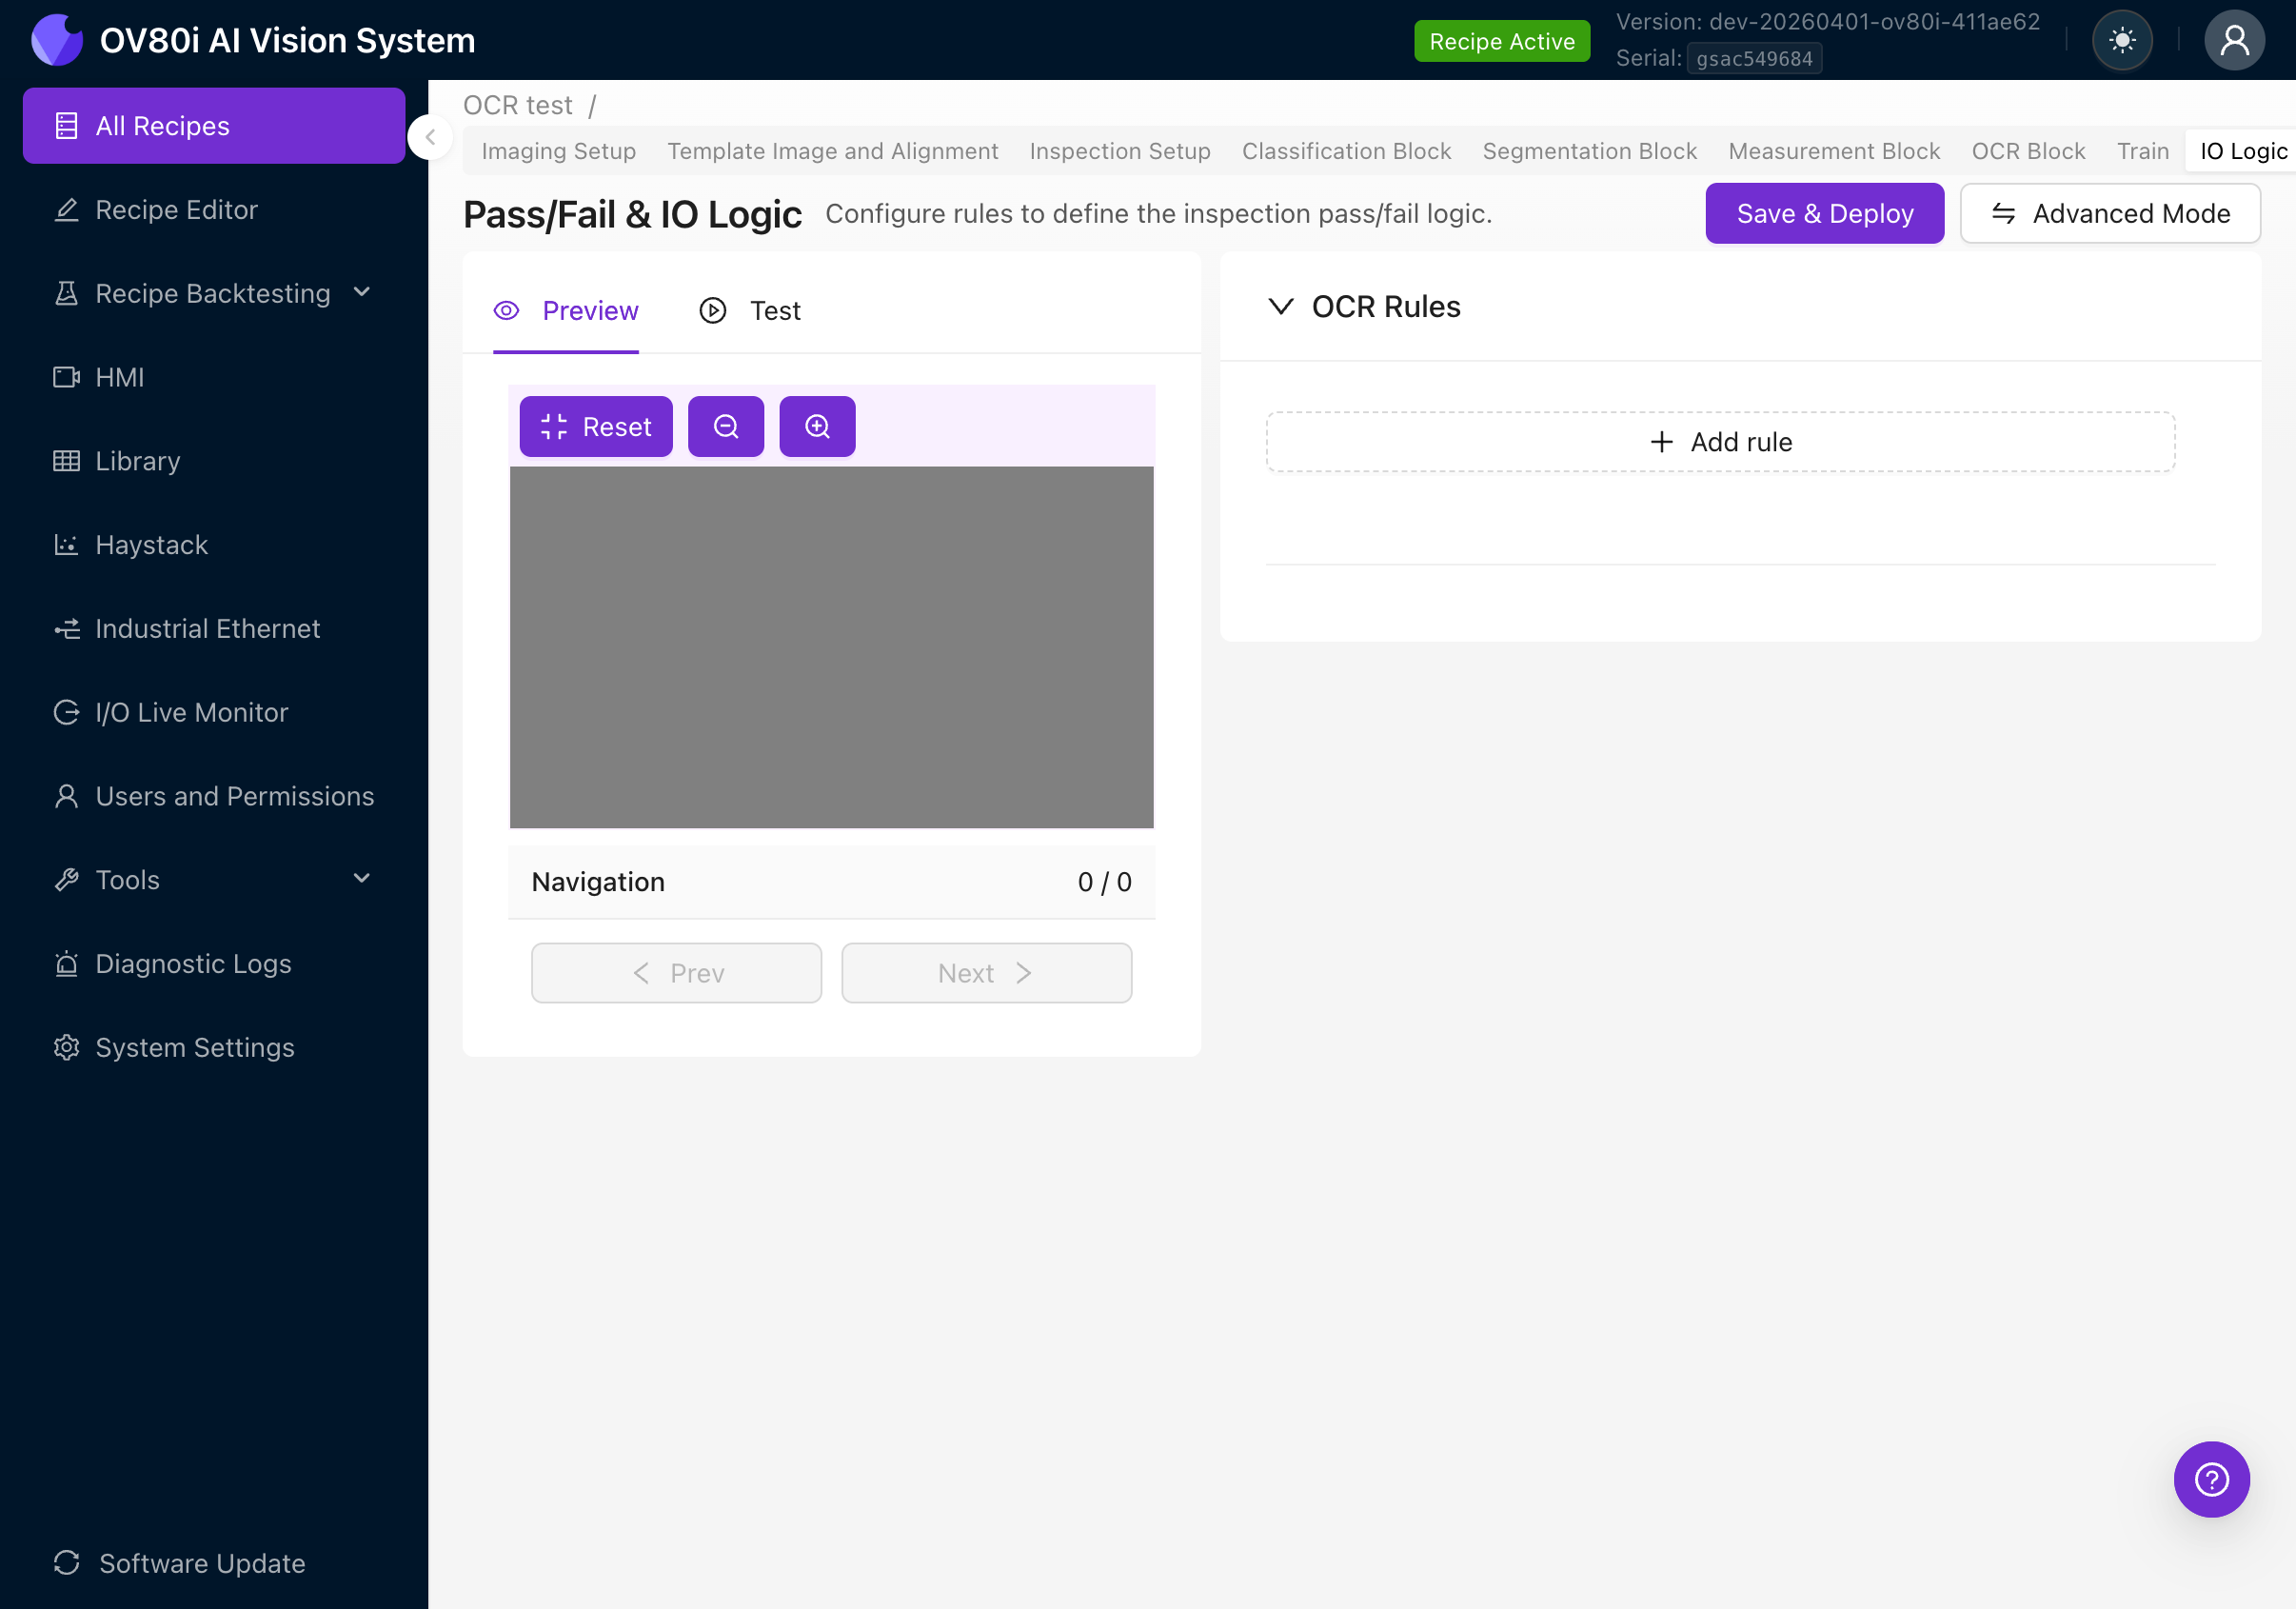
The page shows:
- Preview / Test tabs on the left (to visualize results against your rules)
- OCR Rules section on the right
- Save & Deploy button to activate rules
- Advanced Mode button to switch to Node-RED
Creating a Rule
Click + Add rule to create a pass/fail rule. Each rule has three fields:

| Field | Description |
|---|---|
| ROIs | Which ROI(s) to evaluate. Click to expand and select "All ROIs" or pick specific regions. |
| Operator | The comparison to perform on the detected text. |
| Text | The expected text string to compare against. |
Available Operators
Click the Operator dropdown to see all four options:

| Operator | Behavior | Example use case |
|---|---|---|
| = (equals) | All detected text joined together must exactly match the expected text | Verify a serial number reads exactly "SN-2025-0042" |
| != (not equals) | Joined text must NOT match the expected text | Reject parts with a known-bad code |
| includes | Joined text must contain the expected text as a substring | Check that a label contains the word "SAFETY" somewhere |
| not includes | Joined text must NOT contain the expected text | Ensure a deprecated product code doesn't appear |
How Text is Compared
When an ROI contains multiple detected text regions (e.g., the detector finds "LOT" and "2025" as separate words), all individual text strings are joined with spaces before comparison.
So if the detector finds three text regions reading "LOT", "2025", and "A1", the joined text becomes "LOT 2025 A1". Your rule compares against this full joined string.
This means:
- An equals rule for
"LOT 2025 A1"would pass - An includes rule for
"2025"would pass - An equals rule for just
"LOT"would fail (because the joined text includes more than just "LOT")
Multiple Rules
You can add multiple rules by clicking + Add rule again. All rules use AND logic: every rule must pass for the OCR check to pass. If any single rule fails, the entire inspection fails.
ROI Selection

Click the ROIs dropdown to select which region(s) the rule applies to:
- All ROIs: The rule evaluates text from all OCR regions combined
- Specific ROI: Expand to pick individual ROIs by name (this is why naming your ROIs descriptively in Step 4f matters)
Save and Deploy
After configuring your rules, click Save & Deploy to activate them. The rules will take effect immediately for all future inspections.
Advanced Mode (Node-RED)
For more complex pass/fail logic that Basic Mode can't handle, switch to Advanced Mode.
Click the Advanced Mode button to see a confirmation dialog:
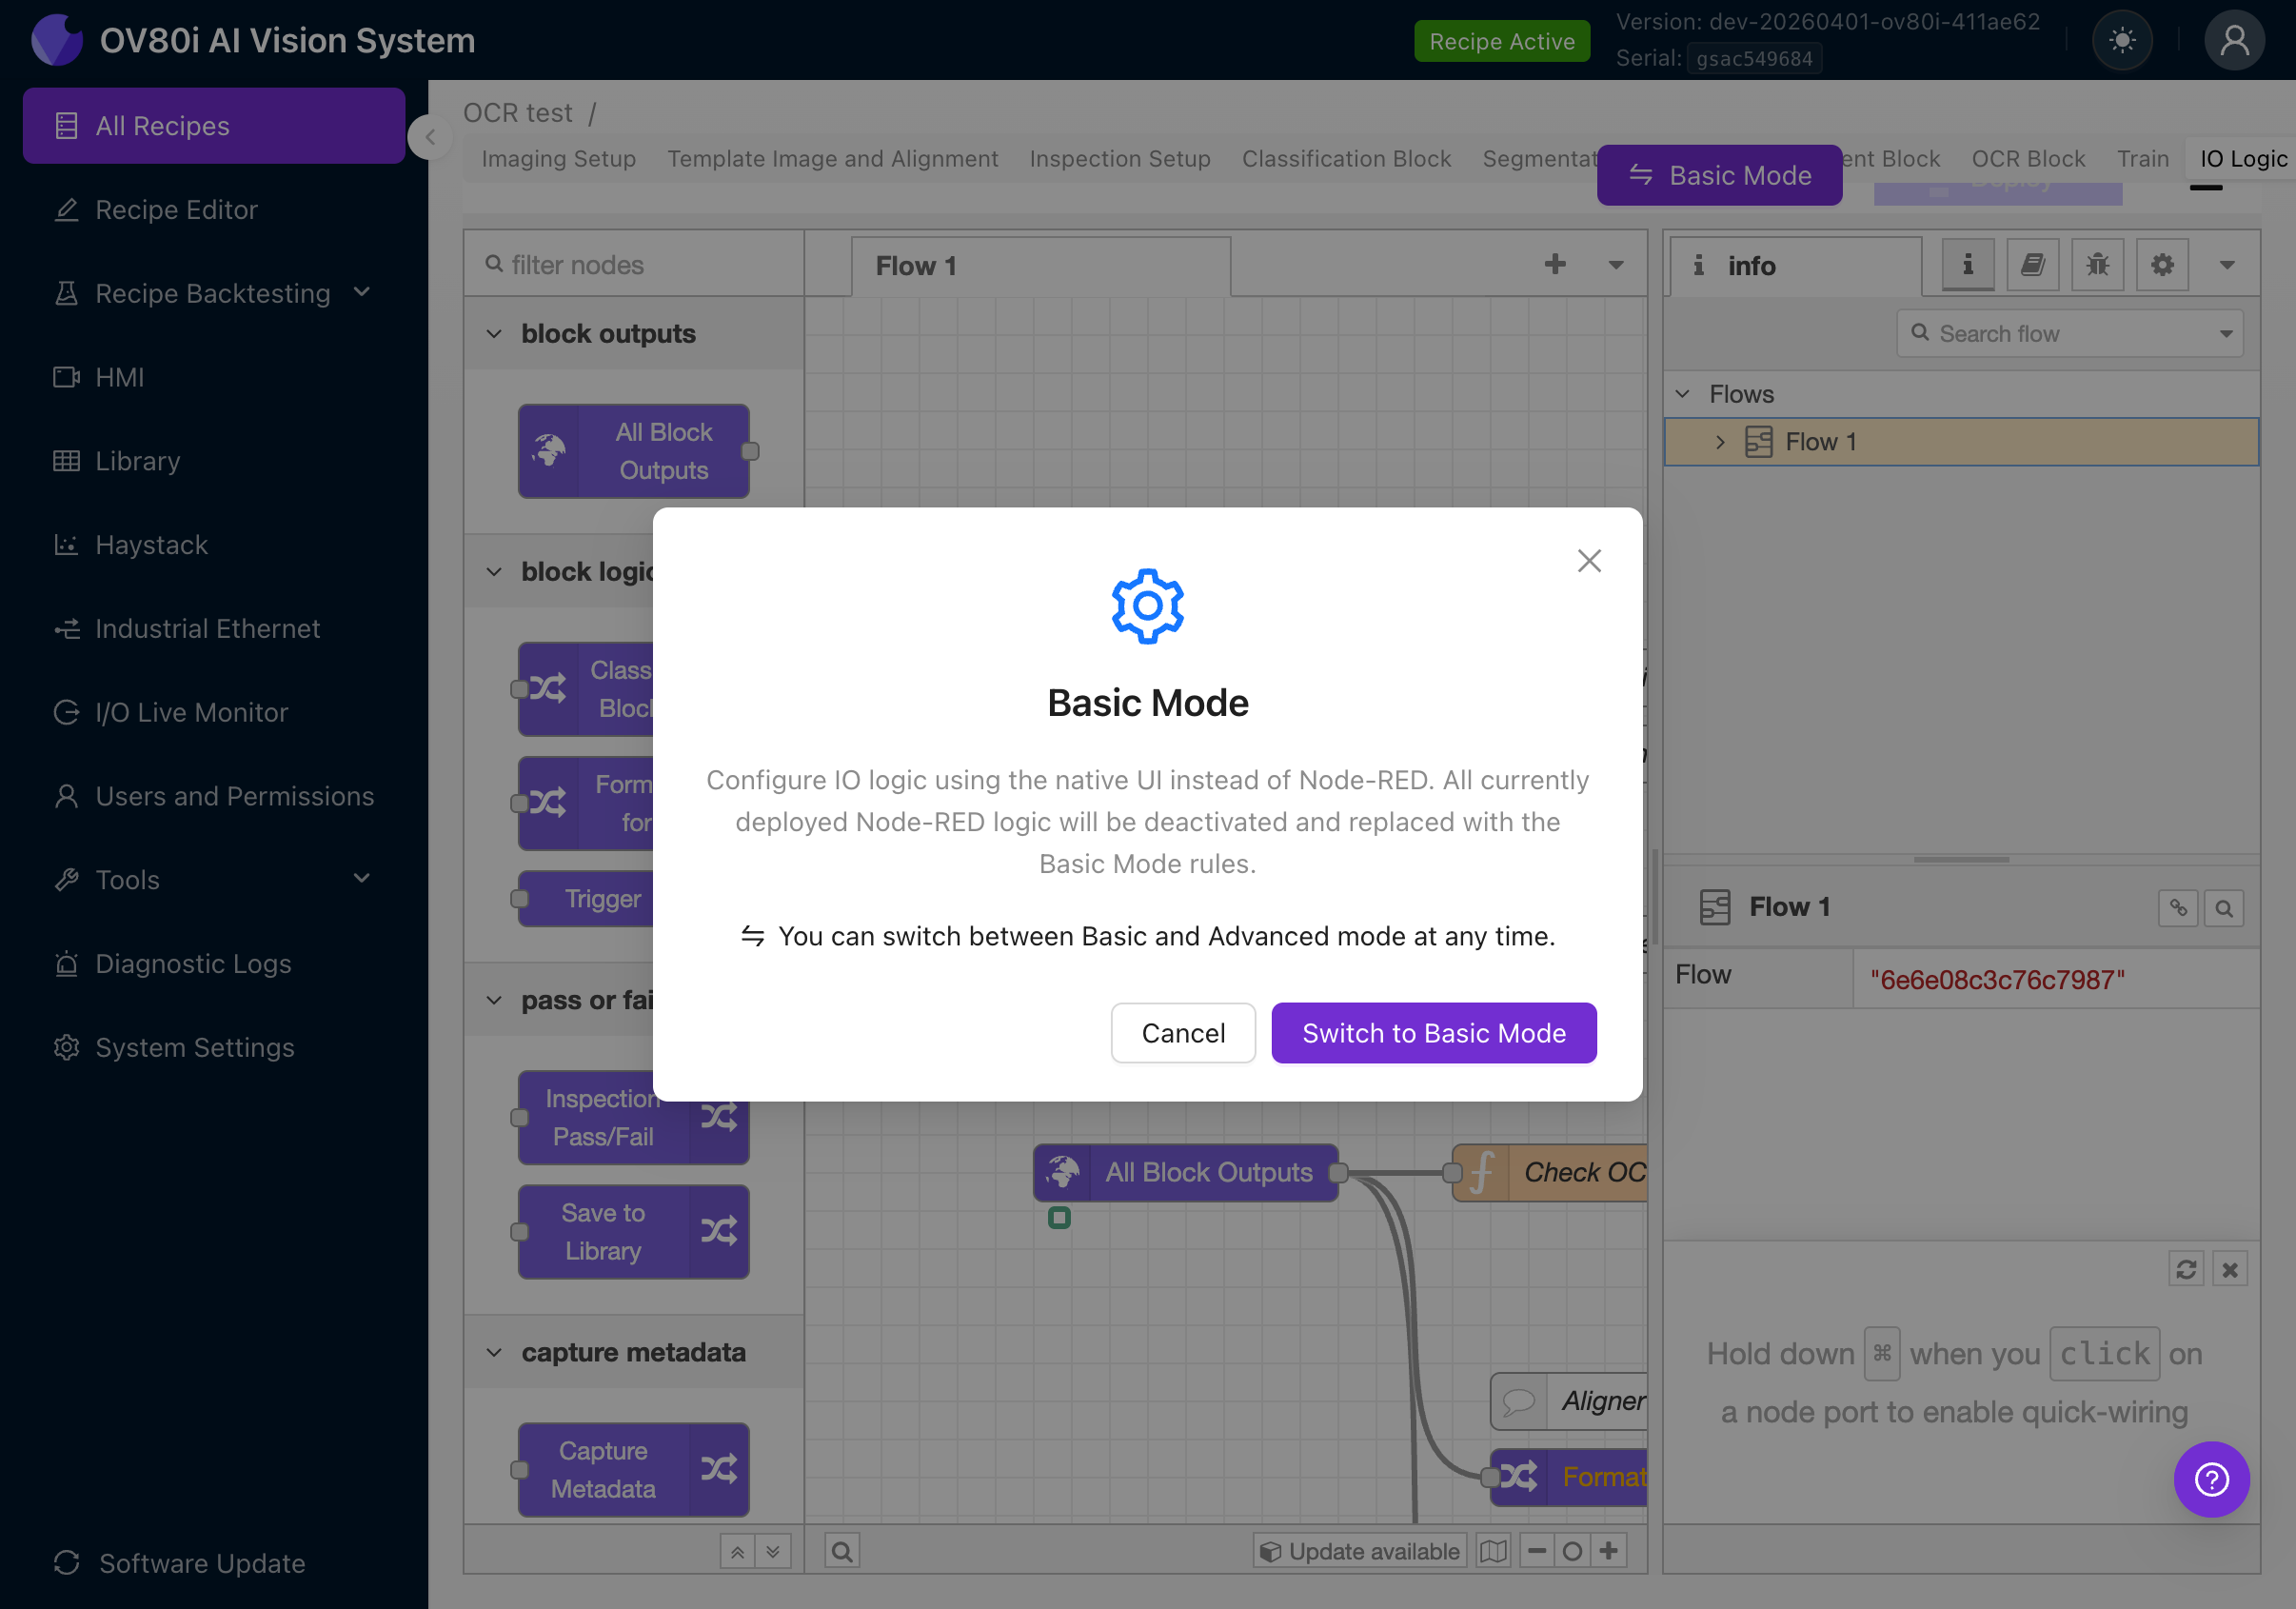
The dialog explains:
- Advanced Mode uses the full Node-RED visual programming environment
- Any Basic Mode rules will be deactivated
- You can switch back to Basic Mode at any time
Click Switch to Advanced Mode (or if you're already in Advanced Mode, the button says Basic Mode).
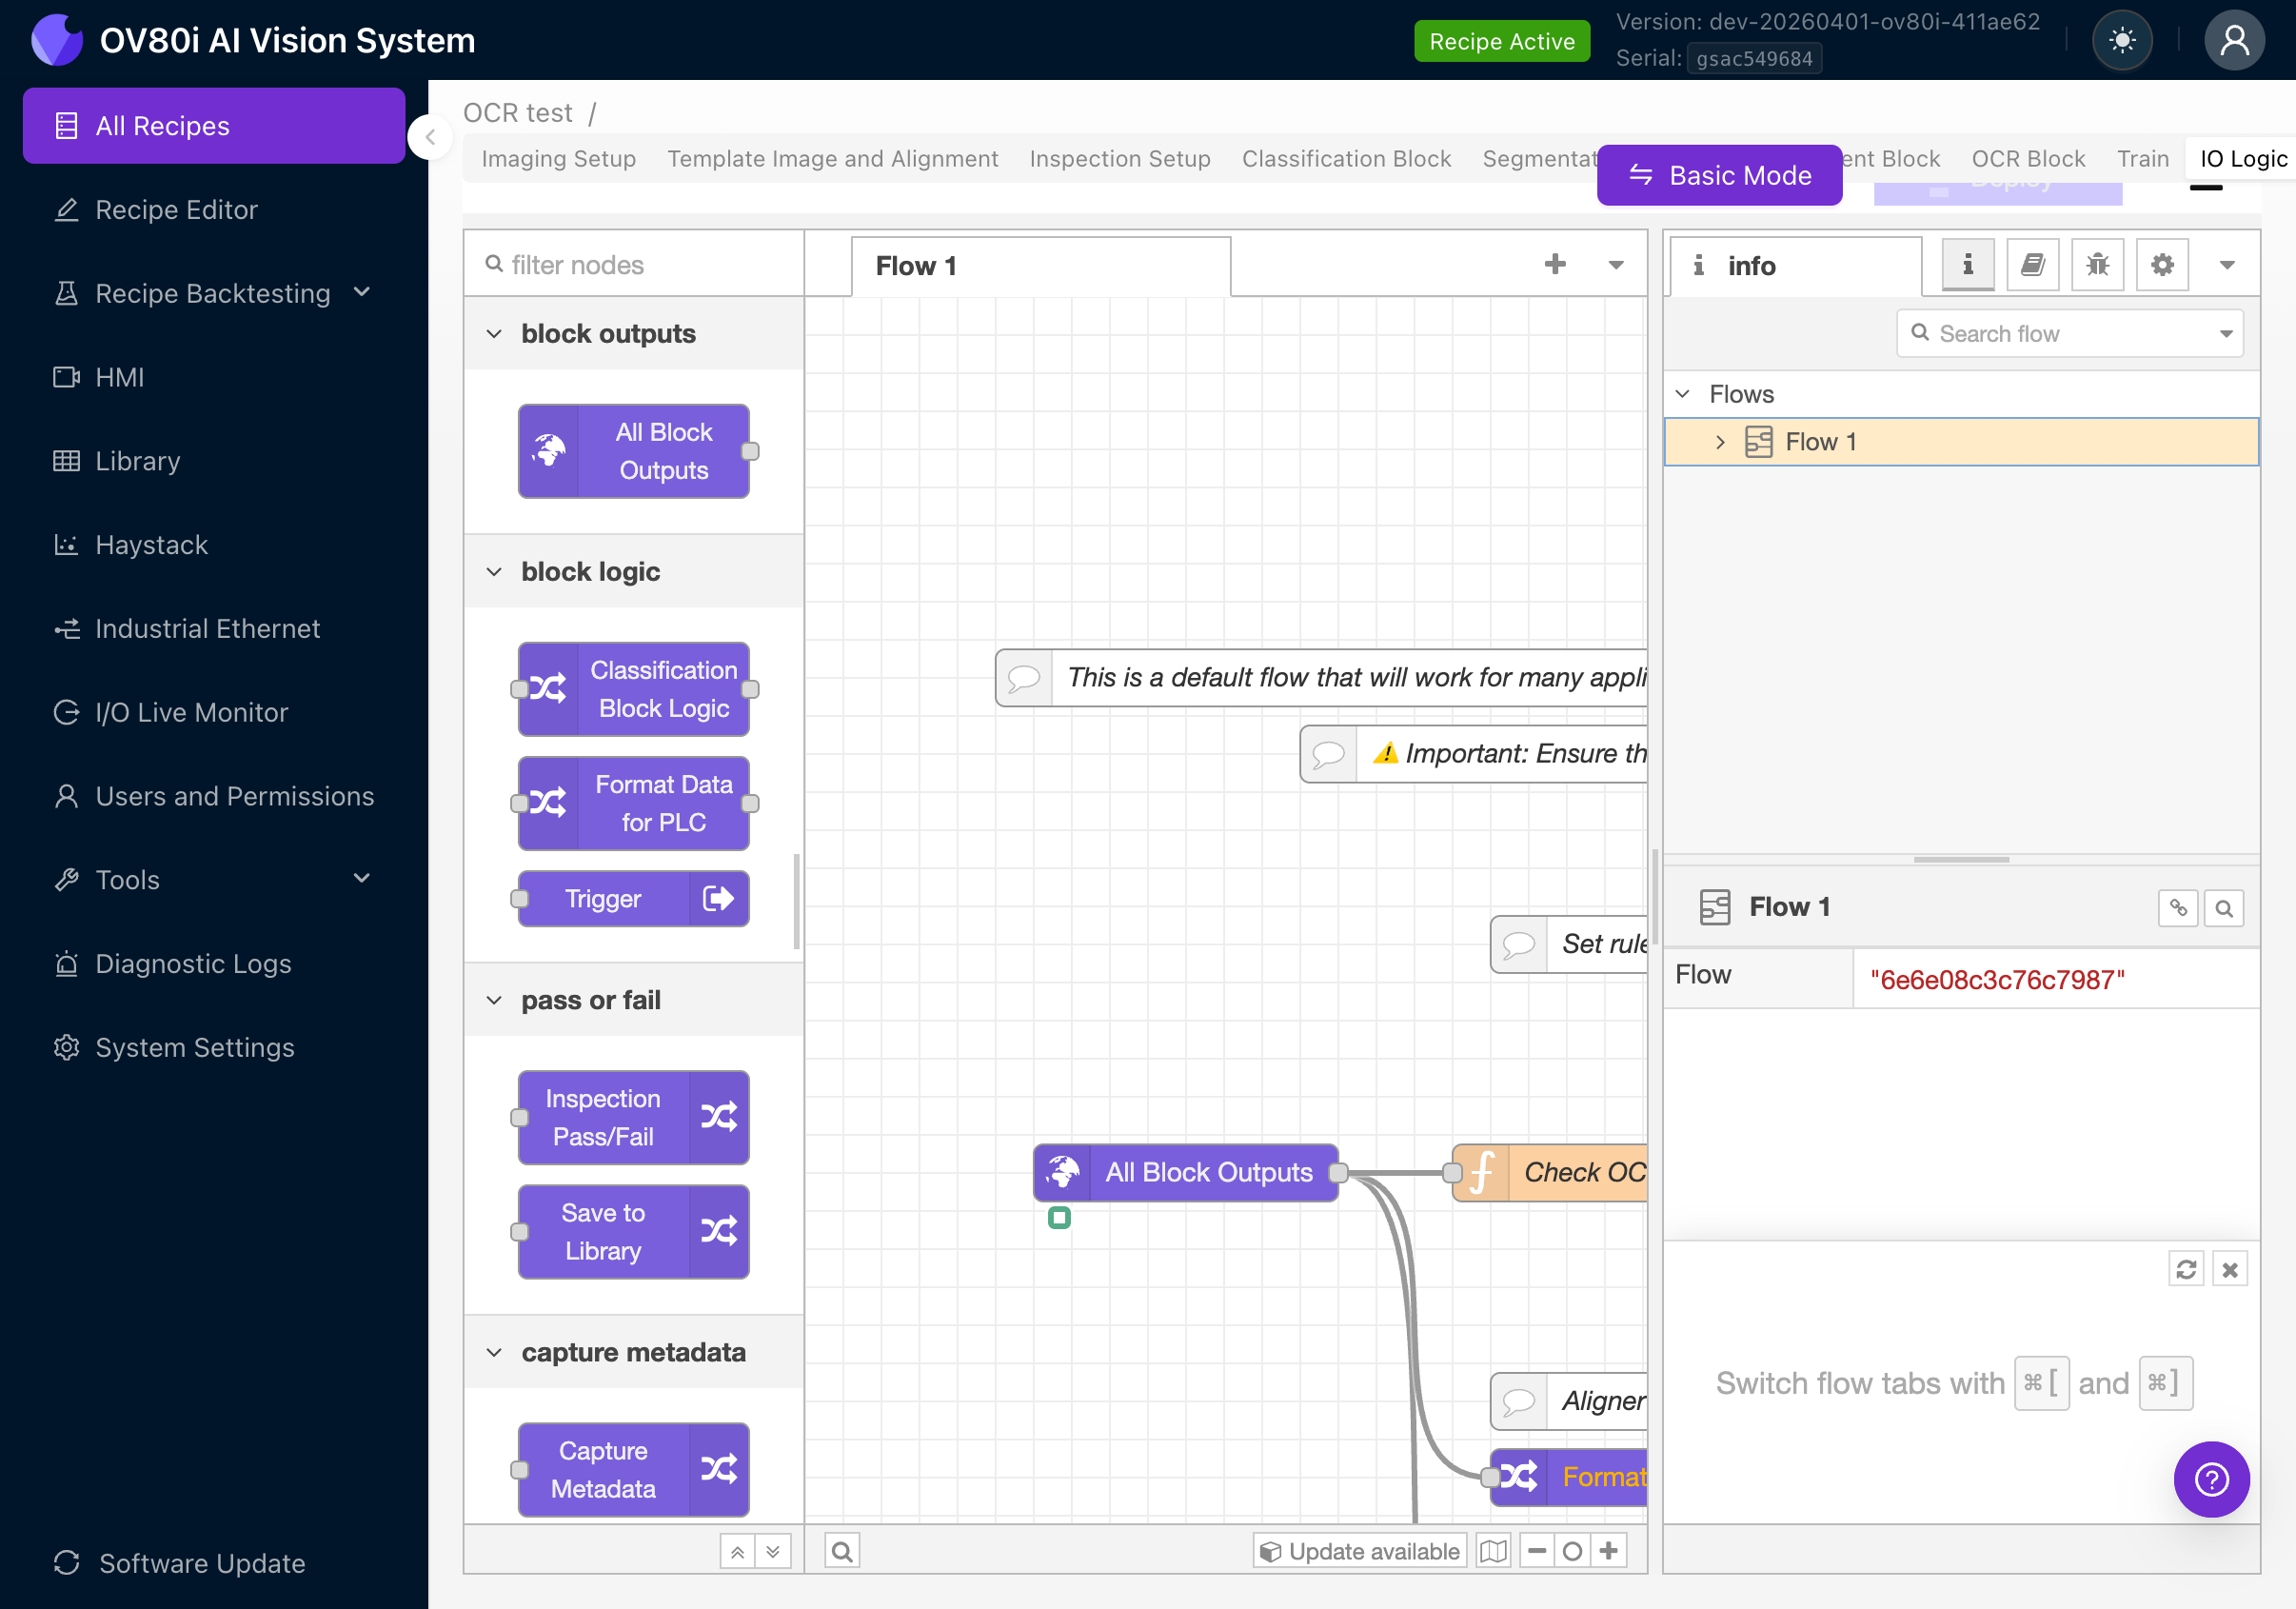
In Advanced Mode, you'll see a Node-RED flow canvas with pre-built nodes including:
- All Block Outputs: Receives results from all AI blocks (classification, segmentation, OCR, measurement)
- Check OCR (or similar): A function node containing JavaScript that evaluates OCR results
- Classification Block Logic / Format Data for PLC / Trigger: Other output nodes for integration
- Inspection Pass/Fail: Final pass/fail determination
- Save to Library: Stores results
OCR Output Payload in Node-RED
In Advanced Mode, OCR results are available in the msg.payload.ocr object. This gives you full programmatic access to every detection:
{
  "predictions": [
    {
      "roi_id": 1,
      "roi_name": "Serial Number",
      "center_x_global": 450,
      "center_y_global": 220,
      "angle_global": 90,
      "search_area_id": 1,
      "detections": [
        {
          "text": "SN-2025-0042",
          "confidence": 0.95,
          "roi_bbox": {
            "x": 10,
            "y": 5,
            "width": 120,
            "height": 30,
            "angle": 0
          },
          "global_bbox": {
            "x": 450,
            "y": 220,
            "width": 120,
            "height": 30,
            "angle": 90
          }
        }
      ]
    }
  ]
}
| Field | Description |
|---|---|
| roi_id | Numeric ID of the ROI that produced this result |
| roi_name | The name you gave the ROI (e.g., "Serial Number") |
| center_x_global / center_y_global | Center position of the ROI in full-frame coordinates |
| angle_global | Rotation angle of the ROI in the full frame |
| search_area_id | The inspection type / search area this ROI belongs to |
| detections | Array of individual text detections found within this ROI |
| detections[].text | The recognized text string |
| detections[].confidence | Recognition confidence from 0.0 to 1.0 (clamped) |
| detections[].roi_bbox | Bounding box position relative to the ROI crop origin |
| detections[].global_bbox | Bounding box position in the full camera frame (accounts for ROI rotation and alignment) |
Use msg.payload.ocr.predictions[0].detections.map(d => d.text).join(" ") to get the same joined text string that Basic Mode uses for comparison.
With Advanced Mode, you can:
- Apply regex patterns to detected text using JavaScript
- Filter detections by confidence threshold
- Combine OCR results with classification/segmentation results for complex logic
- Format OCR text for PLC output (e.g., send the detected serial number over EtherNet/IP)
- Send custom messages to Microsoft Teams or email based on OCR content
For a detailed guide on Node-RED, see Node-RED Basics.
You can switch between Basic and Advanced mode at any time using the toggle button at the top of the IO Logic page. When switching to Basic Mode, any deployed Node-RED logic is deactivated and replaced with Basic Mode rules. When switching back, the Node-RED flow is restored.
Step 9: Deploy the Recipe
Once your OCR setup is complete and tested:
- Navigate back to the Recipe Editor (click Recipe Editor in the left sidebar)
- Click the purple Deploy Recipe button at the bottom right
- The recipe is now active and running inspections
Viewing Results
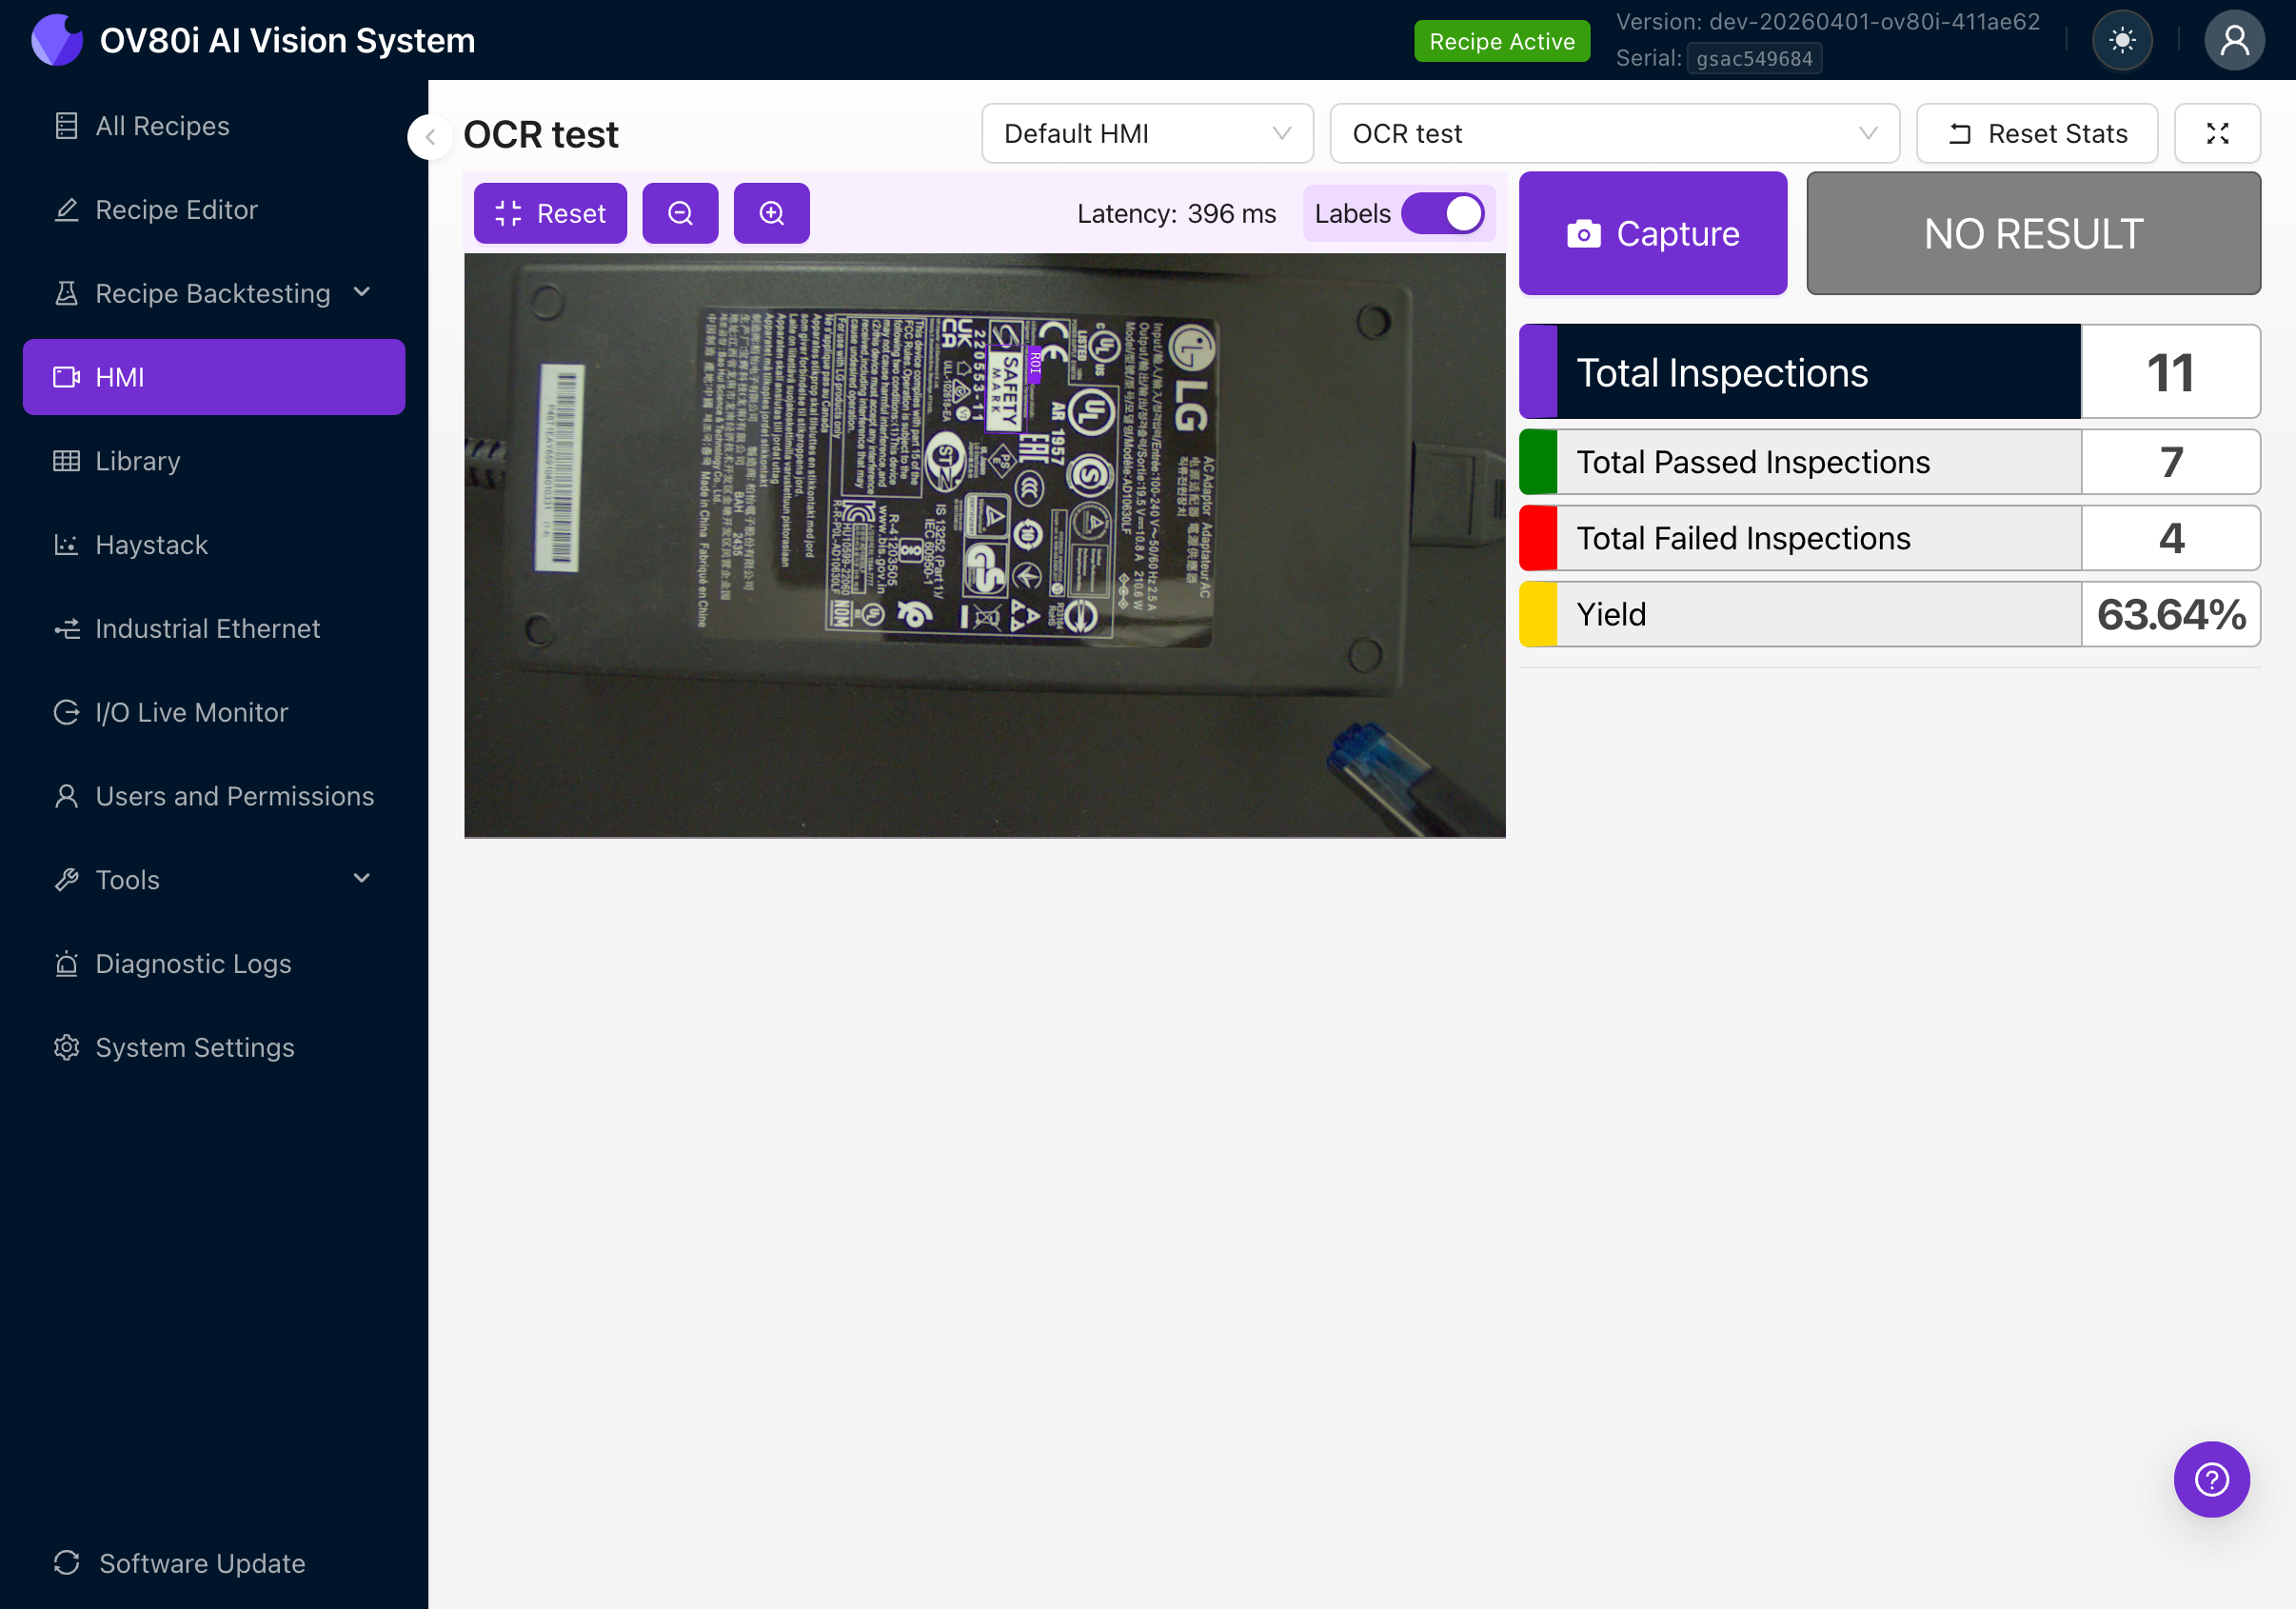
HMI
The HMI page shows live inspection results. With OCR active, you'll see:
- The live camera feed with purple bounding boxes around detected text
- Text labels showing what was read
- Pass/fail status based on your IO Logic rules
- Running statistics: total inspections, passed, failed, yield percentage
Library
Navigate to Library in the left sidebar to review stored results from past captures. Each capture entry shows:
- The captured image with OCR overlay
- Detected text per ROI
- Confidence scores
- Pass/fail outcome
Troubleshooting
No text detected
| Possible cause | Fix |
|---|---|
| ROI not positioned over text | Reposition the ROI in Inspection Setup |
| ROI orientation doesn't match text | Rotate the ROI to align with the text direction (Step 4d) |
| Text too small in the image | Move the camera closer or use a longer focal length lens |
| Text too small relative to ROI | Make the ROI tighter around the text area |
| Min Text Area too high | Lower the Min Text Area parameter |
| Poor lighting / low contrast | Improve lighting to maximize contrast between text and background |
| Text is blurry | Adjust focus on the C-mount lens and verify the camera mount is stable |
| Alignment not set up | Text detection requires alignment. Set up template alignment (Step 3) |
Wrong text detected (misreads)
| Possible cause | Fix |
|---|---|
| ROI orientation doesn't match text orientation | This is the #1 cause. Rotate the ROI to align with the text direction (Step 4d) |
| Low image quality or noise | Increase exposure, reduce gain, improve lighting |
| Text Segmentation Threshold too low | Increase to filter out false text detections |
| Overlapping text regions merging into one detection | Decrease Unclip Ratio to prevent box merging |
| Multiple lines of text in one ROI | Create separate ROIs for each line if reading order matters |
OCR confidence is consistently low
| Possible cause | Fix |
|---|---|
| Poor lighting uniformity | Ensure even illumination across the text area |
| Glare or reflections on text (especially glossy labels) | Adjust lighting angle to eliminate specular reflections. Consider diffuse lighting. |
| Very small or highly stylized font | Move camera closer or use a longer focal length lens to increase text size in the image |
| Damaged, faded, or partially printed text | OCR can only read what the camera sees. If text is physically degraded, accuracy will be lower. |
| High gain in image settings | Reduce gain. High gain adds noise that looks like text artifacts. |
Pass/fail rules not working as expected
| Possible cause | Fix |
|---|---|
| Text is joined differently than expected | Enable Live Preview and check exactly what text is being detected. Remember, multiple detections are joined with spaces. |
| Using "equals" when "includes" is more appropriate | If you only care about a substring, use "includes" instead of "equals" |
| Rules not deployed | Click Save & Deploy after changing rules in Basic Mode |
| Wrong ROI selected in the rule | Check the ROIs dropdown in your rule to make sure it targets the correct region |
Limitations
- Maximum 1 OCR block per recipe (you can have multiple ROIs within that block)
- English-optimized model only: The pre-trained model is optimized for Latin-based printed text. Handwritten text, cursive, or non-Latin scripts (Chinese, Japanese, Korean, Arabic) are not supported.
- No regex or pattern matching in Basic Mode: Pass/fail rules use simple string comparison (equals, not equals, includes, not includes). For complex validation patterns (e.g., matching "SN-####-####"), use Advanced Mode (Node-RED) with custom JavaScript regex.
- No user-configurable character set: The model's 480-character dictionary is fixed. You cannot restrict recognition to digits-only, for example. Use pass/fail rules to validate the expected format.
- No guaranteed text ordering: When multiple text regions are detected within an ROI, they are joined in detection order (by contour), not necessarily in reading order (left-to-right, top-to-bottom). If reading order matters, use separate ROIs for each line of text.
- Pre-trained model only: Unlike classification and segmentation, the OCR model cannot be retrained or fine-tuned on your specific fonts or text styles. It uses the built-in pre-trained OCR model.
See Also
- Create First Inspection - Full recipe creation walkthrough
- Image Settings - Detailed imaging setup guide
- Alignment - Template alignment deep dive
- Regions of Interest (ROIs) - ROI sizing and strategy
- Inspection Setup and ROI Types - ROI type reference
- Node-RED Basics - Advanced IO logic programming
- Imaging Setup Fundamentals - Lighting and image quality theory