AI 驅動文件
您想了解什麼?
連線到 Tulip
Tulip 是一個無程式碼 MES/互聯前線運營平臺。OV10i 攝像頭透過執行在攝像頭上的 Node-RED 與 Tulip 進行橋接 — 這與您用於 PLC、MQTT 和其他 I/O 整合的流程編輯器相同。Tulip 可以:
- 透過操作員按鈕或應用事件觸發檢測。
- 接收每個 ROI 和全域性的 pass/fail 結果以及捕獲後設資料。
- 當操作員掃描零件條形碼或選擇不同產品時,切換活動程式。
- 在 Tulip 應用中顯示實時影象(帶邊界框疊加層),讓操作員看到 AI 所看到的內容。
本指南將端到端地介紹這四個整合點。
架構
┌────────────────────────────┐               ┌──────────────────────────────┐
│            TULIP           │               │           OV10i              │
│                            │               │                              │
│  ┌──────────────────┐      │   HTTP/MQTT   │   ┌──────────────────────┐   │
│  │ Operator Button  │──────┼───trigger─────┼──▶│ Node-RED HTTP IN     │──▶│
│  │ in Tulip App     │      │               │   │ /trigger             │   │
│  └──────────────────┘      │               │   └──────────────────────┘   │
│                            │               │              │               │
│  ┌──────────────────┐      │               │              ▼               │
│  │ Tulip Connector  │◀─────┼─── results ───┼─── All Block Outputs         │
│  │ Function (HTTP)  │      │               │   (image_url, pass/fail,     │
│  └──────────────────┘      │               │    per-ROI classes)          │
│                            │               │              │               │
│  ┌──────────────────┐      │               │              ▼               │
│  │ Image Widget     │◀─────┼── live-feed ──┼─── http://CAMERA_IP/live-feed│
│  │ (iframe URL)     │      │  (HMI w/ ROI  │   (shows bounding boxes      │
│  └──────────────────┘      │    overlays)  │    on the captured image)    │
│                            │               │                              │
│  ┌──────────────────┐      │               │   ┌──────────────────────┐   │
│  │ Recipe Selector  │──────┼─── HTTP ──────┼──▶│ /pipeline/activate   │   │
│  │ (barcode / btn)  │      │               │   │ {id: <recipe_id>}    │   │
│  └──────────────────┘      │               │   └──────────────────────┘   │
└────────────────────────────┘               └──────────────────────────────┘
中間的橋接始終是執行在攝像頭 IO模組 中的 Node-RED — 您在此處構建所有四個整合。
將 Tulip 聯結器 URL 硬編碼到 Node-RED 流程中會將該流程與單一部署繫結。請在 System Settings → Environment Variables 中定義一個 TULIP_ENDPOINT 環境變數,然後透過 ${TULIP_ENDPOINT} 在 HTTP Request 節點中讀取它。這樣您就可以匯出同一個流程並將其重新匯入到產線上的每臺攝像頭。完整模式請參見 環境變數。
選擇傳輸方式:HTTP 或 MQTT
| 選項 | 適用場景 | 說明 |
|---|---|---|
| HTTP(推薦用於大多數 Tulip 部署) | Tulip Connector Functions 原生呼叫 HTTP 端點。這是從 Tulip 小部件按鈕觸發的最簡單方式。 | 無需任何額外基礎設施即可工作。Tulip → 相機和相機 → Tulip 都使用普通的 POST。 |
| MQTT | 您的工廠已執行 MQTT broker(Sparkplug B、IT/OT broker 等),並且 Tulip Edge Connector 已配置為與其通訊。 | 高頻信令時延遲更低。需要 broker。 |
| OPC UA | 您正在執行配備 OPC UA Connector 的 Tulip Edge MC 例項。 | OV10i 出廠時已預裝 OPC UA Node-RED 模型。 |
本指南其餘部分的示例使用 HTTP ——這是大多數 Tulip 部署的預設方式。相同的模式同樣適用於 MQTT(將 HTTP IN / HTTP Request 節點替換為 MQTT in / MQTT out 節點)。
1. 從 Tulip 應用觸發相機
Tulip 操作員按下按鈕 → Tulip 的 Connector Function 呼叫相機 Node-RED 正在監聽的 HTTP 端點 → Node-RED 觸發一次捕獲。
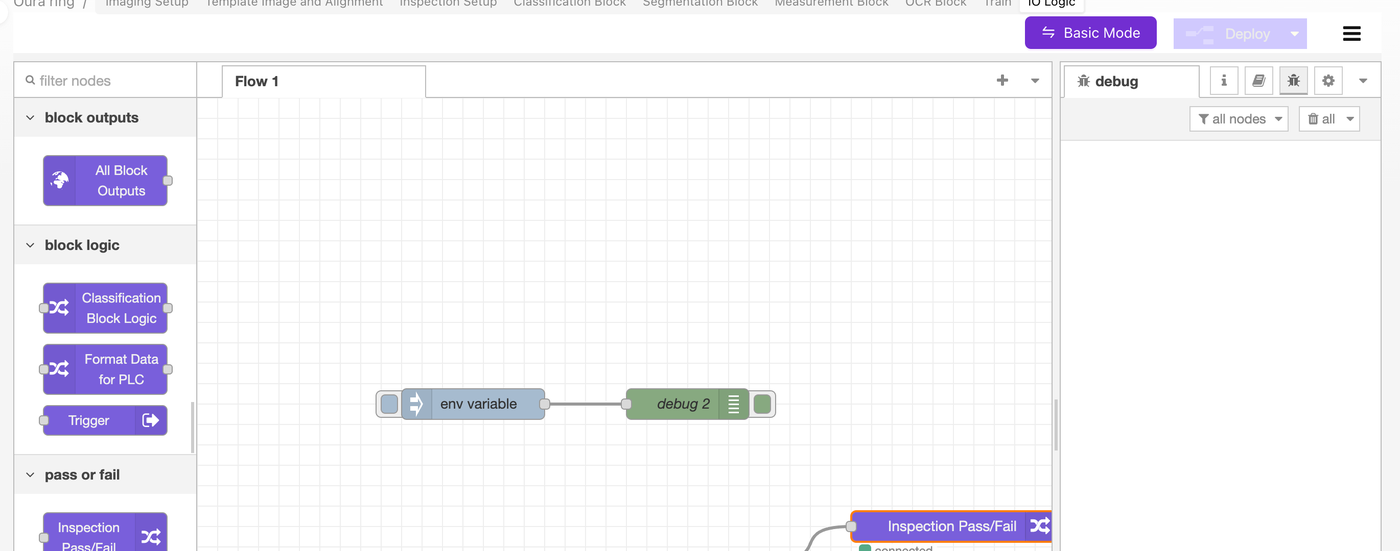
Node-RED 端:接收觸發
在相機的 IO模組(Advanced Mode → Node-RED)中,構建:
[ HTTP IN: POST /trigger ]──▶[ Trigger node ]──▶[ HTTP Response: 200 ok ]
- 從 network 類別中拖入一個 http in 節點。
- Method:
POST - URL:
/trigger
- Method:
- 將其連線到 OV 專用的 Trigger 節點(位於 OV 調色盤的 block logic 下)。Trigger 節點會觸發相機的捕獲流水線。
- 新增一個 http response 節點,以便 Tulip 的 Connector 立即收到
200 OK響應(不要讓 Tulip 等待 AI 推理——讓結果非同步返回,參見第 2 節)。 - 點選 部署。
該端點現已在 http://<CAMERA_IP>/node-red/trigger 上執行(Node-RED 的 HTTP 根路徑掛載於 /node-red/ 下)。
Tulip 端:從按鈕呼叫觸發
在您的 Tulip 帳戶中:
- 前往 Apps → Connectors,如果尚未建立,則新建一個 HTTP Connector。
- 將 Host 設定為相機的 IP,Port 設定為
80(如果已啟用 HTTPS,則為443)。 - 建立一個名為
Trigger Camera的新 Connector Function:- Method:
POST - Endpoint:
/node-red/trigger - 基本觸發不需要正文或輸入引數——相機將使用當前活動的程式。
- Method:
- 儲存並測試該 Connector Function。您應看到 200 響應,且相機應捕獲一張影象。
- 在您的 Tulip 應用中,新增一個 Button 小部件。在其操作中,選擇 Run Connector Function → Trigger Camera。
當操作員點選按鈕時,相機即觸發。
如果您希望在每次觸發時傳送序列號或零件 ID,請將 Tulip Connector Function 更改為接受輸入(例如 serial_number),並將其放入請求正文中。在相機端,您的 HTTP IN 節點會將其作為 msg.payload 接收,您可以將其儲存在 flow 變數中,以便結果傳送流程(第 2 節)將其附加到檢測報告中。
2. 將結果傳送回 Tulip
相機捕獲後,All Block Outputs 節點將攜帶完整的檢測結果觸發。模式如下:
[ All Block Outputs ]──▶[ Function: format for Tulip ]──▶[ HTTP Request: POST to Tulip ]
構建流程
- 在 All Block Outputs 節點的下游連線一個 function 節點。
- 該函式將每個 ROI 的結果整合為單一的全域性 pass/fail,並將載荷精簡為 Tulip 實際所需的內容:
// Read the camera's full inspection payload
const p = msg.payload || {};

// Consolidate per-ROI classifier predictions into a global pass/fail
const preds = p.classification?.predictions || [];
const allPass = preds.length > 0 && preds.every(r => r.predicted_class === 'pass');

// Optional: count segmentation defects (e.g., for thresholded fail)
const defectPixels = (p.segmentation?.blobs || [])
  .reduce((s, b) => s + (b.pixel_count || 0), 0);

// Build a flat object for Tulip (Tulip Connector Functions like flat fields)
msg.payload = {
  result: allPass ? "pass" : "fail",
  inspection_id: p.inspection_id || null,
  timestamp: new Date().toISOString(),
  image_url: p.image_url || null,            // see Section 4 for displaying this in Tulip
  defect_pixel_count: defectPixels,
  per_roi: preds.map(r => ({
    roi: r.roi_name,
    class: r.predicted_class,
    confidence: r.confidence,
  })),
  // If you stashed a serial number from the trigger (see Section 1), add it:
  // serial_number: flow.get('lastSerial') || null,
};

// Set headers for the outbound HTTP request
msg.headers = { 'Content-Type': 'application/json' };
msg.method = 'POST';
return msg;
- 將其連線到 http request 節點:
- Method:
POST(或使用上述函式中的msg.method) - URL:
${TULIP_ENDPOINT}(從環境變數讀取)或硬編碼的 Tulip Connector URL - Return:
a UTF-8 string(如果你的 Tulip 端點返回 JSON,則選擇 JSON)
- Method:
- 在 HTTP request 之後連線一個 debug 節點,以便在測試時檢查 Tulip 的響應。
- 點選 部署。
Tulip 端:接收結果
在 Tulip 中:
- 在接收方向建立一個 HTTP Connector Function——一個 webhook 端點,或者使用 Tulip 的 Tables API 將結果寫入 Tulip Table。
- 配置你的 Tulip 應用邏輯以響應入站載荷(例如,更新狀態指示器、記錄到 Table、遞增計數器)。
對於 Tulip Tables,具體模式是向 https://<your-tulip-instance>.tulip.co/api/v3/tables/<table_id>/records 傳送 POST 請求,並附帶 result、serial_number、timestamp 欄位。在 Authorization 標頭中使用 Tulip API token——將 token 作為憑據儲存在 HTTP Connector 上,而不是儲存在 Node-RED 流程中。
3. 從 Tulip 切換程式
當產品型別發生變化時(條碼掃描、下拉選擇、排程),操作員通常需要切換到不同的程式。相機暴露了一個內建的 HTTP 端點,可透過 ID 啟用程式。
查詢程式 ID
- 在 程式編輯器 中開啟程式。
- 檢視瀏覽器位址列:
/recipes/15/editor→ ID 即為15。
構建程式切換流程
[ HTTP IN: POST /change-recipe ]──▶[ Function: format request ]──▶[ HTTP Request: POST localhost:5001/pipeline/activate ]──▶[ HTTP Response ]
- HTTP IN 節點:
POST /change-recipe。Tulip 將使用類似{ "id": 15 }的請求體呼叫此端點。 - Function 節點 — 將程式 ID 傳遞給相機的內部 API:
const recipeId = msg.payload?.id;
if (!recipeId) {
  msg.statusCode = 400;
  msg.payload = { error: "missing 'id' field" };
  return msg;
}
msg.headers = { 'Content-Type': 'application/json' };
msg.payload = JSON.stringify({ id: recipeId });
msg.method = 'POST';
return msg;
- HTTP Request 節點:
- Method:
POST - URL:
localhost:5001/pipeline/activate - Return:
a parsed JSON object
- Method:
- HTTP Response 節點,讓 Tulip 的 Connector Function 能夠獲取返回的狀態碼。
在相機的 Node-RED 中,程式切換端點為 localhost:5001/pipeline/activate — 這是相機內部的管理 API。您是透過 Node-RED 將 Tulip 的請求代理到本地 API。請勿嘗試從相機外部直接呼叫 5001 埠;該埠僅向相機內部流程開放。
對於較舊的韌體(v18.92 之前),URL 為 http://[CAMERA_IP]/edge/pipeline/activate。如果您使用的是較舊的韌體,且 localhost:5001 無響應,請回退到 v17/v18 的 URL。請將相機韌體更新至 v18.92+ 以使用新版路徑。
Tulip 端:呼叫程式切換
- 在同一個 HTTP Connector 上新增一個 Connector Function
Switch Recipe。 - Method:
POST,Endpoint:/node-red/change-recipe。 - 新增一個輸入引數
recipe_id(數字)。 - 將請求體設定為
{ "id": $recipe_id }。 - 在您的 Tulip 應用中,將 Barcode Scanner 觸發器或 Dropdown 控制元件連線到此函式,使用匹配的程式 ID 進行呼叫。
操作員掃描條碼 → Tulip 查詢該零件對應的程式 ID → Connector Function 呼叫相機 → 相機在不到一秒內切換程式。
4. 在 Tulip 中顯示實時影象(含邊界框)
Tulip 的 Image Widget 可以顯示任何返回影象的 URL。OV10i 擁有一個內建的 HMI URL,可返回最近一次的捕獲影象,並在其上繪製邊界框和 ROI 疊加層:
http://<CAMERA_IP>/live-feed
將其嵌入 Tulip 應用:
- 向您的 Tulip 步驟中新增 Image Widget。
- 將 Image URL 設定為您從檢測結果中填充的 Tulip 變數,或者如果每個相機都有自己的儀表板步驟,則設定為一個靜態 URL。
- 最簡單的方式:硬編碼
http://<CAMERA_IP>/live-feed,並讓它在每次捕獲時自動重新整理(Tulip 的 Image Widget 在其 URL 或查詢引數發生變化時會重新整理 — 附加一個?t={{timestamp}}來強制重新整理)。
如果您想要原始捕獲影象(不含邊界框),請改用 msg.payload 中的 image_url — 這是一個每次捕獲的 URL,指向儲存在相機庫中的影象。
如果同一條產線上有多臺相機,每臺都有自己的 IP,請按應用步驟將相機 URL 儲存在 Tulip 變數中,讓操作員選擇要檢視的工位。當變數變化時,Image Widget 會立即切換。
參考流程(可匯入的 Node-RED JSON)
下面的流程結合了所有四個整合:觸發器 HTTP IN、結果傳送 HTTP Request、程式切換器和除錯節點。複製 JSON,開啟 Node-RED → 漢堡選單 → Import,然後貼上。
[
  {
    "id": "tulip_trigger_in",
    "type": "http in",
    "name": "POST /trigger",
    "url": "/trigger",
    "method": "post",
    "x": 160, "y": 100, "wires": [["tulip_trigger_fire"]]
  },
  {
    "id": "tulip_trigger_fire",
    "type": "trigger-camera",
    "name": "Trigger camera",
    "x": 380, "y": 100, "wires": [["tulip_trigger_resp"]]
  },
  {
    "id": "tulip_trigger_resp",
    "type": "http response",
    "name": "200 ok",
    "statusCode": "200",
    "x": 580, "y": 100, "wires": []
  },
  {
    "id": "tulip_results_format",
    "type": "function",
    "name": "Format for Tulip",
    "func": "const p = msg.payload || {};\nconst preds = p.classification?.predictions || [];\nconst allPass = preds.length > 0 && preds.every(r => r.predicted_class === 'pass');\nmsg.payload = {\n  result: allPass ? 'pass' : 'fail',\n  timestamp: new Date().toISOString(),\n  image_url: p.image_url || null,\n  per_roi: preds.map(r => ({roi: r.roi_name, class: r.predicted_class, confidence: r.confidence}))\n};\nmsg.headers = {'Content-Type':'application/json'};\nmsg.method = 'POST';\nreturn msg;",
    "x": 380, "y": 200, "wires": [["tulip_results_send"]]
  },
  {
    "id": "tulip_results_send",
    "type": "http request",
    "name": "POST to Tulip",
    "method": "POST",
    "url": "${TULIP_ENDPOINT}",
    "ret": "obj",
    "x": 600, "y": 200, "wires": [["tulip_results_debug"]]
  },
  {
    "id": "tulip_results_debug",
    "type": "debug",
    "name": "Tulip response",
    "x": 800, "y": 200, "wires": []
  },
  {
    "id": "tulip_recipe_in",
    "type": "http in",
    "name": "POST /change-recipe",
    "url": "/change-recipe",
    "method": "post",
    "x": 160, "y": 300, "wires": [["tulip_recipe_format"]]
  },
  {
    "id": "tulip_recipe_format",
    "type": "function",
    "name": "Format request",
    "func": "const id = msg.payload?.id;\nif (!id) { msg.statusCode = 400; msg.payload = {error:'missing id'}; return msg; }\nmsg.headers = {'Content-Type':'application/json'};\nmsg.payload = JSON.stringify({id});\nmsg.method = 'POST';\nreturn msg;",
    "x": 380, "y": 300, "wires": [["tulip_recipe_call"]]
  },
  {
    "id": "tulip_recipe_call",
    "type": "http request",
    "name": "/pipeline/activate",
    "method": "POST",
    "url": "localhost:5001/pipeline/activate",
    "ret": "obj",
    "x": 600, "y": 300, "wires": [["tulip_recipe_resp"]]
  },
  {
    "id": "tulip_recipe_resp",
    "type": "http response",
    "name": "to Tulip",
    "x": 800, "y": 300, "wires": []
  }
]
您仍需將 All Block Outputs 節點連線到 tulip_results_format(它不在上述 JSON 中,因為該節點是 OV 特有的,且已存在於每個流程中)。
故障排除
| 現象 | 原因 / 解決方法 |
|---|---|
Tulip Connector 返回 connection refused | 相機與 Tulip Edge Device 不在同一網路上,或相機防火牆阻止了埠 80。兩者必須能夠相互訪問;請先從 Tulip Edge Device ping 相機。 |
| 觸發器 HTTP IN 從未觸發 | 新增節點後忘記在 Node-RED 中執行 Deploy,或 URL 拼寫錯誤(必須以 / 開頭,而非 /node-red/)。 |
| 程式切換返回 404 | 端點與您的韌體不匹配。v18.92 之前的版本使用相機 IP 的 /edge/pipeline/activate;v18.92+ 在 Node-RED 內部使用 localhost:5001/pipeline/activate。 |
/live-feed 在 Tulip 中顯示黑色影象 | 相機尚未進行捕獲,或影象未重新整理。追加 ?t={{Date.now()}} 以強制 Image Widget 重新獲取。 |
| Tulip 收到 200 但沒有結果正文 | 相機觸發後立即返回 200 — 結果透過結果傳送流程(第 2 節)非同步返回。確保該流程已連線並部署。 |
| 每個 ROI 的結果過於繁雜 / Tulip 只需要 pass/fail | 這就是為什麼 Function 節點會在傳送前將所有內容合併為單個 `result: "pass" |
後續步驟
- 環境變數 — 將
TULIP_ENDPOINT和其他部署相關配置排除在流程之外。 - 連線到 PLC(EtherNet/IP 和 PROFINET) — 用於在 Tulip 之外並行整合 PLC。
- Overview Node-RED 自定義模組 — OV 專用調色盤節點(Trigger、All Block Outputs 等)的參考。
- 設定輸出(步驟 5) — Node-RED 在更廣泛的透過/失敗流程中的位置。