AI-POWERED DOCS
What do you want to know?
Inspection Tools: Which One to Use
OV Spark Pro ships seven tools. The hard part is not configuring them, it is picking the right one, so start from what you are trying to check rather than from the tool names.
What do you need to check?
Pick the closest description. Most recipes combine several tools, so you can come back and add another once the first one is working.
Set one up
Picking the tool is half the job. Each tool below carries a live demonstration of the one setting that decides its verdict, alongside the steps the camera puts you through, the real defaults, and the mistakes that cost the most time.
Locates the part so every other tool inspects the same spot. Unless a fixture holds the part identically every cycle, this is tool 1 and everything else references it.
What you actually do
- Add it first. The order in the tool list is the order tools run, and the aligner has to run before anything that follows it.
- Set Up. Press My part is in position, let’s capture to freeze a good part, then add 1 to 3 template regions on features that are always there, spread as far apart as you can.
- Live Preview. Move real parts around the frame and set the confidence threshold so good parts sit clear of it.
- Point your other tools at it. Each tool has its own Aligner step where you pick this aligner, and its regions then follow the part.
Training (optional)
Settings that matter
| Setting | Range | Default | What it controls |
|---|---|---|---|
| Rotation Range | 0 to 180 degrees | 15 degrees | How much rotation is searched. A narrow range doubles as an orientation reject. |
| Sensitivity | 0 to 2 | 1.0 | How aggressively edges are found. Raise only until the highlights stay green. |
| Confidence threshold | 0 to 1 | 0.5, recommended 0.6 to 0.9 | How sure the aligner must be before it calls the part found. |
How it passes or fails
- The aligner does not judge the part. It decides only whether the part was found.
- If it is not found, every tool referencing it is skipped, and Step 4 Judgment decides whether that counts as a failure.
What it reports
Whether the part was found, its confidence, centre position, rotation, and processing time.
Watch out for
- Never anchor to a label, sticker or defect. The aligner will follow the sticker rather than the part, and drag every inspection region with it.
- Spread your anchors. Two anchors close together give almost no rotation baseline, which is the most common setup mistake.
- Validate it before building anything on top. Fixing the aligner afterwards means redoing every tool that references it.
This is the short version. The Alignment page has the full four-step walkthrough and an anchor lab showing why spread matters.
Alignment has its own walkthrough on the Alignment page, since almost every recipe starts with it.
The same catalog, in the camera
You will find the same set under Add tool in the recipe editor:
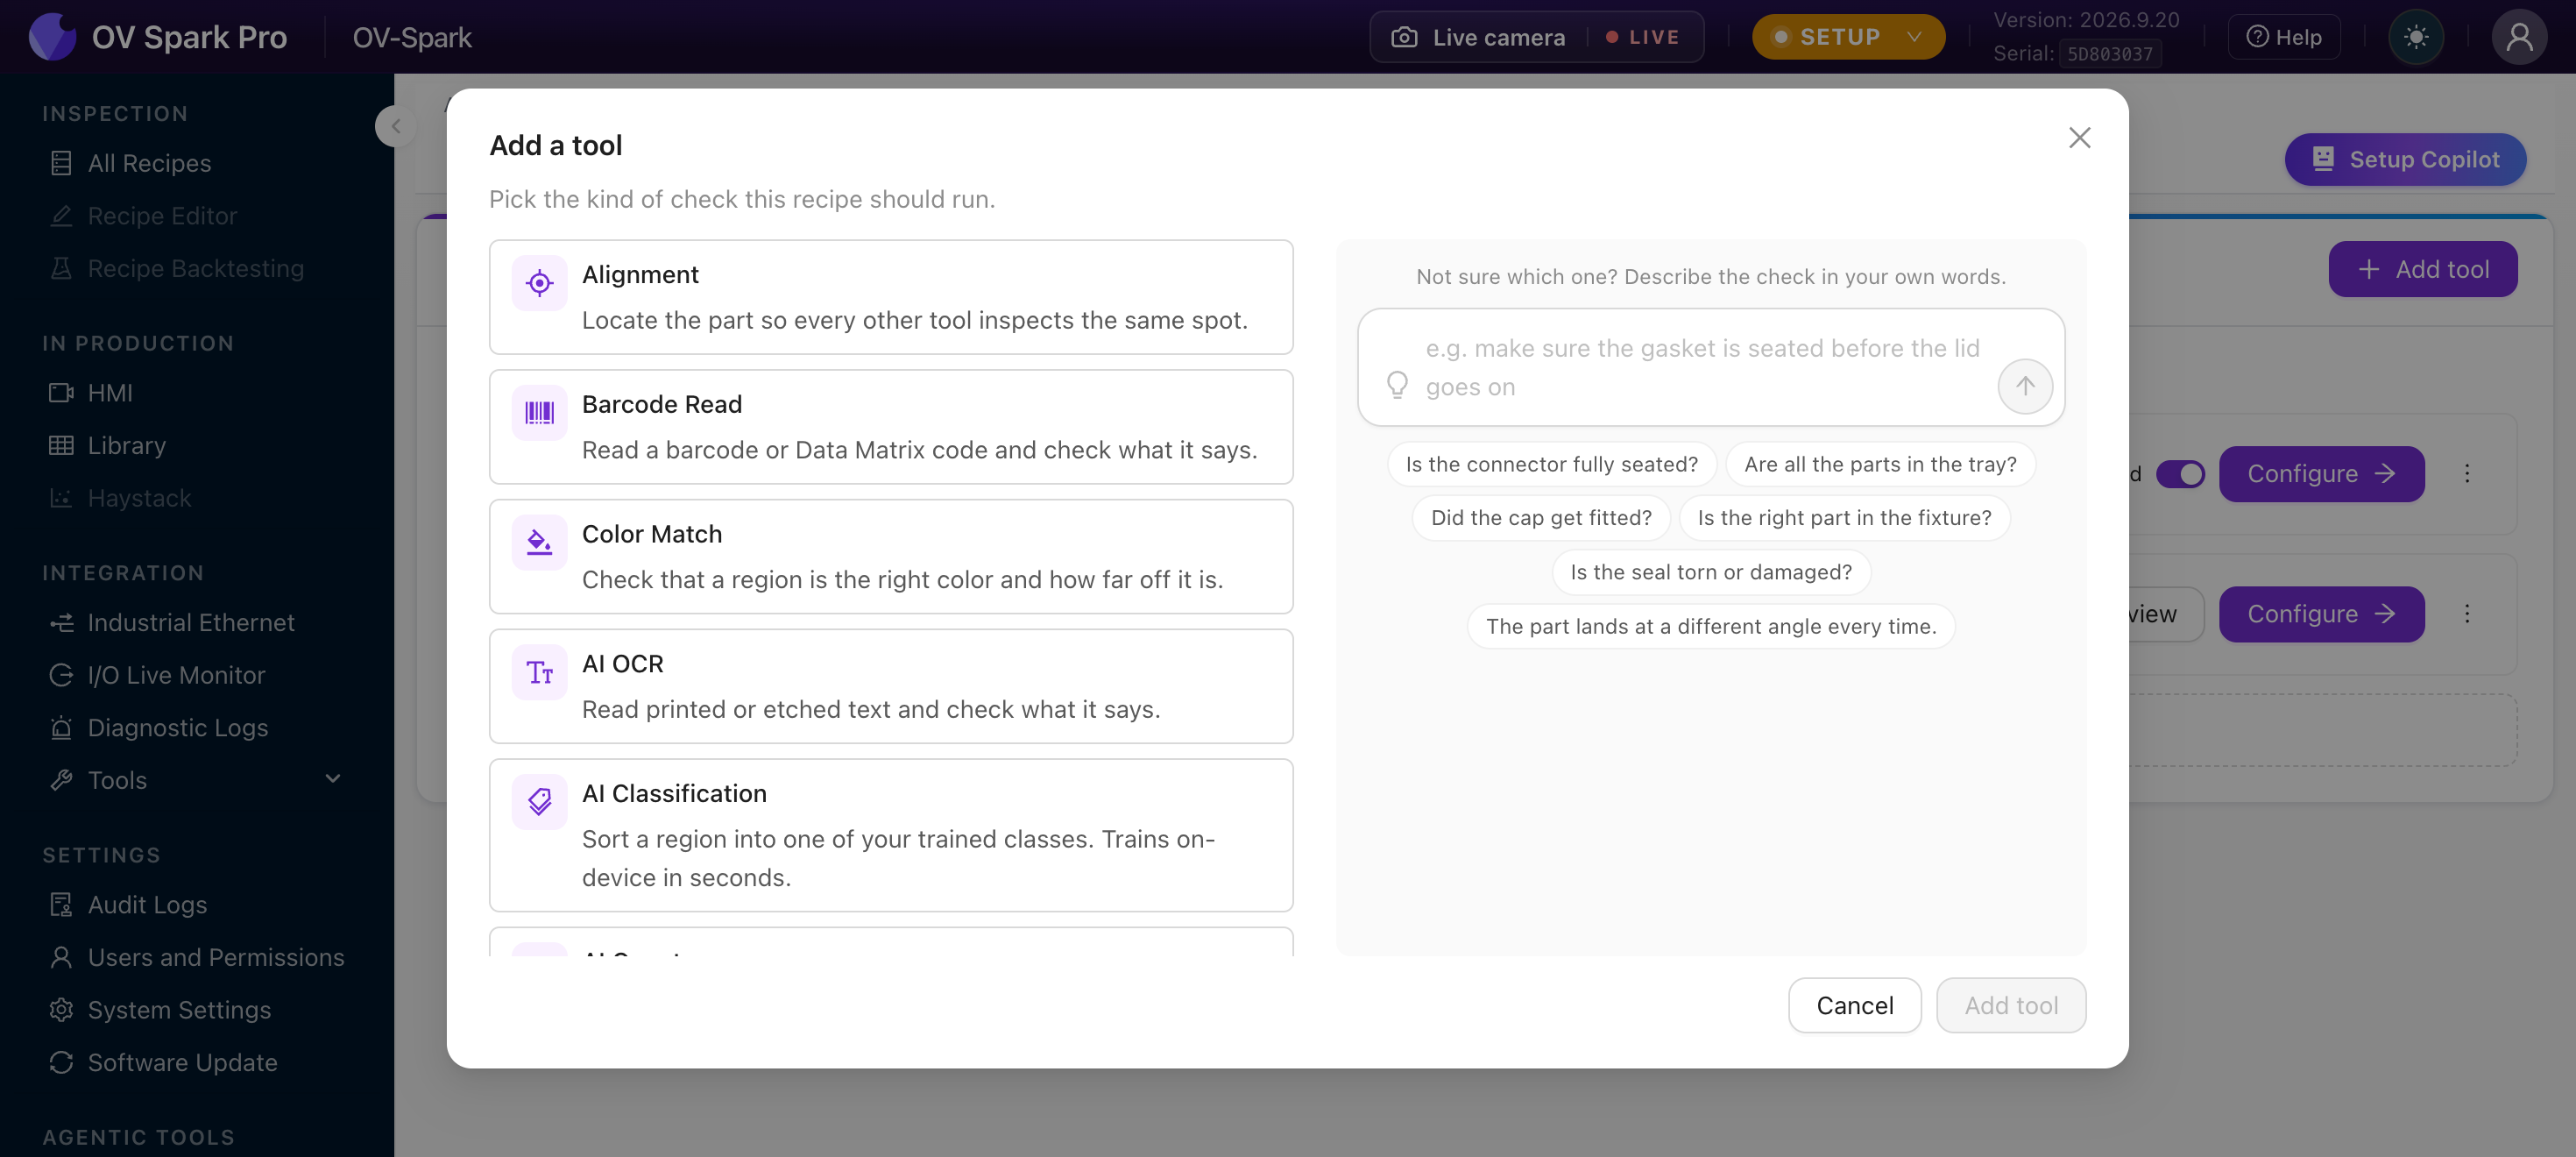
It has a built-in AI helper at the bottom: Not sure which one? Describe the check in your own words, with starters like "Is the connector fully seated?" and "The part lands at a different angle every time." If you would rather describe the problem than pick from a list, use that.
The full set
| Tool | Category | Training | What it does |
|---|---|---|---|
| AI Classification | AI | On-device | Sorts a region into one of your trained classes |
| AI Count | AI | On-device | Detects and counts objects, judges against an expected count |
| AI Segmentation | AI | On-device | Outlines features pixel by pixel, judges by area and blob count |
| AI OCR | AI | None, tuning optional | Reads printed or etched text and checks what it says |
| Barcode Read | Classical | None | Reads a 1D or 2D code and checks what it says |
| Color Match | Classical | None | Checks a region is the right color and reports how far off |
| Alignment | Alignment | None | Locates the part so every other tool inspects the same spot |
Alignment, AI OCR, Barcode Read, and Color Match work as soon as you draw a region and set their rules. Only Classification, Count, and Segmentation learn from your examples. If one of the untrained tools solves your problem, it will be quicker to deploy and easier to support.
How much each tool can hold
| Tool | Limit |
|---|---|
| AI Classification | 64 regions, 16 classes |
| AI Segmentation | 64 regions, 64 classes |
| AI Count | 256 marked parts on the master image |
| AI OCR | 16 fields, 8 patterns |
| Color Match | 10 reference samples |
The editor stops you adding past a limit. If a recipe needs more, split the work across two tools of the same kind.
Bring in images you already have
You do not have to capture every template or training image live. Wherever a tool asks for an image, you can also pick one from the camera's Library or upload one from your computer.
Look for Use existing image next to the capture button, wherever a tool asks you to capture: the aligner's template, the reference and training captures in each tool's Set Up and labeling steps, the AI Count master image, and Color Match samples. Steps that need one image take one; steps that build a training set take several at once.
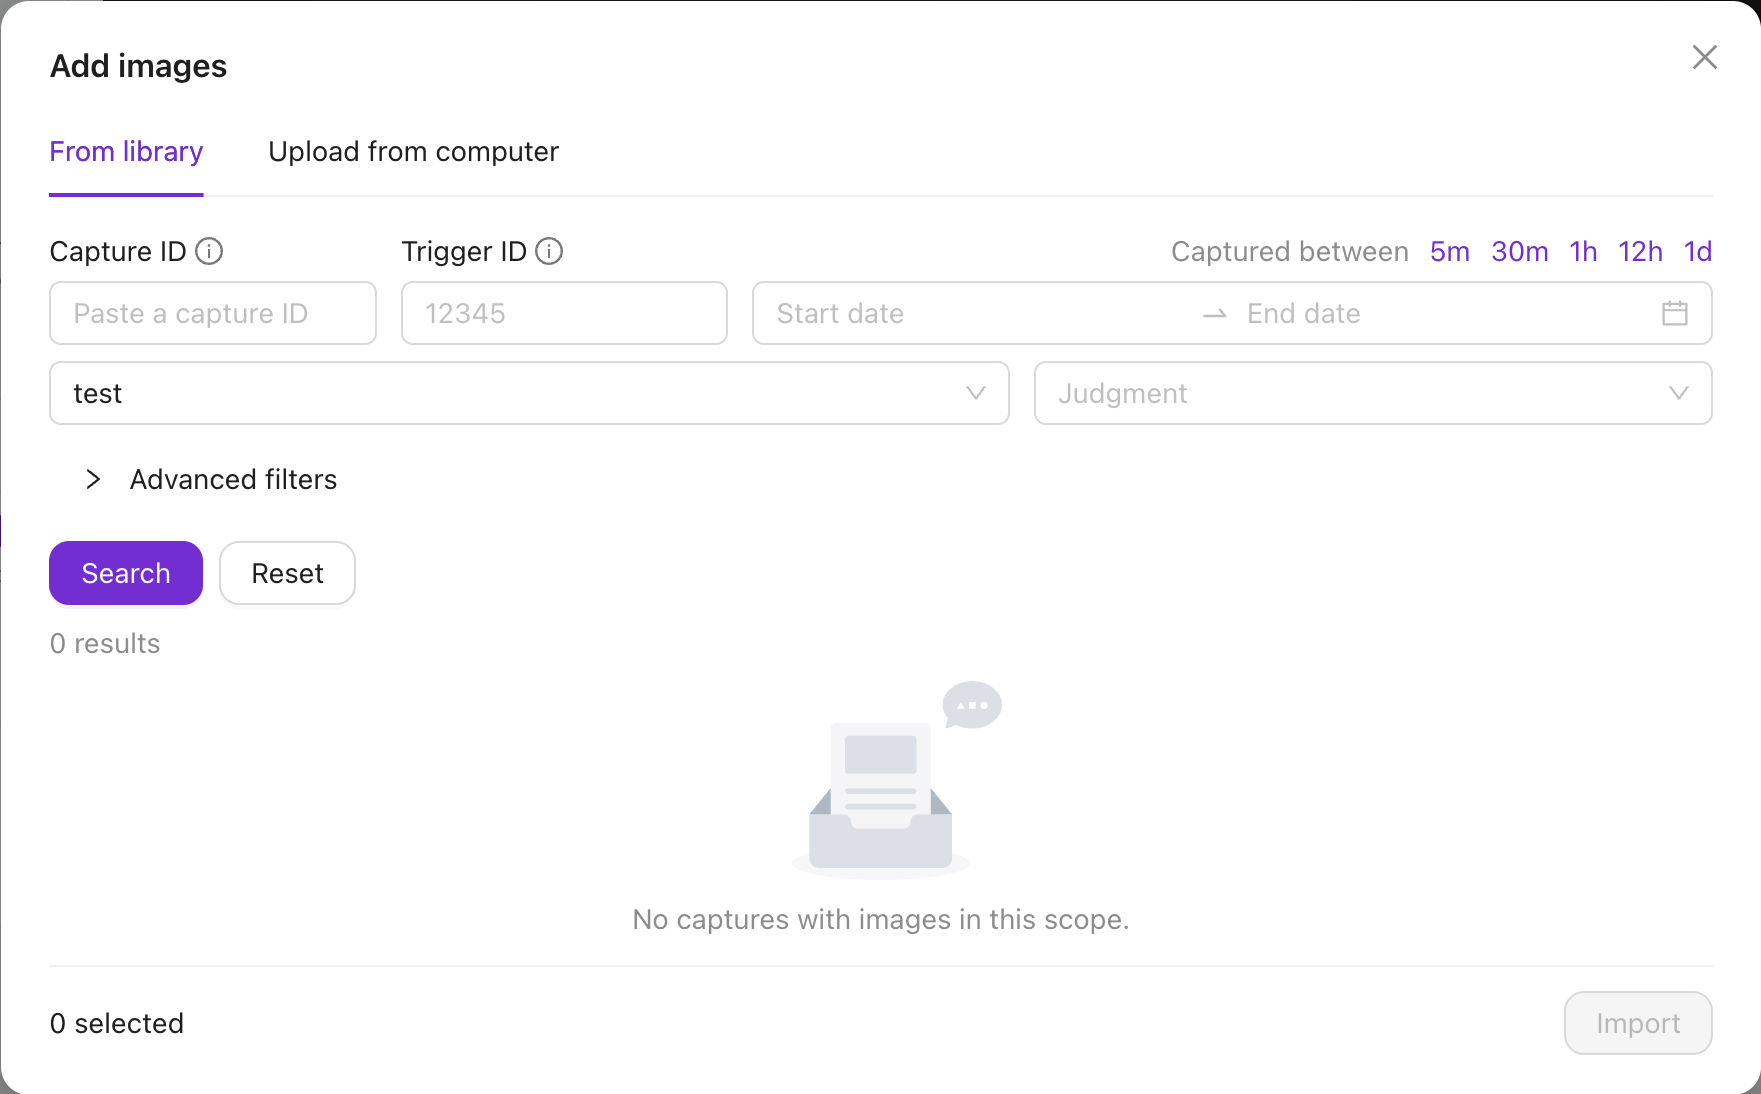
It opens the picker:
| Tab | How it works |
|---|---|
| From library | Filter by Capture ID, Trigger ID, capture time, recipe or judgment, tick the captures you want, and press Import |
| Upload from computer | Drag JPEG or PNG files onto the page, or click to choose them, then press Import |
| From dataset | Shown when a tool already has a training set, so you can reuse one of its images as the reference |
Imported images carry an Imported badge, and each file reports whether it went in or why it did not.
An uploaded image must be the camera's own resolution, 2592×1944 on OV Spark Pro, as an 8-bit JPEG or PNG. It is refused if it is a different size, 16-bit, has a transparency channel, carries EXIF rotation, or is over 32 MiB. The camera never rescales an upload, because regions and templates are stored in sensor pixels. The safe source is an image this camera took, exported from its Library.
The camera deletes the oldest unpinned captures as storage fills, and a capture whose image has gone cannot be imported. When a part shows a defect you will want to train on, pin it in the Library.
Alignment comes first
If your parts are not held in a fixture, Alignment is almost always the first tool in the recipe. It teaches the camera a reference pattern, finds that pattern in each frame, and reports where the part actually is.
Other tools then reference the aligner, so their regions follow the part instead of staying pinned to the frame. Without it, a part that arrives 5 mm to the left takes every region with it, and good parts start failing for no visible reason.
The AI tools in more depth
AI Classification
Use it when the answer is a category. Present or absent, fitted or missing, torn or intact, good or bad, which variant, which defect grade.
Draw one or more regions, label a handful of example images per class, and train on-device in seconds. At runtime each region is classified and graded against the verdict rules you set.
Best when the difference is visual and you can show examples of each outcome.
Labelling is the whole job here: each region gets a class on each captured image. Try it:
Tap a screw to cycle through the three classes. The output table to the right updates live, and the global verdict reflects whatever rule you'd write in the IO Block.
Tap a chip to highlight just that class.
AI Count
Use it when the answer is a number. Pills in a blister, pins in a connector, items in a tray.
Label the objects on a few captured images and train a small detector on-device. At runtime the tool counts every match inside the region and passes or fails against the count range you set.
You need a master image captured before you can label.
AI Segmentation
Use it when the answer is how much. Contamination extent, coating coverage, defect size.
Paint a pixel mask over each class of interest on a handful of images, then train on-device. At runtime the tool measures the area and blob count of each class inside the region and passes or fails against the minimum and maximum you set per class.
Training can start as soon as a mask is painted on one image, and a model trained on only a few images is already useful. More varied examples still give a better model.
This is the most work to set up, so reach for it when a simple pass or fail genuinely is not enough. The work is in the painting:
Pick a class on the right, then drag to paint. The pixel coverage updates as you paint, and the verdict applies a sample FAIL when total > 2% rule. Hit Auto-paint to see a canonical labeling.
AI OCR
Use it when you need to read text. Lot codes, expiry dates, serials.
Draw a field per line of text, declare what that field can contain, and optionally pin its format or a calendar rule, so an expired date fails rather than merely being read. Works out of the box with no training.
The classical tools
Barcode Read
Reads a 1D barcode (Code 128, EAN-13) or a 2D code (Data Matrix, QR) and reports the decoded text. Pass means a code was read and, if you set an expected pattern, that the text matches.
Everywhere else in this page the advice is to crop tightly. Barcodes are the exception. Codes need quiet space around them to decode, so draw the region around the area where the code appears, not tightly around the code itself.
The difference is not marginal: a tight box measured 21 successful decodes out of 300, where the same code with double the margin read 158 out of 300. Include the whole code too, since half a code reads as nothing.
If the code is too small in the frame, move the camera closer. Enlarging the region will not help, and a region covering most of the frame can take over a second to search.
Color Match
Draw a region over the color to check and set a reference from samples or by hand. Every inspection reports the region's mean color, its ΔE2000 distance from the reference, and a match score derived from it:
score = 100 - 4 x deltaE
The tool passes when the score is at or above your threshold, which defaults to 70. Lower it if good parts fail, raise it if bad parts pass.
No training. It runs as soon as the region and reference are set.
ΔE here is relative to this camera under this light. Compare parts to each other, never to a lab reading. Set a manual white balance in Imaging first, because auto white balance re-adapts when the part color changes, which is the very thing you are trying to measure.
Choosing between close calls
| If you are torn between | Choose | Because |
|---|---|---|
| Classification and Segmentation | Classification | If a pass or fail answer is enough, it trains faster and runs lighter |
| Classification and Count | Count | If the number itself is the spec, not just presence |
| Count and Segmentation | Segmentation | If objects merge together and cannot be separated |
| OCR and Barcode Read | Barcode Read | If the marking is a code. It is faster and more reliable than reading text |
| Color Match and Classification | Color Match | If the check is genuinely about shade. No training needed |