AI 驱动文档
您想了解什么?
第四步:训练您的 AI 模型
您的感兴趣区域 (ROI) 已设置完毕。现在是时候教 AI 识别"良品"和"不良品"的样子了。
训练的三条基本原则
在开始之前,请牢记这三条原则。无论您训练的是分类器还是分割器,无论使用 5 张图像还是 500 张图像,这些原则都适用。
原则 1:仅根据图像进行标签
绝不通过查看实物零件(或将其置于显微镜下)来判断它是良品还是不良品。如果您在相机图像中看不到缺陷,AI 就无法学习它。
AI 不是魔法。它只能处理相机所看到的内容。如果您因为通过触摸或在放大镜下放大观察发现了某些情况而将零件标签为"有缺陷",但相机图像看起来正常,那么您就是在教 AI 识别不存在的东西。
如果您无法仅通过图像进行标签,请返回到安装步骤并修正物理设置:更好的镜头、更好的照明、更近的安装位置、不同的角度。
原则 2:再三检查您的标签
每个人都会出现错误标签;经验丰富的工程师也会犯这种错误。但在小型数据集中,一个错误标签就可能毁掉您的结果。
对于 5 张训练图像,一个错误标签会污染 20% 的训练数据。这是灾难性的。
**每次训练运行之前:**点击 View All ROIs 并验证每一个标注。这是最容易修复且影响最大的事情。
原则 3:从小规模开始,快速迭代
不要标签 50 张图像后就点击训练。相反,创建一个紧密的循环:每个类别标签 10-15 张图像,训练(大约 30 秒),测试并尝试找出问题,然后在失败的地方有针对性地添加数据。重复此循环 2-4 次。
此循环是您获得良好模型的最快路径。
分步训练工作流程
1. 捕获初始训练图像
在您的程序处于活动状态且零件正在流动(或手动放置)时,捕获图像。每个类别至少需要 10-15 张图像才能开始。
对于简单的通过/失败检测:
- 10-15 张良品零件图像
- 10-15 张不良品零件图像
2. 定义您的类别
在标签界面中,添加每种检测类型所需的类别。对于分类器,这可能是:
- Pass / Fail
- Present / Absent
- Good / Scratched / Cracked
一开始保持简单。您随时可以稍后添加类别。
3. 标签图像
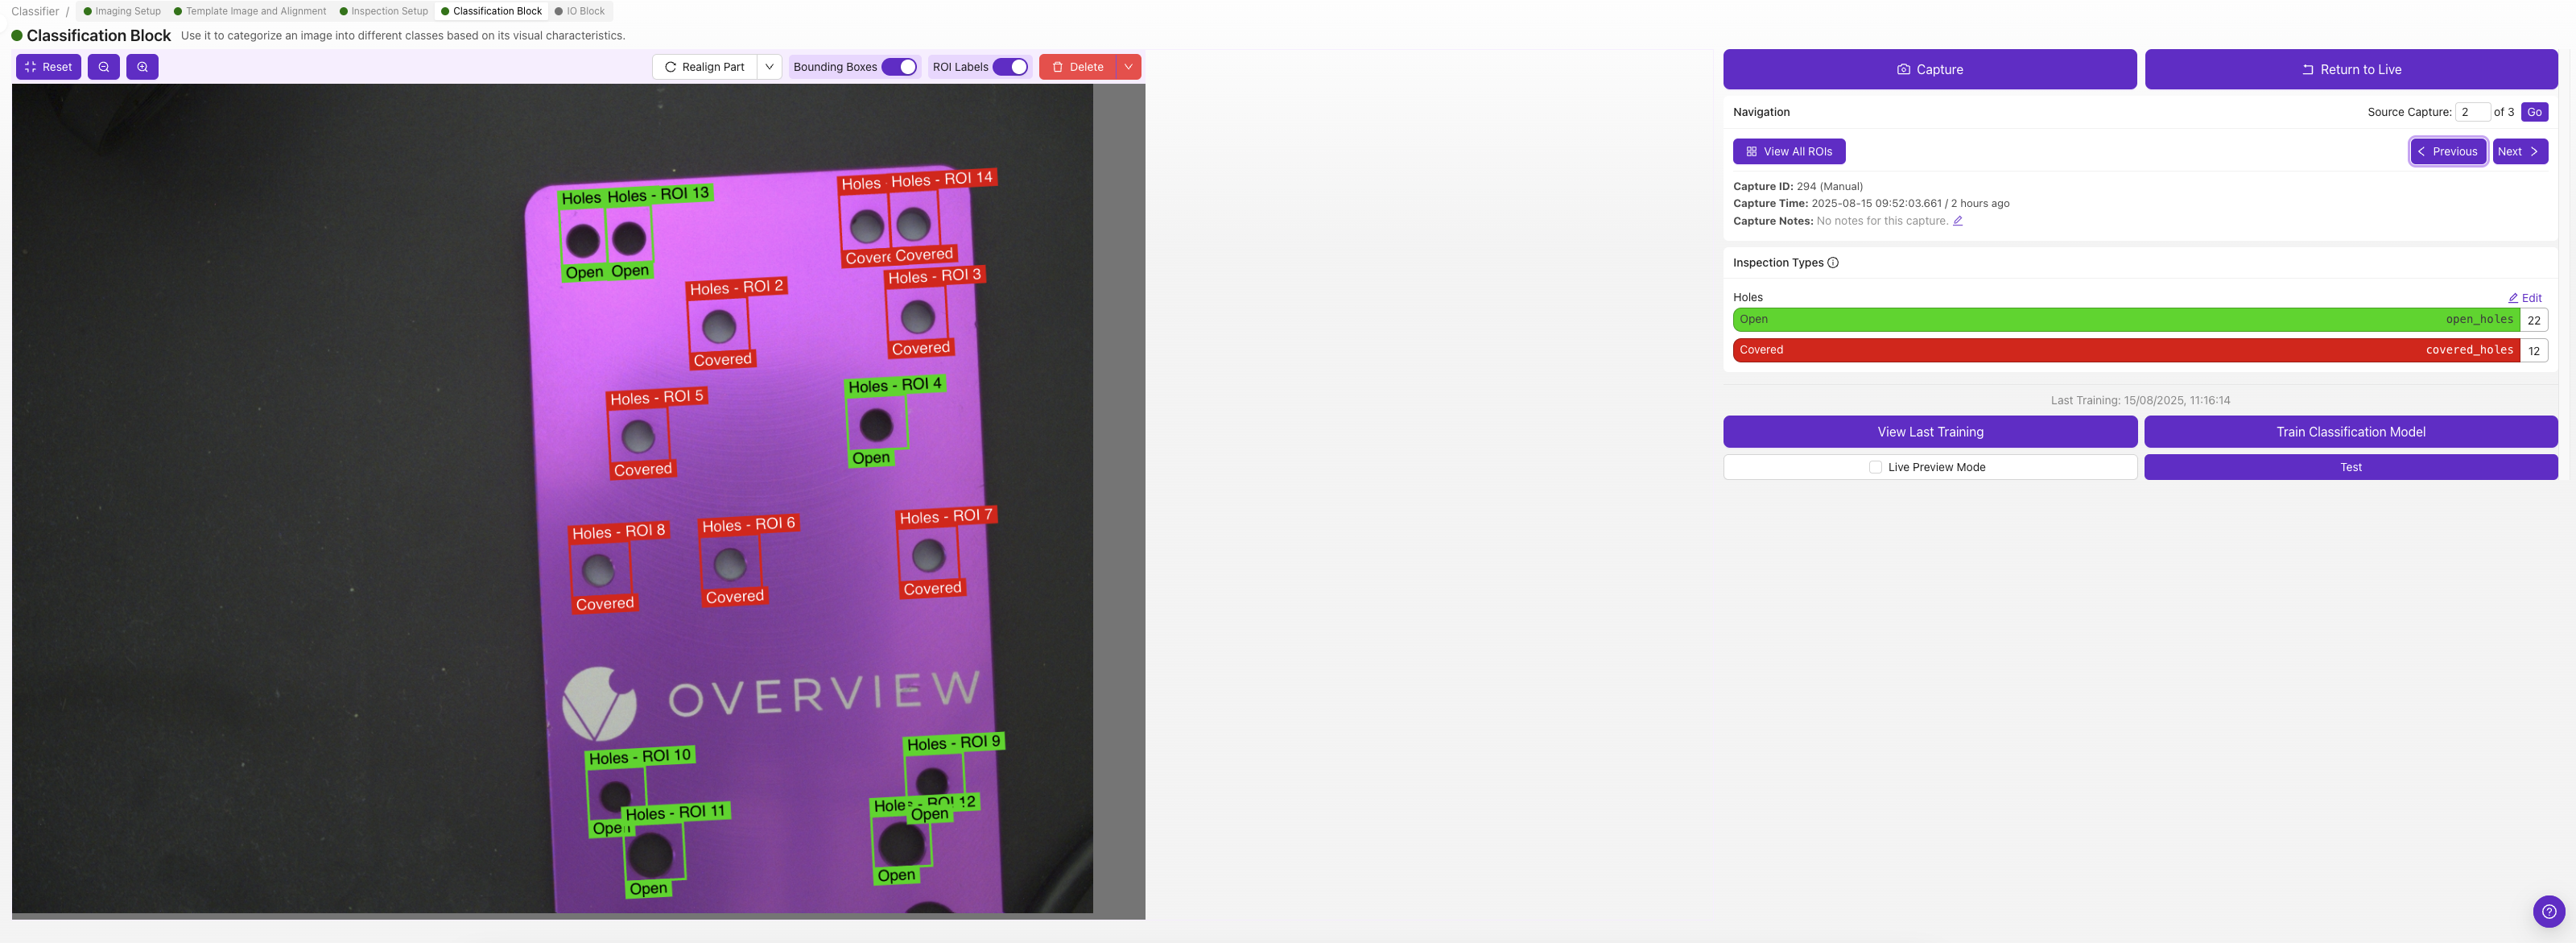
每个 ROI 都有自己的分类类别 — 选择描述该图像中该 ROI 的类别(例如,"pass"或"fail")。
OV10i 仅支持分类器。对于像素级分割,您需要 OV20i 或 OV80i。
4. 训练模型
点击 Train。分类器提供两种训练模式:
- Fast mode — 大约需要 30 秒到 1 分钟。最适合在设置过程中快速迭代、对标签进行合理性检查以及处理简单/易于区分的零件。准确度低于生产模式,但能让您快速看到结果。
- Production mode — 耗时较长,但能产生明显更准确的模型。在部署到生产线之前,请始终使用 Production mode。对于棘手的零件、难以区分的缺陷或任何您将在生产中信赖的内容,Production mode 是正确的选择。
良好的节奏:在清理标签和添加数据时使用 Fast mode 进行迭代,结果看起来不错后运行一次 Production mode — 部署前再运行一次。
5. 使用实时预览进行测试
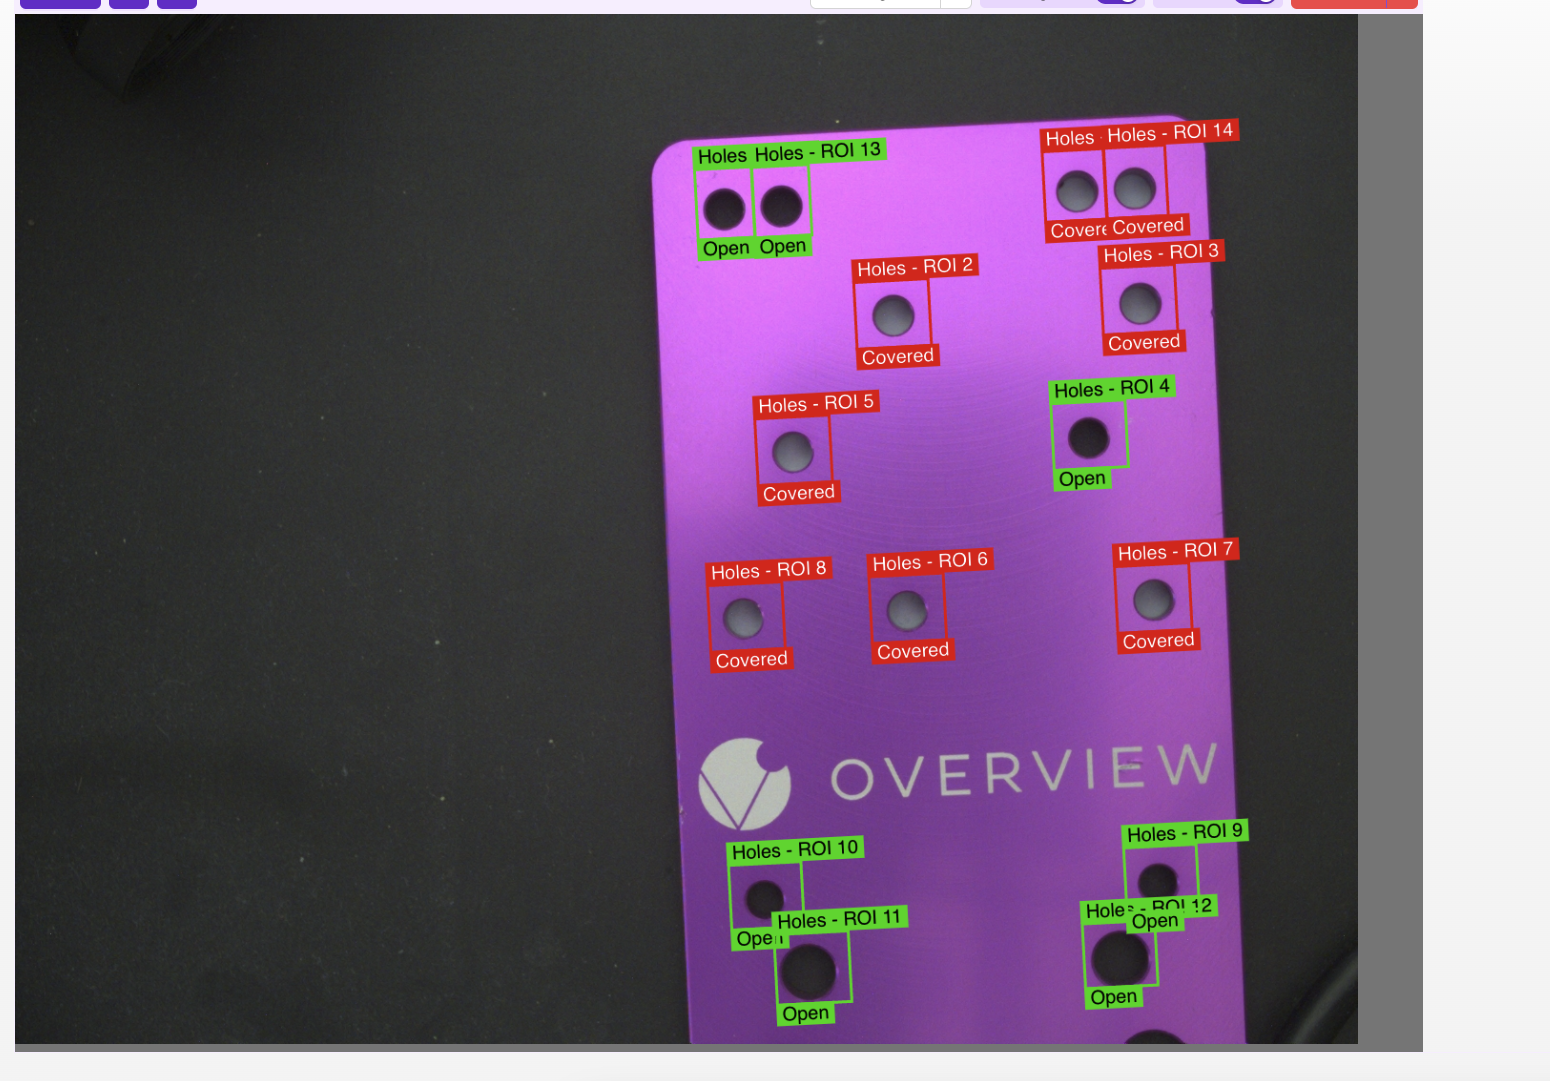
点击 实时预览模式 并运行零件。测试面板会显示每个 ROI 的预测类别和置信度分数。观察:
- 简单的案例是否以高置信度获得正确的判定
- 模型在哪些情况下表现不佳(置信度低或判定错误)
- 临界案例 — 通常是任何置信度低于 70% 的案例
尝试找出问题。 找到模型失败的案例。这些低置信度的判定是您下一轮标注的路线图。
6. 添加有针对性的数据
不要随意添加新图像。请专门针对您发现的失败模式添加图像:
- 如果模型将划痕与反光混淆,添加更多两者的示例
- 如果模型遗漏小缺陷,添加更多小缺陷的图像
- 如果模型在角落处的零件上失败,添加更多角落示例
7. 重新训练并重新测试
重复步骤 4-6 两到四次。每次迭代都应提高准确率。如需更深入的指导(包括如何在不丢失先前训练成果的情况下向现有模型添加新图像),请参阅 添加数据与重新训练。
数据增强:教会 AI 处理变化
数据增强会在训练过程中随机修改您的训练图像 — 调整亮度、添加旋转、微调对比度等。每张图像会以略有不同的增强效果被输入 AI 数百次,但标签保持不变。这就是让模型在真实环境条件下保持鲁棒性的方法,而无需捕获每种可能变化的示例。
默认应启用的项
少量的亮度变化几乎总是值得启用的 — 即使是控制最严格的工厂也会有闪烁的顶灯、随班次变化的阴影以及随时间发生的轻微 LED 漂移。亮度增强基本上能免费让模型对所有这些因素具有抗干扰能力。
旋转:很有用,但要注意 ROI 形状
如果您的零件确实可能以不同角度到达(传送带上松散的螺丝、手动放置的零件、任何未固定在夹具中的物品),旋转增强非常有用。但它与 ROI 形状相互影响:
- 方形 ROI: 旋转增强可以正常工作 — 旋转后的图像仍能装入 ROI 框内。
- 分类器上的非方形 ROI: 旋转可能会裁切图像。当一个高而窄的 ROI 被旋转 45° 时,旋转内容的角落会超出框外,模型将基于不完整的图像进行训练。如果您的零件可能旋转,要么将 ROI 设为方形,要么依靠 对齐器 在上游处理旋转,这样您就不需要在此处使用旋转增强。
何时不应使用特定的数据增强
一般规则:不要对您正在检测的属性进行数据增强。 如果您要检测方向,旋转增强会让模型认为颠倒的零件仍然是"良品"。
- 检测颜色一致性? 不要使用饱和度增强。
- 检测模糊/对焦? 不要使用运动模糊增强。
- 检测方向? 不要使用旋转增强(也可能不应使用对齐器)。
数据多样性很重要
您的训练数据应代表 AI 在生产中将看到的全部范围:
- 不同时间段(如果光照有变化)
- 不同的零件批次(表面光洁度可能略有差异)
- 零件在画面中的不同位置
- 简单和困难的案例都要包括
重点关注最难的案例。 如果您的训练数据包含 10 个最难分类的零件,那么 90% 的简单零件对 AI 来说将不在话下。
高学习能力
OV 相机的 AI 设计为可随着数据增加而持续改进。与许多在 20 张图像后即达到瓶颈的 AI 系统不同,该模型在 50 张、100 张甚至 500+ 张图像下仍能持续改进。大多数检测使用 5-10 张图像就能很好地工作,但如果您面临复杂的多缺陷问题,不要犹豫继续添加数据。
使用合成数据加速:Defect Studio
如果您需要训练一个很少见到的缺陷该怎么办?一个您必须刻意拆除的缺失螺钉、一道您必须人为制造的划痕、一个每千件零件才出现一次的裂纹?等待数月才能收集到足够的样本是不切实际的。
OV Auto-Defect Creator Studio(tools.overview.ai)解决了这一问题。它可以生成逼真的合成缺陷图像,速度比等待真实缺陷在生产线上出现快 10,000 倍。
工作原理:5 个简单步骤
- 上传一张零件的良品图像
- 标记缺陷应出现的区域
- 用简单英语描述缺陷(例如 "deep scratch across the surface" 或 "missing solder joint")
- 生成缺陷变体(AI 创建逼真的结果)
- 将合成图像直接导出到您的训练集中
合成数据为何有效
生成的图像不是简单"粘贴上去"的伪影。它们是与您实际的光照、相机角度和零件表面相匹配的逼真变体。AI 能够理解在您特定的成像条件下缺陷外观的物理特性。
应用场景:
- 罕见缺陷: 针对您从未(或很少)见到过的故障模式进行训练
- 新产品发布: 在第一件次品下线之前就构建检测方案
- 边缘案例: 生成临界样本以改进 AI 的决策边界
- 数据增强: 用合成的多样性来补充小型数据集
实际演示
最佳方法:首先使用最初的 3-5 张真实图像进行训练,找出 AI 表现不佳的地方,然后使用 Defect Studio 针对这些特定故障模式生成有针对性的合成样本。真实数据教授基线;合成数据填补空缺。
训练检查清单
在继续之前,请确认:
- 已捕获初始图像,每个类别至少 10-15 张
- 所有标签均已复核(View All ROIs)
- 已训练并使用实时预览测试
- 已识别失败模式并添加针对性数据
- 已完成 2-4 轮 标注 → 训练 → 测试 迭代
- 结果符合预期
模型已训练且效果良好?前往 第 5 步:设置输出。