AI 驱动文档
您想了解什么?
添加数据与重新训练
本教程向您展示如何通过向现有程序添加新图像并重新训练模型来提高 AI 模型的准确性。当您的模型错误地将良品判为失败,或者在生产中遇到新的变化时,此过程至关重要。
视频指南
查看此主题的实际操作:OV Auto-Defect Creator Studio
缺陷图像不足?
使用 Defect Creator Studio 可以从单张良品图像生成逼真的合成缺陷图像。用简单的英语描述缺陷,几秒钟内即可获得可用于训练的图像。
您将学习到:
- 如何查找并选择用于重新训练的图像
- 如何将图像添加到现有训练集
- 如何标注新的训练数据
- 如何使用新数据重新训练模型
使用场景: 当良品未通过检查时、当您有新的部件变化时,或者当您需要通过额外示例提高模型准确性时。
先决条件
- 具有已训练 AI 模型(分类或分割)的活动程序
- 可访问 OV10i 摄像头界面
- 库中有需要添加到训练的图像
第一步:查找用于重新训练的图像
1.1 导航到库
- 打开 OV10i 界面
- 点击左侧导航菜单中的 "库"
- 您将看到从摄像头捕获的所有图像
1.2 筛选图像
- 按程序筛选:选择您想要改进的程序
- 按通过/失败筛选:选择 "FAIL" 查看失败的图像,或选择 "PASS" 查看通过的图像
- 排序方式:选择日期或其他条件来组织结果
- 点击 "搜索" 显示筛选结果
目标: 查找被错误分类的图像 - 未通过的良品或通过的不良品。
第二步:将图像添加到训练集
2.1 选择图像
- 审查每张图像 以识别被错误分类的部件
- 选择显示以下内容的图像:
- 被错误标记为失败的良品
- 被错误标记为通过的不良品
- 点击复选框 选择您要添加的每张图像
重要
添加被错误分类的图像 - 包括失败的良品和通过的不良品。两者都有助于提高模型准确性。
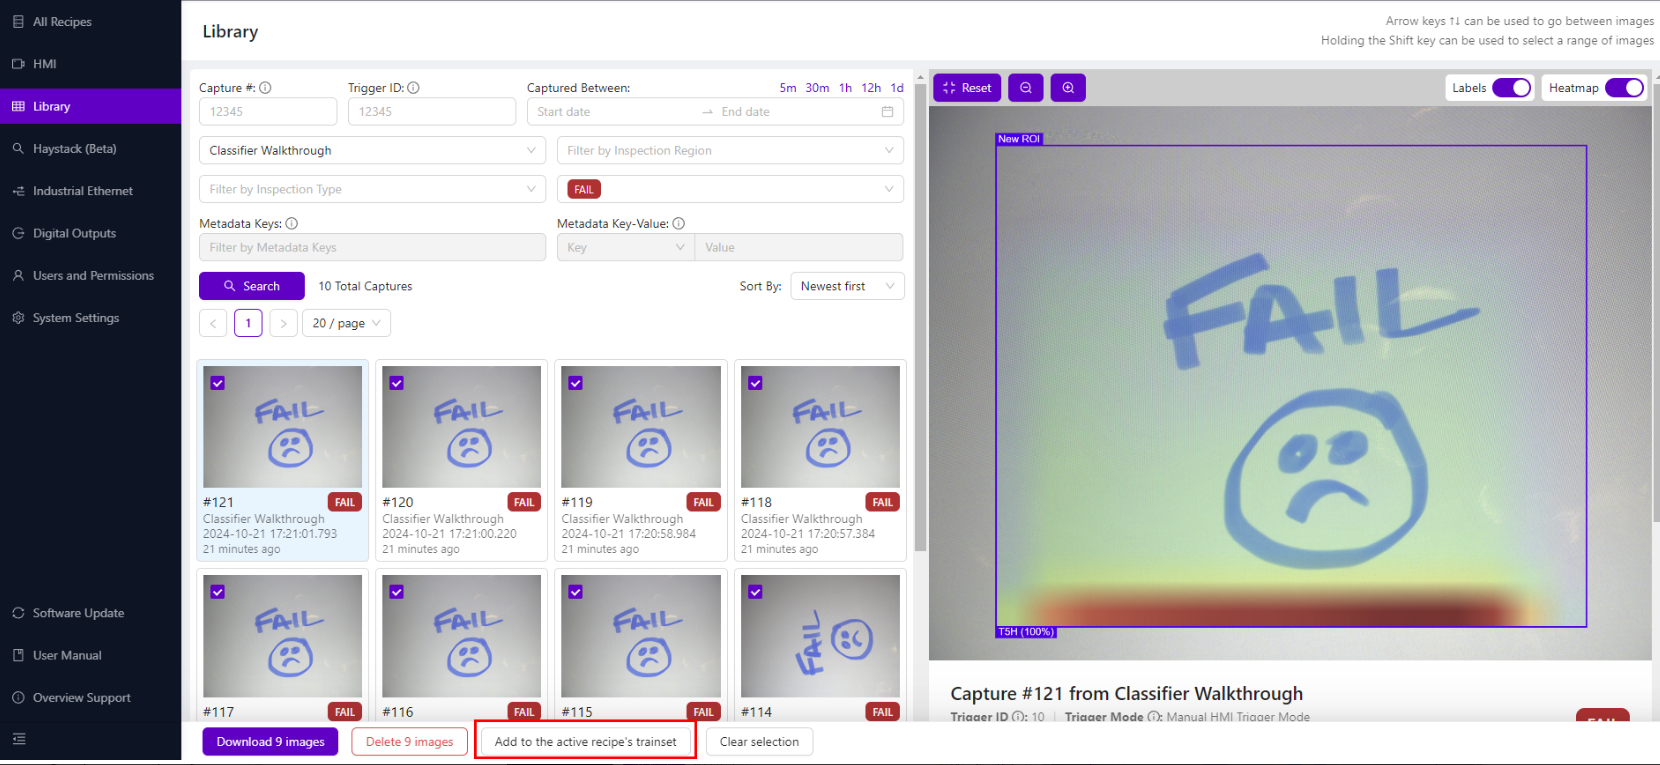
2.2 添加到训练集
- 选择图像后,点击底部的 "添加到活动程序的训练集"
- 成功消息将确认图像已添加
- 点击 "转到程序编辑器" 继续
第三步:标注新的训练数据
3.1 导航到 Label and Train
- 从程序编辑器中,进入:
- Classification Recipe:"Classification Block"
- Segmentation Recipe:"Label And Train"
- 点击 "View All ROIs"
3.2 查找未标注的图像
- 使用 "Filter By Class" 下拉菜单
- 选择 "Unlabeled" 以仅显示未标注的图像
- 您将看到刚添加到训练集的图像
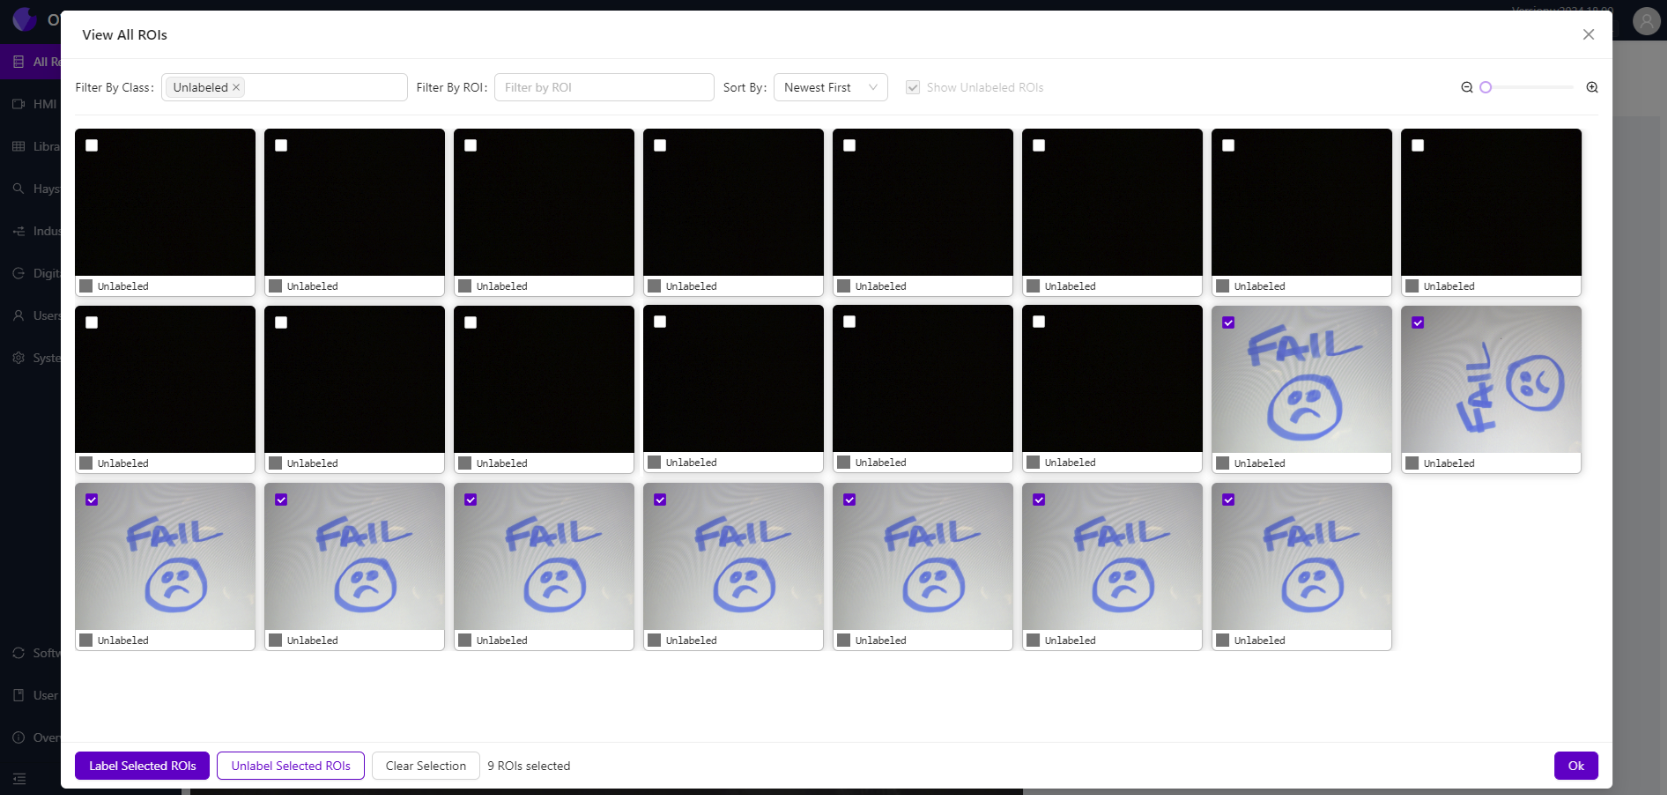
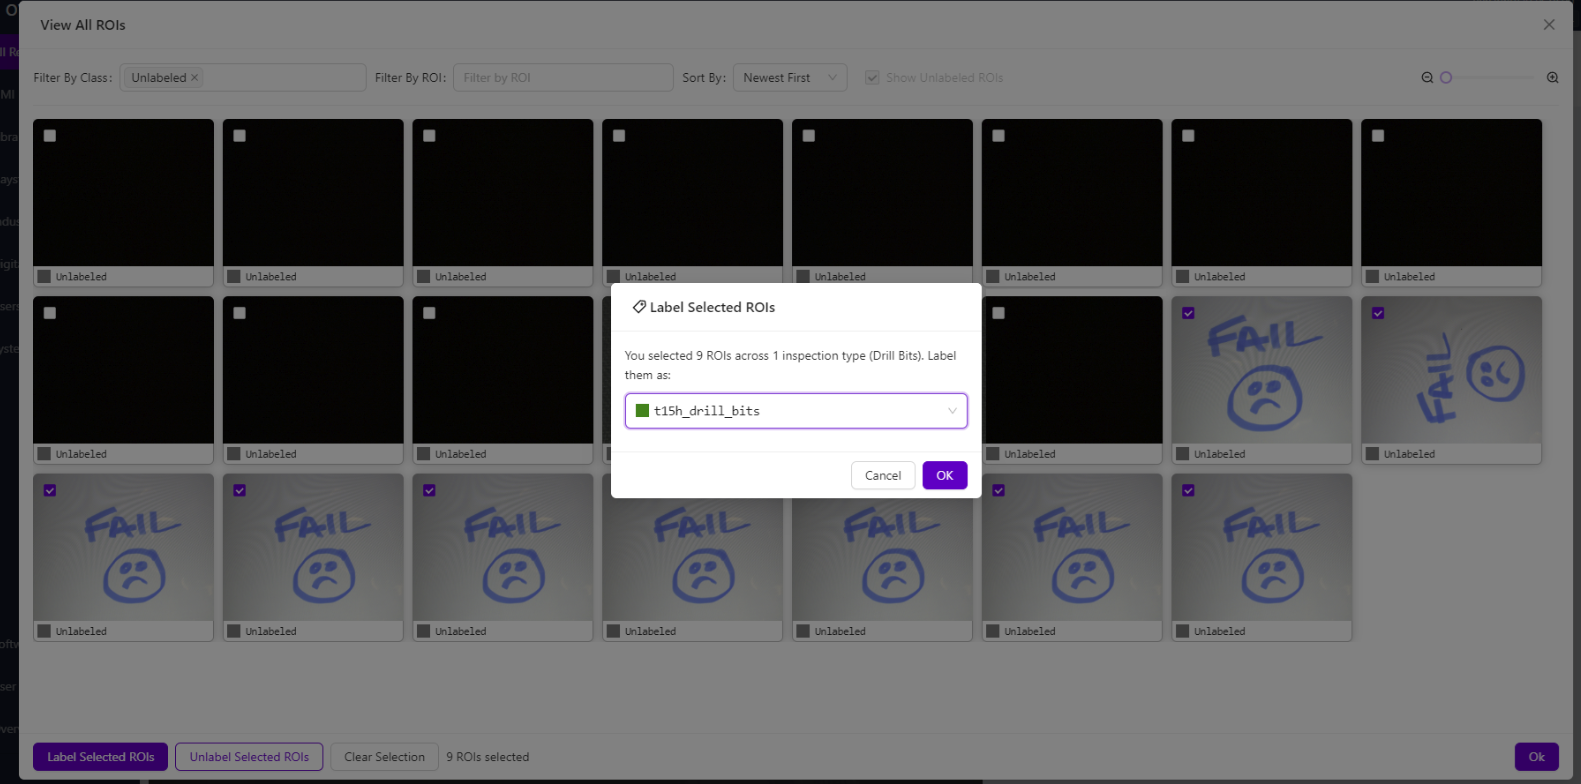
3.3 为选定图像添加标签
- 选择所有新添加的未标注图像
- 点击左下角的 "Label Selected ROIs"
- 从下拉菜单中 选择正确的标签(例如 "Pass"、"Good" 等)
- 点击 "OK" 应用标签
重要
在不同的标注会话之间点击 "Clear Selection",以避免错误标注。
3.4 关闭 ROI 视图
- 关闭 "View All ROIs" 模态窗口
- 返回主 Label and Train 页面
第四步:重新训练模型
4.1 开始重新训练
- 点击 "Train Classification Model" 或 "Train Segmentation Model"
- 系统将使用所有现有数据加上新图像重新训练
- 监控训练进度
4.2 训练过程
- 模型从旧的和新的已标注数据中共同学习
- 训练时间取决于数据总量
- 等待训练完成后再进行测试
4.3 测试改进后的模型
- 使用 "Live Preview Mode" 测试重新训练的模型
- 使用之前被错误判失败的图像进行测试
- 验证模型现在能正确将合格部件识别为通过
第五步:验证结果
5.1 使用新图像进行测试
- 捕获类似部件的新图像
- 检查模型在边缘情况下是否表现更好
- 验证之前合格的图像现在能正确通过
5.2 监控性能
- 留意是否出现新的误报或漏报
- 记录准确率的提升
- 记录任何遗留问题,以便将来重新训练
成功!您的模型已重新训练
您改进后的 AI 模型现在可以:
✅ 更好地识别 之前被误判失败的合格部件
✅ 处理 生产部件中的新变化
✅ 减少误判失败,提高准确率
✅ 适应 制造过程中的变化
成功的关键技巧
数据质量
- 添加被错误分类的图像(包括误通过和误失败)
- 标注一致性 —— 合格部件标为 "Pass",不合格部件标为 "Fail"
- 包含多样化示例,涵盖通过和失败条件
- 在不同的标注会话之间 清除选择
何时需要重新训练
- 误判失败增加(合格部件被判失败)
- 误判通过增加(不合格部件被判通过)
- 生产中出现 新的部件变化
- 工艺变化 影响部件外观
- 材料或照明的 季节性变化
最佳实践
- 从小规模开始 —— 每次添加 10-20 张图像
- 每次重新训练后 彻底测试
- 记录变更 和改进
- 在重大重新训练之前 备份 可用的模型
图像并非越多越好
不加审查地批量添加图像反而会使模型变差。您添加的每一张图像都在教 AI 学习某些东西。如果这些图像包含标注错误的部件、不一致的光照、模糊的捕获图像,或无法代表实际生产条件的边缘案例,模型就会学到错误的模式,准确率会下降。好的数据输入,才有好的数据输出。
在添加图像之前,请逐一确认:标注正确(pass 确实显示合格部件,fail 确实显示缺陷)、能代表 真实生产条件、清晰聚焦(非模糊或过曝),以及与模型需要学习的特征 相关。如果重新训练后准确率下降,请首先检查最近添加的图像。删除少量不良示例往往比添加数十张新图像更有帮助。
后续步骤
重新训练模型后:
- 监控生产,确认准确率是否提升
- 持续收集有问题的图像,以供将来重新训练
- 如有需要,制定定期重新训练计划
- 培训操作员,使其了解何时标记图像以进行重新训练
- 记录重新训练流程,以确保一致性