AI 驱动文档
您想了解什么?
训练分割器
本指南将向您展示如何设置和配置 OV20i 分割功能,以自动检测、测量和分析零件中的特定特征或缺陷。当您需要识别不规则形状、测量面积或检测简单分类无法处理的特定模式时,请使用分割。
视频指南
查看此主题的实际操作:如何在几分钟内创建分割配方
备注
OV10i 不具备分割功能。
何时使用分割: 表面缺陷、液体溢出、不规则形状、面积测量、模式检测,或任何需要像素级精度的特征。
开始之前
您需要准备的
- 已设置并连接的 OV20i 相机系统
- 具有您想要分割特征的测试零件(例如,带铅笔标记的板材)
- 针对您特定应用的良好照明条件
- 15-20 张用于训练的样本图像
第一步:创建分割配方
1.1 开始新配方
- 导航到所有配方 页面
- 点击
+ 新配方(右上角)
![]()
- 输入配方名称: 使用描述性名称,如 "Pencil_Mark_Detection" 或 "Surface_Defect_Segmentation"
- 选择配方类型: 从下拉菜单中选择 "分割"
- 点击
确定创建
1.2 激活配方
- 在列表中找到您的配方(显示为 "未激活")
- 点击
激活 - 点击
激活并进入编辑器确认并启动配方编辑器

✅ 结果: 配方现在为 "激活",并显示配方编辑器。
第二步:配置相机设置
2.1 打开成像配置
- 点击
配置成像(左下角)
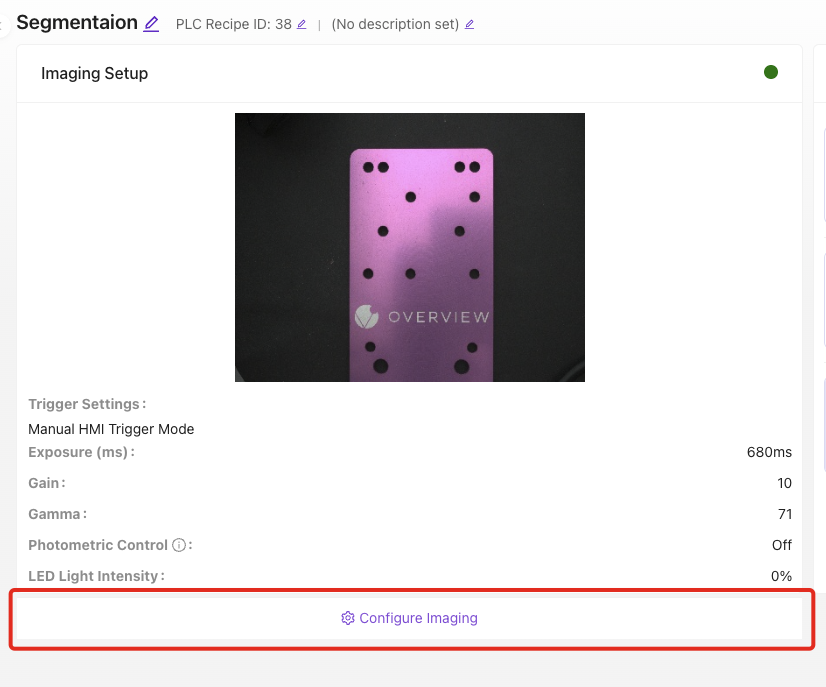
2.2 为分割优化焦距
焦距对于准确的边缘检测至关重要:
- 将测试零件放置在相机视野中
- 调整焦距,直到边缘清晰锐利
- 使用不同的零件进行测试,以确保在您的范围内保持一致的焦距
提示
- 聚焦于缺陷/特征将出现的表面
- 确保整个感兴趣区域都处于清晰聚焦状态
- 对于分割,轻微的过度锐化比模糊焦点更好
2.3 设置最佳曝光
适当的曝光确保一致的特征检测:
- 调整曝光 以获得平衡的照明
- 避免过曝区域(纯白区域)
- 确保特征可见,并具有良好的对比度
分割曝光指南:
- 特征应与背景有明显对比
- 避免可能被误认为缺陷的阴影
- 在不同的零件条件下进行测试(干净、脏污、磨损)
2.4 配置 LED 照明模式
根据您要分割的内容选择照明:
| 特征类型 | 推荐照明 | 原因 |
|---|---|---|
| 表面缺陷 | 明场 | 均匀照明显示表面不规则性 |
| 划痕/裂缝 | 侧光 | 产生阴影,突出线性缺陷 |
| 凸起特征 | 暗场 | 使凸起区域从背景中突出 |
| 液体溢出 | 侧光 | 显示表面纹理差异 |
2.5 调整伽玛以增强特征
- 增加伽玛以增强特征与背景之间的对比
- 测试不同值同时查看目标特征
- 找到设置使特征最易区分
2.6 保存配置
- 在实时预览中检查设置
- 点击
保存成像设置
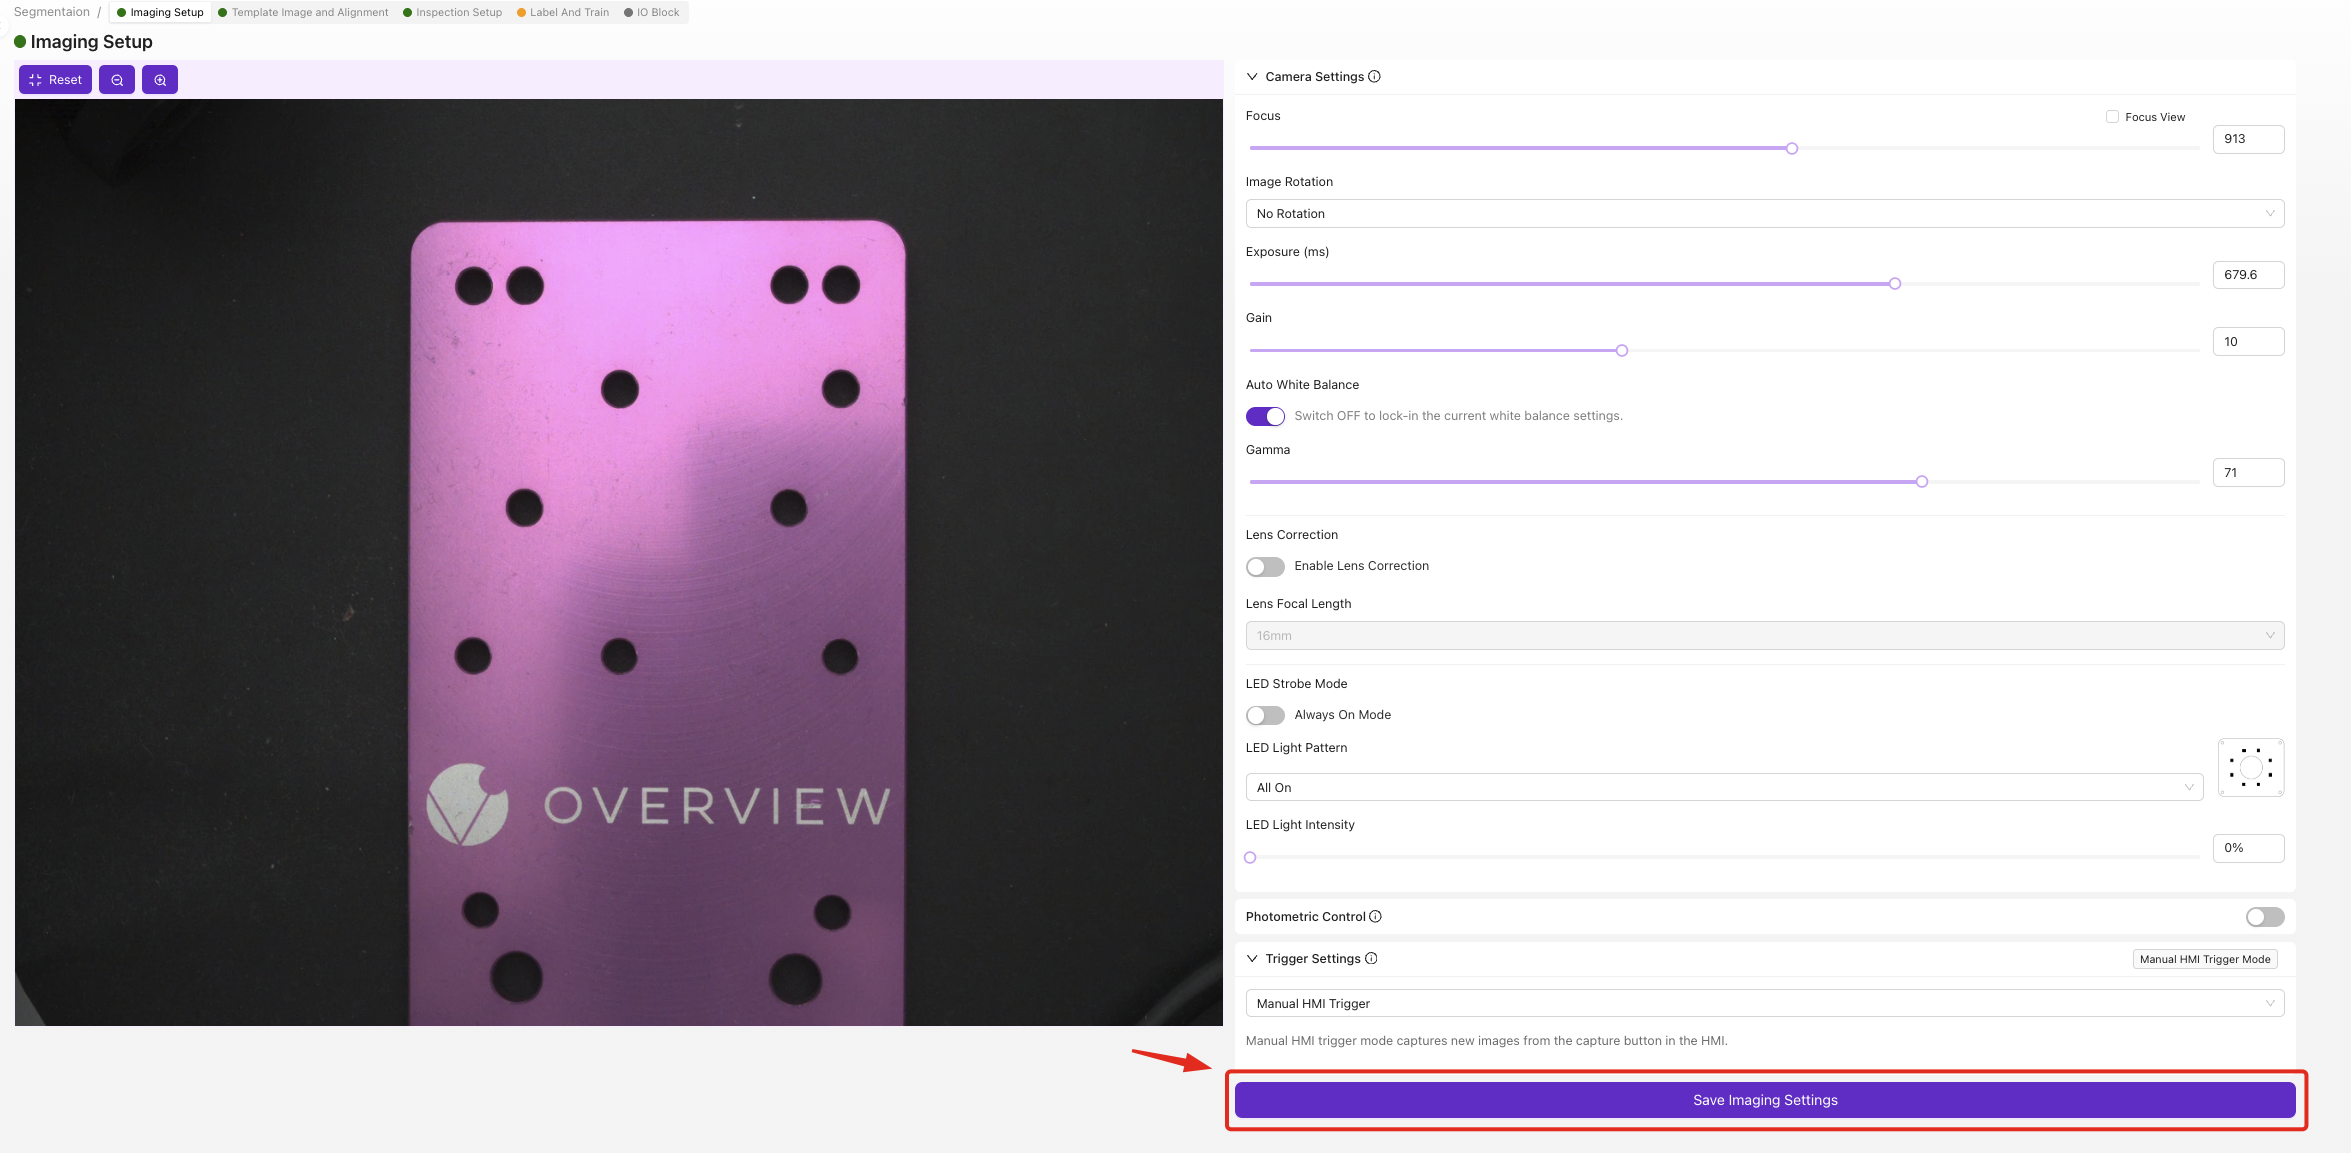
✅ 检查点: 特征应清晰可见,且对比度良好。
第 3 步:设置模板和对齐
3.1 导航到模板部分
**点击“模板图像和对齐”**在面包屑菜单中
3.2 配置对齐(可选)
![]()
在此示例中,我们将跳过对齐:
- 选择
跳过对齐器如果零件位置一致 - 点击
保存
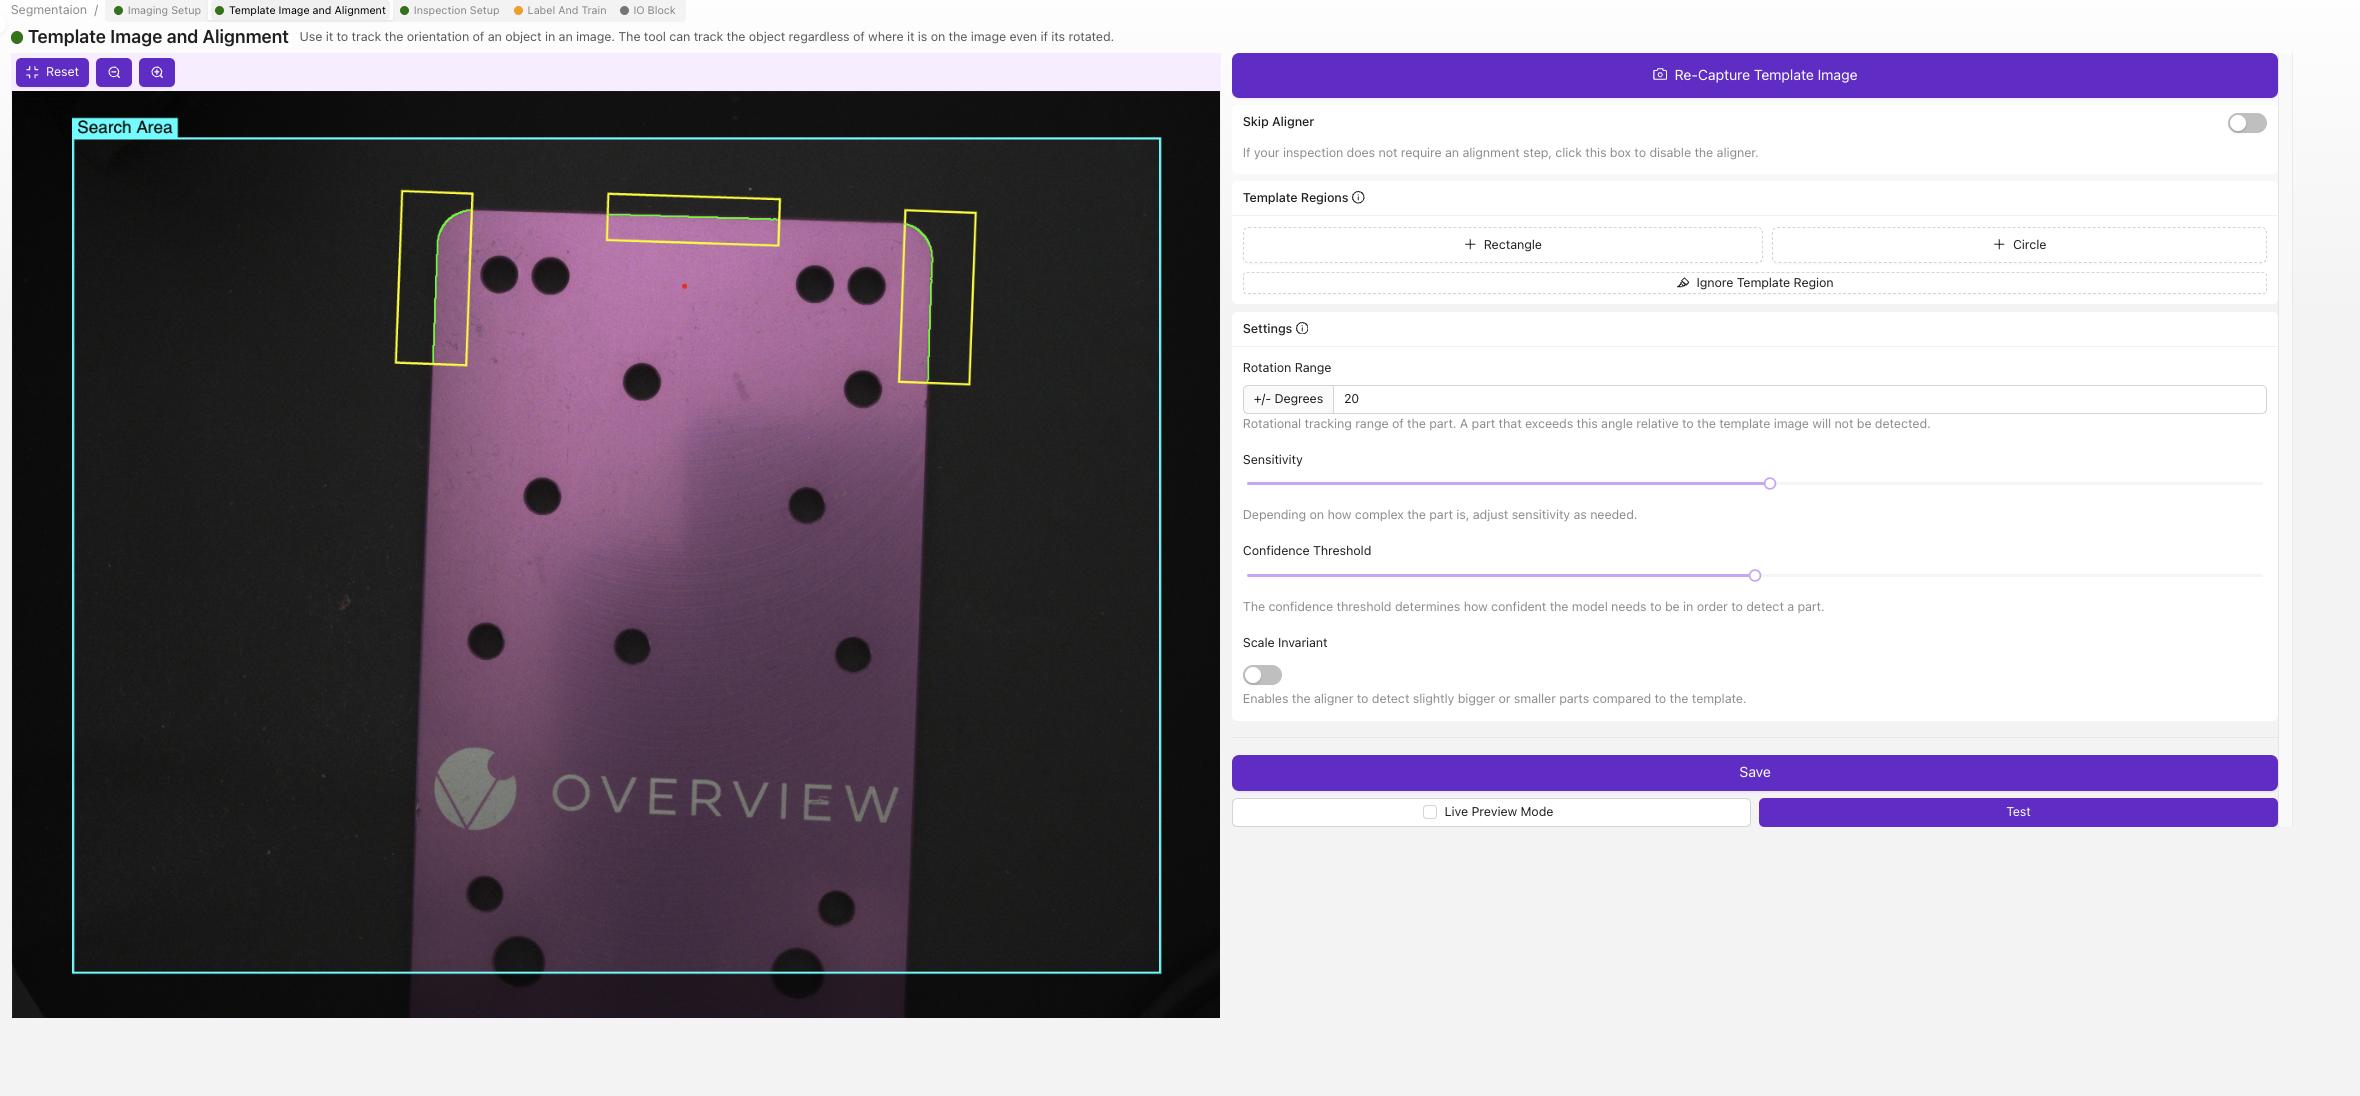
何时使用对齐器: 当零件以不同位置或方向到达时启用,以避免影响分割精度。
第 4 步:定义检测区域
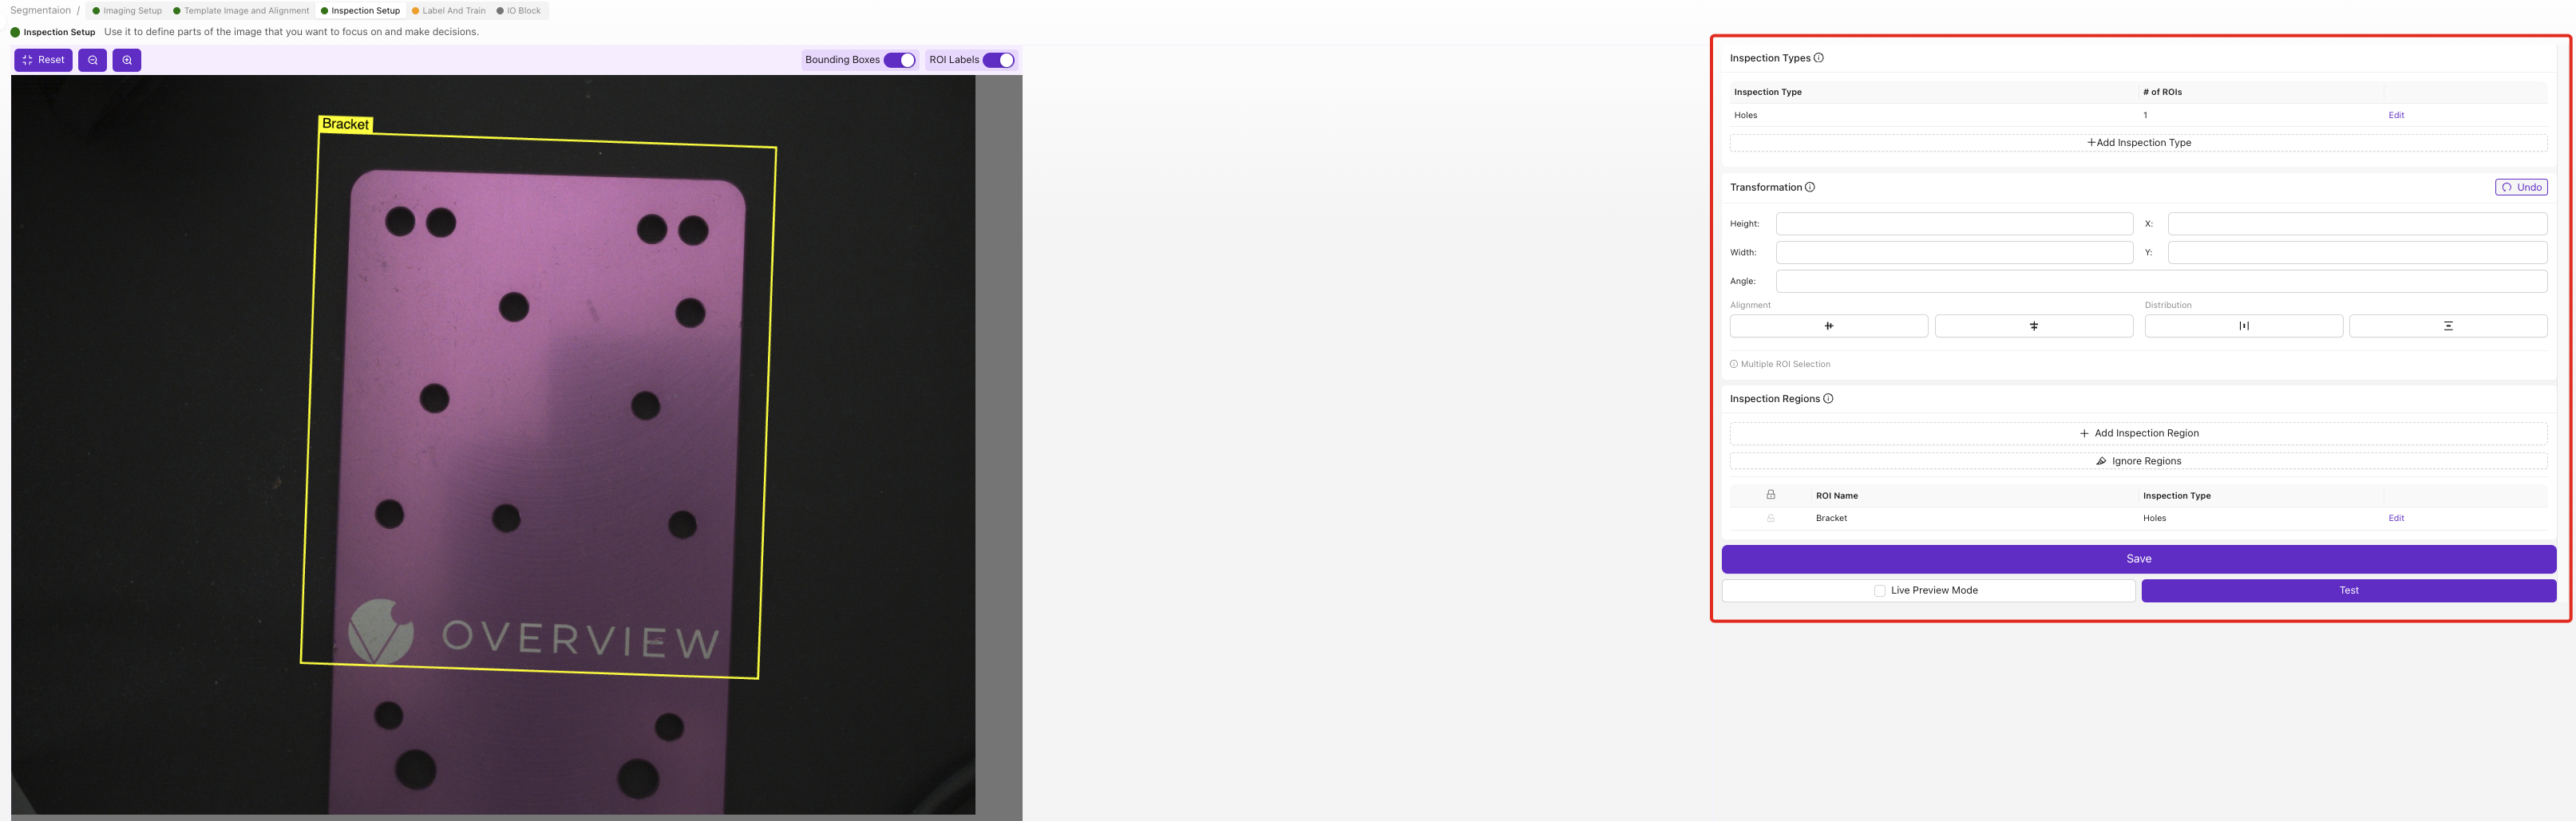
4.1 导航到检测设置
**点击“检测设置”**在面包屑菜单中
4.2 设置兴趣区域(ROI)
ROI 定义了分割将发生的位置:
- 将测试零件放置在相机视野中
- 拖动 ROI 角以框定检测区域
- 适当调整 ROI 大小:
- 包括所有可能出现特征的区域
- 排除不必要的背景区域
- 在预期特征位置周围留出小缓冲区
4.3 分割的 ROI 最佳实践
| 做 | 不做 |
|---|---|
| 覆盖整个检测表面 | 包括无关的背景物体 |
| 在边缘留出缓冲空间 | 使 ROI 对特征变化过小 |
| 考虑零件位置变化 | 与夹具或工具重叠 |
| 测试最大预期特征 | 包括带有永久标记的区域 |
4.4 保存 ROI 设置
- 验证 ROI 覆盖所有目标区域
- 点击
保存
第 5 步:标记训练数据
5.1 导航到标记和训练
**点击“标记和训练”**在面包屑菜单中
5.2 配置检测类别
- 点击
编辑在检测类型下 - 重命名类别以匹配您的特征(例如,“铅笔痕迹”、“表面缺陷”、“溢出区域”)
- 选择类别颜色以便于视觉识别
- 保存更改
5.3 捕获和标记训练图像
您需要至少 10 张标记图像,但推荐 15-20 张:
图像捕获过程
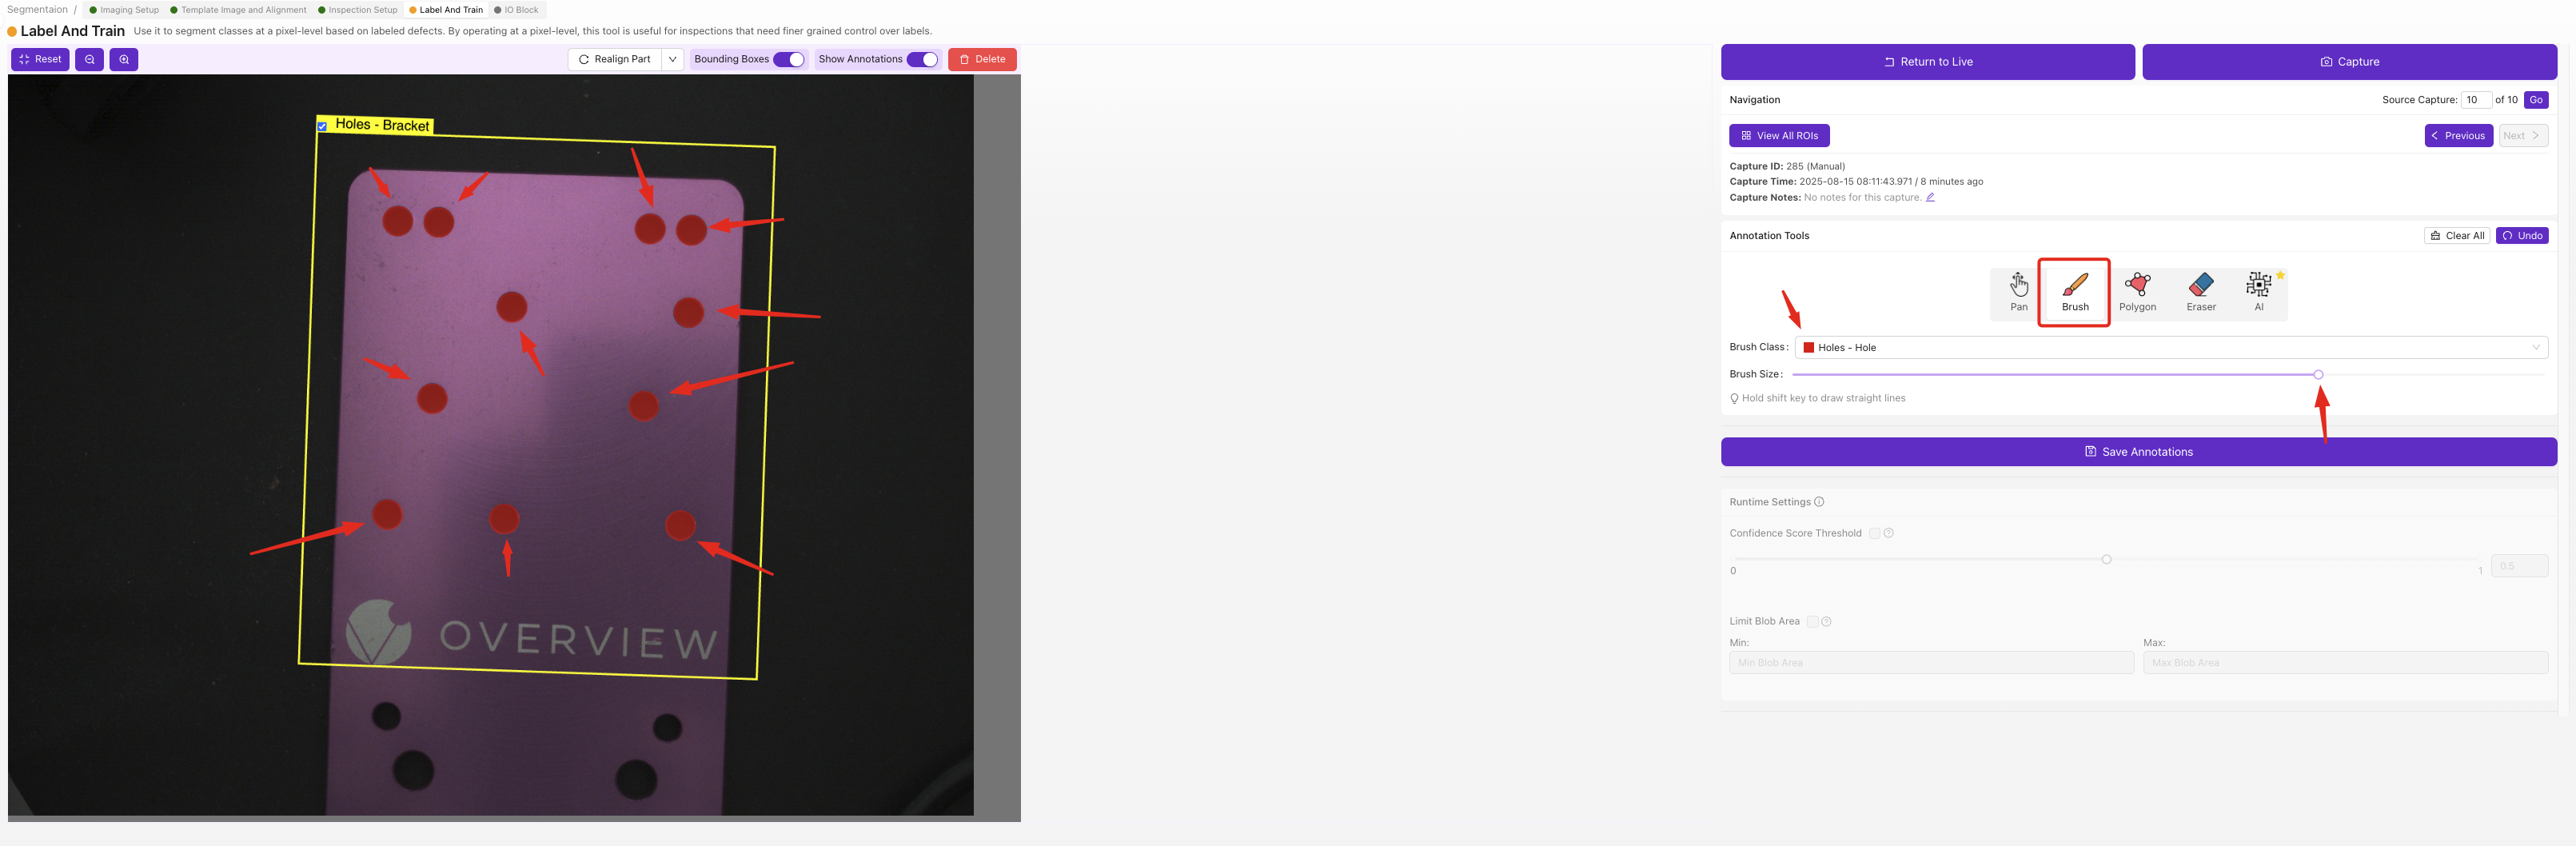
- 将第一个测试零件放置在检测区域
- 使用相机界面拍摄图像
- 使用画笔工具在目标特征上涂抹
- 准确涂抹:
- 覆盖整个特征区域
- 保持在特征边界内
- 不要涂抹背景区域
- 使用一致的标记方法
- 点击
保存注释 - 对下一个零件重复此过程
标注最佳实践
| 良好标注 | 差标注 |
|---|---|
| 精确的特征边界 | 粗糙的边缘涂抹 |
| 一致的特征定义 | 不一致的标准 |
| 完整的特征覆盖 | 缺失的特征区域 |
| 干净的背景(未涂抹) | 意外的背景涂抹 |
5.4 训练数据多样性
确保您的训练集包括:
- 不同的特征大小
- 各种特征强度
- ROI 内的多个位置
- 不同的光照条件(如适用)
- 边缘案例和边界示例
5.5 质量检查训练数据
- 审核所有标注的图像
- 验证一致的标注方法
- 删除任何错误标注的示例
- 如有必要,添加更多示例
第 6 步:训练分割模型
6.1 开始训练过程
- 标注完成后,点击
返回实时 - 点击
训练分割模型

6.2 配置训练参数
- 设置迭代次数:
- 快速训练: 50-100 次迭代(5-10 分钟)
- 生产质量: 200-500 次迭代(15-30 分钟)
- 高精度: 500 次以上迭代(30 分钟以上)
- 点击
开始训练
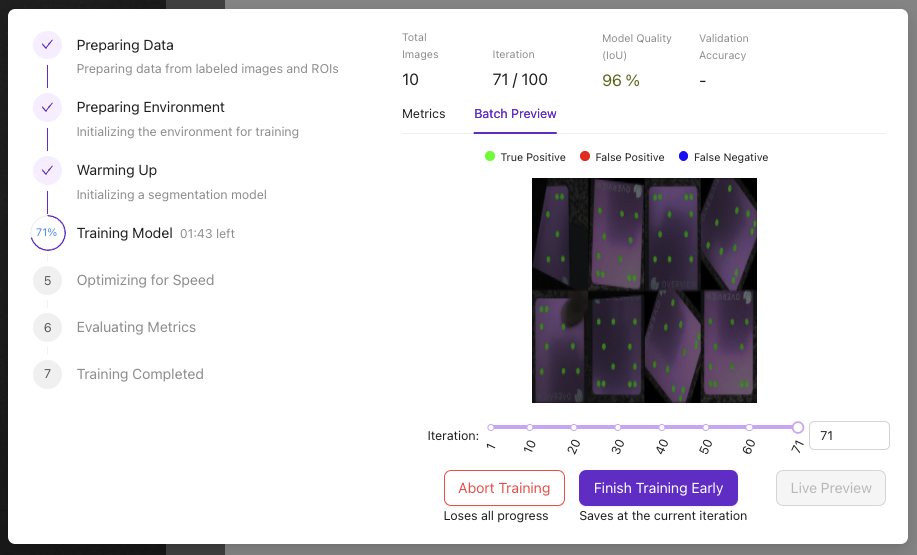
6.3 监控训练进度
训练进度显示:
- 当前迭代次数
- 训练准确率百分比
- 预计完成时间
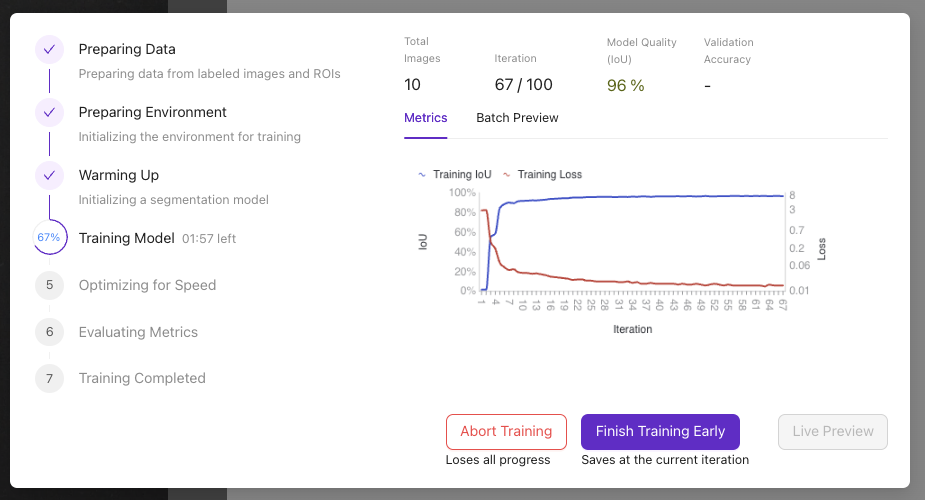
训练控制:
- 中止训练: 如果出现问题则停止
- 提前结束训练: 当准确率足够时停止
提示
- 85% 的准确率通常适合生产
- 训练会在达到目标准确率时自动停止
- 更多的训练数据通常比更多的迭代更好
第 7 步:测试分割性能
7.1 访问实时预览
- 训练完成后,点击
实时预览 - 使用各种零件进行测试:
- 已知良品(应显示无/最小分割)
- 已知缺陷品(应突出缺陷)
- 边缘案例和边界示例
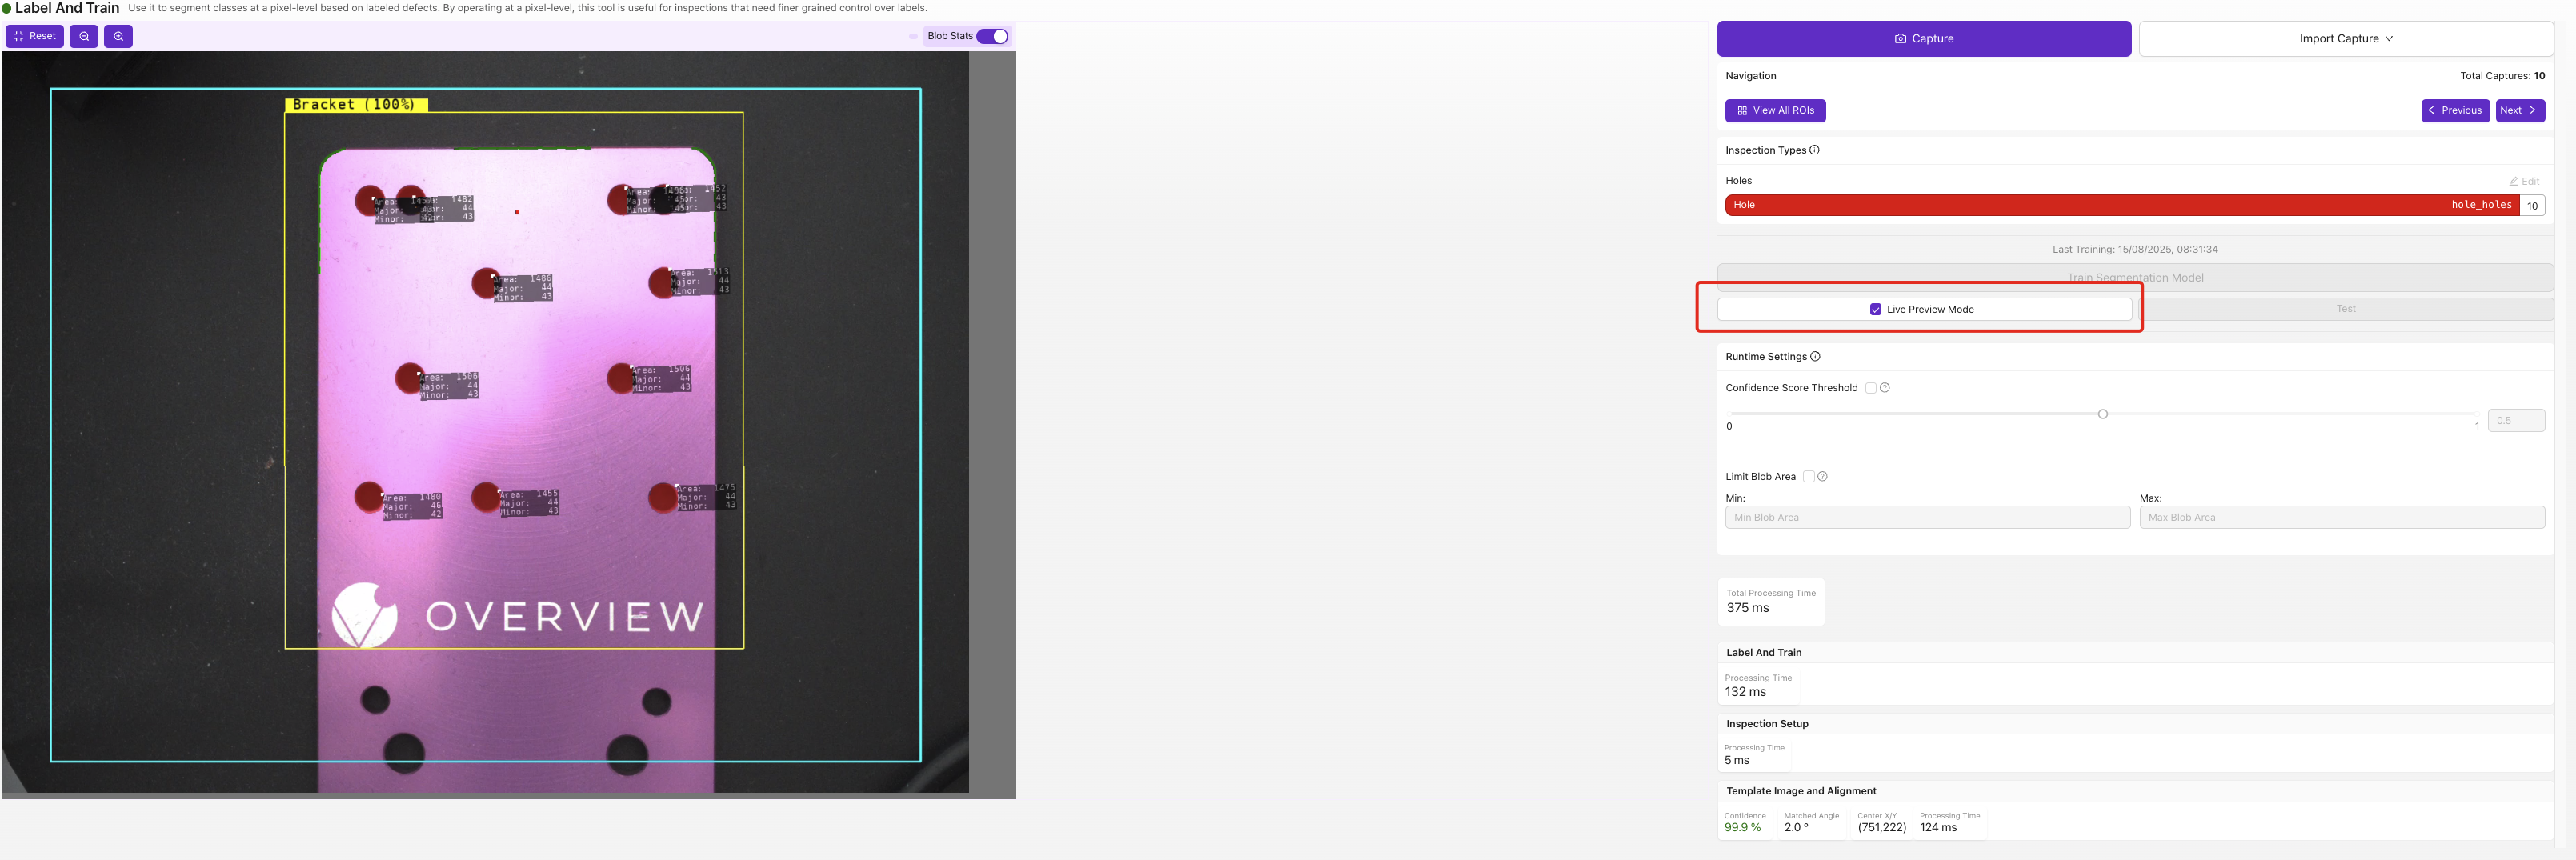
7.2 评估结果
检查分割质量:
| 指标 | 良好表现 | 需要改进 |
|---|---|---|
| 准确率 | 一致地找到真实特征 | 漏掉明显特征 |
| 精确度 | 假阳性较少 | 许多背景区域被突出 |
| 边缘质量 | 干净、准确的边界 | 粗糙或不准确的边缘 |
| 一致性 | 重复测试结果相似 | 结果高度可变 |
7.3 排查不良结果
| 问题 | 可能原因 | 解决方案 |
|---|---|---|
| 缺失特征 | 训练数据不足 | 添加更多标注示例 |
| 假阳性 | 光照/对比度差 | 改善成像设置 |
| 粗糙边缘 | 图像质量差 | 改善焦距/光照 |
| 结果不一致 | 训练多样性不足 | 添加更多多样化示例 |
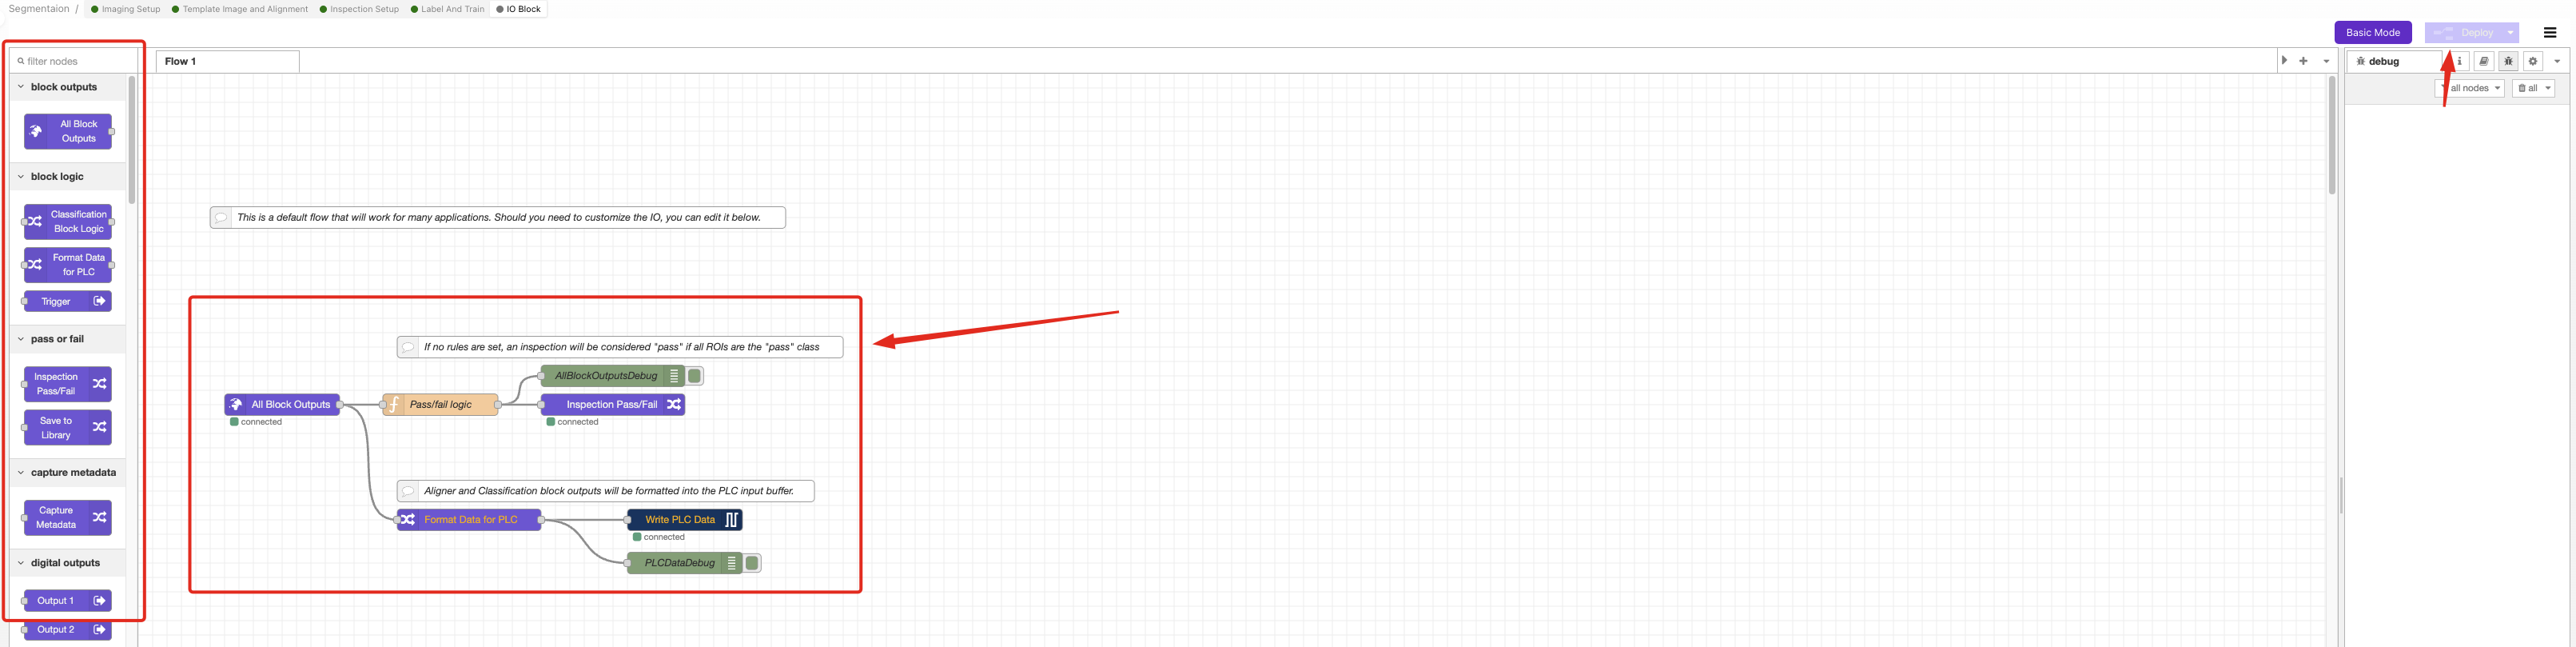
第 8 步:配置合格/不合格逻辑
8.1 访问 IO 块
- 确保 AI 模型显示为绿色(训练状态)
- 通过面包屑菜单导航到 IO 块
8.2 移除默认逻辑
- 删除分类块逻辑节点
- 准备构建自定义分割逻辑
8.3 构建分割流程
使用以下组件创建 Node-RED 流程:
- 从左侧面板拖动节点:
- 功能节点(用于逻辑)
- 调试节点(用于测试)
- 最终合格/不合格节点
- 用电线连接节点
8.4 根据您的需求配置逻辑
选项 A:如果未检测到缺陷则合格
用例: 质量检查中,任何检测到的特征都是不合格
功能节点代码:
const allBlobs = msg.payload.segmentation.blobs;
const results = allBlobs.length <1; // Pass if no features found
msg.payload = results;
return msg;
选项 B:如果仅有小缺陷则合格
用例: 接受小于尺寸阈值的轻微缺陷
功能节点代码:
const threshold = 500; // Adjust pixel count threshold
const allBlobs = msg.payload.segmentation.blobs;
const allUnderThreshold = allBlobs.every(blob => blob.pixel_count < threshold);
msg.payload = allUnderThreshold;
return msg;
选项 C:如果总缺陷面积较小则合格
用例: 接受总缺陷面积有限的部件
功能节点代码:
const threshold = 5000; // Adjust total pixel threshold
const allBlobs = msg.payload.segmentation.blobs;
const totalArea = allBlobs.reduce((sum, blob) => sum + blob.pixel_count, 0);
msg.payload = totalArea < threshold;
return msg;
8.5 配置功能节点
- 双击功能节点
- 从上述示例中复制适当的代码
- 粘贴到“消息处理”选项卡中
- 根据您的应用调整阈值
- 点击
完成
8.6 部署和测试逻辑
- 点击
部署以激活逻辑 - 导航到 HMI 进行测试
- 使用已知的合格和不合格部件进行测试
- 验证合格/不合格结果是否符合预期
第 9 步:生产验证
9.1 综合测试
测试分割系统:
| 测试案例 | 预期结果 | 如果失败的操作 |
|---|---|---|
| 干净部件 | 合格(无分割) | 调整阈值或重新训练 |
| 轻微缺陷 | 根据您的标准合格/不合格 | 精细化逻辑参数 |
| 重大缺陷 | 不合格(明显分割) | 检查模型准确性 |
| 边缘案例 | 一致的行为 | 添加训练数据 |
9.2 性能验证
监控以下指标:
- 每次检查的处理时间
- 多次测试的一致性
- 在生产照明下的准确性
- 长时间操作的可靠性
9.3 最终调整
如果性能不令人满意:
- 为边缘案例添加更多训练数据
- 调整逻辑中的阈值
- 改善成像条件
- 使用额外迭代重新训练模型
成功!您的分割系统已准备就绪
您现在拥有一个可以:
- 自动检测 特定特征或缺陷
- 以像素级精度测量 面积
- 根据您的要求应用自定义合格/不合格逻辑
- 通过 I/O 控制与生产系统集成
高级配置选项
自定义阈值逻辑
对于复杂的验收标准,组合多个条件:
const smallThreshold = 200;
const largeThreshold = 1000;
const maxTotalArea = 3000;

const allBlobs = msg.payload.segmentation.blobs;
const smallBlobs = allBlobs.filter(blob => blob.pixel_count < smallThreshold);
const largeBlobs = allBlobs.filter(blob => blob.pixel_count > largeThreshold);
const totalArea = allBlobs.reduce((sum, blob) => sum + blob.pixel_c