AI 驱动文档
您想了解什么?
镜头选择与安装
本指南介绍如何为您的应用选择合适的镜头,并在 OV10i 摄像头上安全更换镜头。镜头的选择决定了视场角 (FOV) 和工作距离。
何时使用本指南: 当您需要更改工作距离、调整视场或更换损坏的镜头时。
先决条件
- OV10i 摄像头系统
- 十字螺丝刀
- 替换镜头(6mm、8mm、12mm、16mm 或 25mm)
- 对于 25mm 镜头:额外的垫片套件组件
购买前先计算
使用光学计算器根据工作距离、视场和零件尺寸找到合适的镜头。
第一步:计算所需镜头尺寸
1.1 确定您的需求
- 工作距离:摄像头与零件之间的距离
- 视场:需要检查的区域宽度
- 零件尺寸:待检测零件的尺寸
1.2 使用 FOV 图表进行镜头选择
不同距离下的视场 (FOV) 宽度:
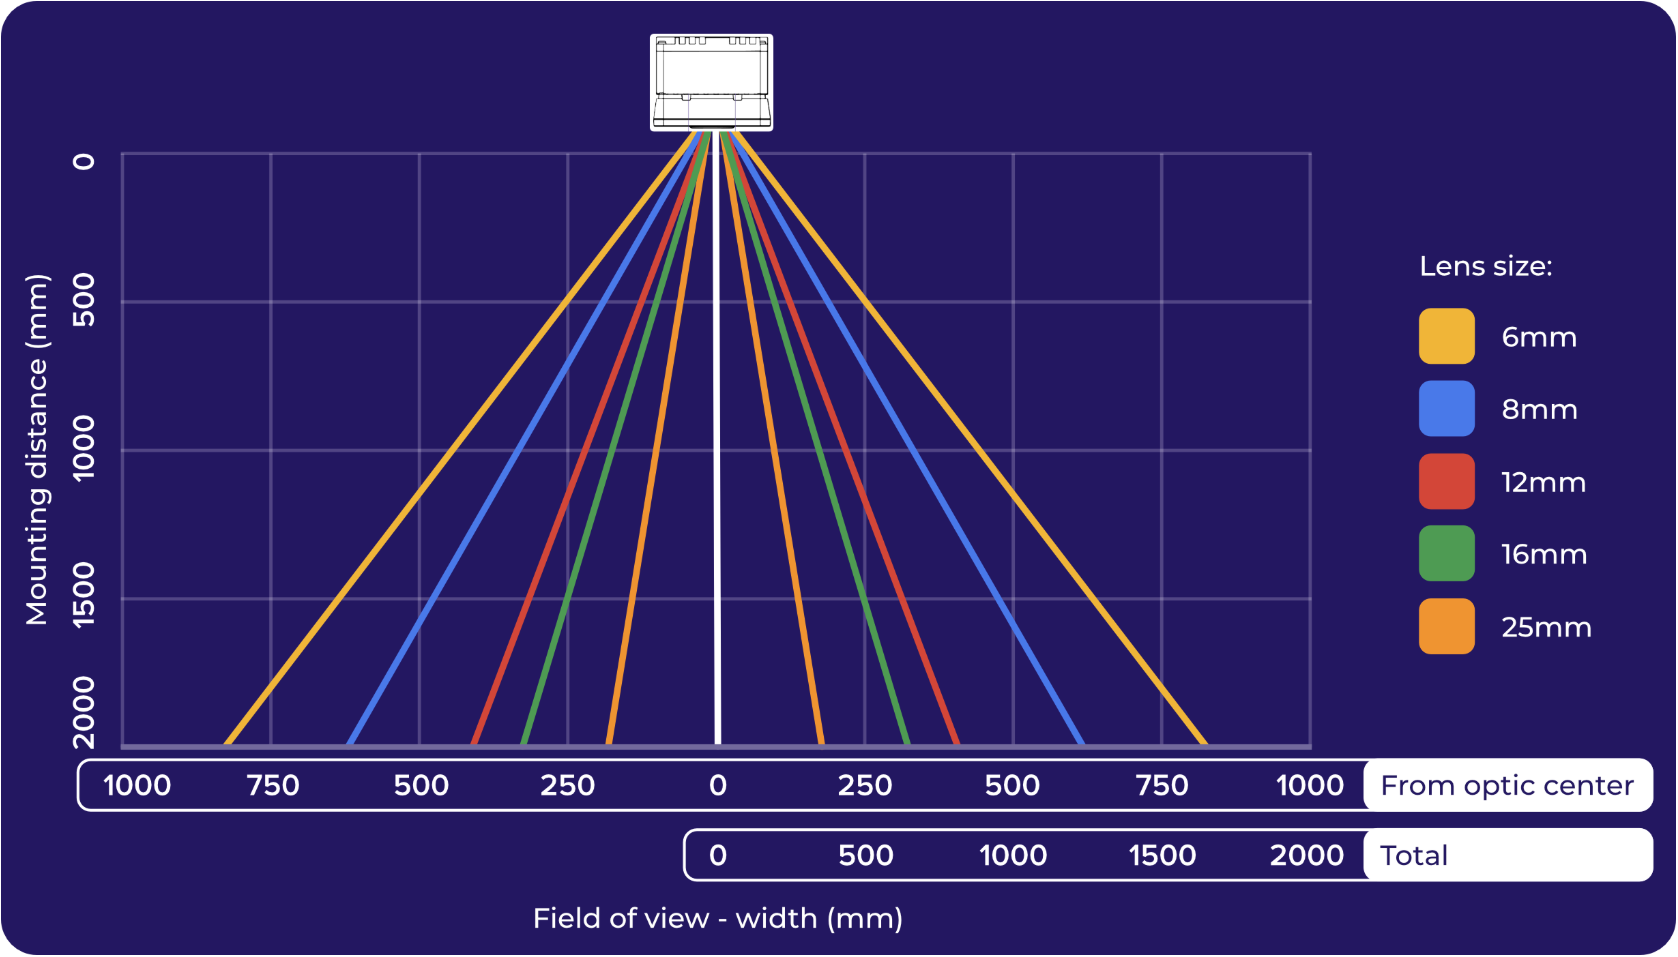
摄像头规格:
- 宽高比:4:3
- FOV 高度:宽度 × 0.75
- 标准镜头:12mm(随摄像头配送)
1.3 在线计算器
使用 OV10i 计算器 根据您具体的安装距离和镜头要求进行精确的 FOV 计算。
第二步:标准镜头更换 (6mm 至 16mm)
2.1 拆除面板
- 关闭 摄像头电源
- 使用十字螺丝刀拆下面板四角的螺丝
- 小心地取下面板,露出 LED 板和镜头
2.2 更换镜头
- 逆时针旋转拧下现有镜头(仅需手动拧紧)
- 顺时针旋转安装新镜头
- 仅手动拧紧 — 请勿使用工具,以免损坏
注意
过度拧紧可能会损坏镜头或摄像头螺纹。
2.3 重新组装
- 将面板重新装回摄像头
- 用之前拆下的四颗螺丝固定
- 通电并测试对焦
第三步:25mm 镜头安装(特殊流程)
3.1 所需额外组件
- M12 25mm 镜头
- 15mm 面板垫片
- 垫圈
- 4 颗 M3x22 内六角螺钉
3.2 确定垫片配置
- 按第 2.1 步拆下面板
- 将摄像头放置于工作距离处
- 缓慢拧入镜头,直至图像清晰
- 测量镜头超出镜头座的延伸长度
- 选择垫圈以匹配所测量的距离
3.3 安装 25mm 镜头
- 将垫圈滑入镜头至正确尺寸
- 将带有垫圈的镜头安装到摄像头镜头座中
- 顺时针手动拧紧
- 使用 M3x22 螺钉安装 15mm 面板垫片
- 将原面板装至垫片上
第四步:对焦与测试
4.1 初步对焦检查
- 通电摄像头
- 在摄像头界面导航至图像设置
- 使用对焦视图达到最佳清晰度
- 使用摄像头控件调整对焦
4.2 验证视场
- 检查 FOV 是否覆盖所需检测区域
- 确保零件位置占据图像的合适部分
- 确认图像质量符合检测要求
镜头选择快速参考
| 镜头尺寸 | 100mm 处 FOV | 1m 处 FOV | 2m 处 FOV | 最佳用途 |
|---|---|---|---|---|
| 6mm | 宽 FOV | 非常宽 | 极宽 | 大型部件、近距离检查 |
| 8mm | 中宽 | 宽 | 非常宽 | 通用用途、中型部件 |
| 12mm (标准) | 中等 | 中等 | 宽 | 大多数应用 |
| 16mm | 窄 | 中等 | 中等 | 较小部件、细节工作 |
| 25mm | 非常窄 | 窄 | 中等 | 精密检查、小特征 |
安全与最佳实践
镜头操作
- 小心操作镜头 - 避免触摸玻璃表面
- 使用镜头清洁布清理任何污渍
- 将拆下的镜头存放在保护盒中
- 安装前检查螺纹是否有损坏
安装提示
- 始终手动拧紧 - 切勿在镜头螺纹上使用工具
- 最终拧紧前试装
- 拆卸过程中保持螺丝有序存放
- 更换镜头前关闭摄像头电源
成功!您的镜头已安装
您的 OV10i 摄像头现已具备:
✅ 符合您应用要求的正确镜头
✅ 适合部件检查的合适视野
✅ 适合您设置的最佳工作距离
✅ 可靠运行的稳固安装
后续步骤
镜头安装完成后:
- 为新镜头配置图像设置
- 更新对焦以获得最佳清晰度
- 使用实际部件测试以验证覆盖范围
- 如需获得最佳 FOV,调整摄像头位置
- 记录镜头配置以供将来参考